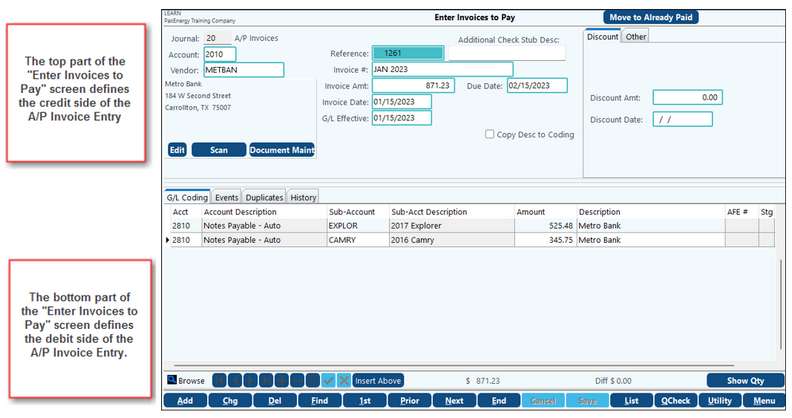
Adding Invoices (the first step in allowing you to track all of the vendors you owe)
Invoices to be paid should be entered via the A/P Enter Invoices to Pay screen. The A/P Entry screen allows the entire invoice to be entered on a single screen, and if the duplicate invoice option is enabled, it also checks for duplicate invoice numbers and amounts. Default due dates can be set in the company A/P Entry Options or in the vendor Sub-Account (individual Sub-Account/vendor defaults will override the company default).
Press [enter] A, or click on "Add" to add a new invoice.
Journal |
This will populate based on the Company Maintenance setup |
|---|---|
Account |
The A/P account will prefill based on the Chart of Account setup. If you have multiple A/P Accounts, use the drop-down to select the account if necessary. |
Vendor |
Enter the Vendor Sub-Account. (You can press the [/?] key to display a pop-up window of vendor selections to choose from.) To add a new vendor, press [F12]. Note: If you have an invoice for a one time vendor (i.e. one that you don't want to setup in Sub-Account Maintenance), enter ZZMISC as the vendor. You can then input the vendor name and address for the one time use. This vendor will not save anywhere. NOTE: A 1099 will not be created for any payment made under the ZZMISC vendor. |
Edit |
Use this button to access Sub-Account Maintenance. This is an easy way to add vendors or make vendor changes on the fly. |
Scan/Document Maint |
Works with the add-on scanning feature. This feature allows you to scan invoices for each accounts payable entry. |
Reference |
Auto-generated by the system so that each entry will have a unique reference. |
Invoice # |
The Invoice # is not required. If not filled in the Reference # will be used upon being saved. However, we recommend coming up with a scheme (such as the date) even if your invoice doesn’t have an invoice number. The reason is that this field is used in the duplicate checking process. Since Reference numbers are always unique, it would do no good when entering in a duplicate. The Invoice # will also print on the stub when the check is printed. |
Invoice Amt |
The Invoice Amt is the amount to be paid to the vendor. |
Invoice Date/GL Effective Date |
When filling in the Invoice Date, the G/L Effective date will populate with the same date. However, these can be different if the client chooses. For example, some clients track the difference between the invoice date and the received date. The Invoice Date is informational only. The G/L Effective date is the date the entry will be posted and will affect the Financial Reports. If the invoice or effective date is not within the posting allowed date range, the will warn you that the date range is too restrictive. Additionally, the date fields will be red. The posting allowed date range must be changed before the system will allow you to continue. If the invoice number field is left blank, the system will assign the reference number as the invoice number. If you are entering manual reference numbers versus letting the system generate them (recommended), you must ensure that they are unique so there is no the possibility of duplicate invoices. |
Due Date |
Enter either a Due Date from the invoice or use the default due date set in the vendor's Sub-Account. Note: If you are writing checks using the due date feature, make the due date the date you plan on writing the check not the actual due date on the invoice. It is important to fill in the correct Due Date for check writing purposes. Oftentimes check runs will use this date to pull in the invoices that need to be paid |
Additional Check Stub Desc |
This is an optional field that can contain a description that will appear on the printed check stub as well as replicate to the Description field on the G/L Coding for the expense. (for example, account numbers for a utility bill). For the Additional Check Stub Description to be replicated to the Description field, the Box for "Copy Description to Coding" must be checked. Note: You have the option to add a check memo that will always print on the check stub. This can be entered in the Sub-Account Maintenance on the Check Memo Description field. This is the preferred method if the description is the same each time since it only needs to be entered in once. |
Coy Desc to Coding |
The "Copy Desc to Coding" option will duplicate the "Additional Check Stub Desc" onto the G/L Coding Description if checked. |
Discount tab |
Discount tab - (only shows if discount is enabled in Company Maintenance) - enter the discount amount and date. See AP Discounts. |
Other tab |
Used with the PO system |
Approval tab |
Approval Tab - (only shows if A/P routing is enabled) - enter the routing path. |
At this point, the system will perform a check to make sure this payable has not been previously entered or paid. If a possible duplicate is found, a pop-up window will appear listing the possible duplicate(s). Duplicate checking cannot be bypassed. The system will allow you to disable whether the warnings (pop-up window) are seen. This can be accomplished at the company level (Company A/P Options, A/P Entry tab) or Sub-Account level (Individual Sub-Account/A/P Options tab). However, any duplicate invoices will have to be corrected before posting will be allowed. Duplicates are checked based on Invoice # and Invoice amount. Blank Invoice #'s will not be counted as a duplicate invoice. the system will assign the invoice a unique number.
NOTE: If the invoice is a duplicate (same invoice # or amt) you must make a change to the entry (i.e invoice # or invoice date) in order to update the invoice UNLESS the invoice is truly a duplicate. Otherwise, it will not allow the invoice to be updated and the invoice will stay in the Enter Invoices to Pay screen.
G/L Coding tab |
|
|---|---|
Enter as many Accounts/Sub-Account lines as needed. Use the lookup field to help you search for the Account or Sub-Account you need. Reminder, if a Sub-Table is not attached to an Account, then a Sub-Account will not be needed, and the Sub-Account field will be grayed out. Only add new/separate lines if the Account/Sub-Account is different. For example, if you have 3-line items on your invoice, but they will all be coded until the same Account/Sub-Account, then you would only need to enter one line. If you have entered a default expense account in the vendor's Sub-Account Maintenance (F12), the system will automatically display the default Account and Sub-Account. Setting up default expense accounts saves time when entering invoices. You can press enter to accept the default or key in a new account to change the account information. |
|
Amount |
Enter the amount to be posted to the particular expense defined above. If this amount is different than the invoice amount, the difference will display in red at the bottom of the screen. The invoice amount can be allocated to an unlimited number of different accounts. The total expense amounts entered must equal the Invoice amount entered at the top portion of the screen. |
Description |
The description will automatically default to the vendor’s name. Additional descriptions can be added after the vendor’s name. Generally, the larger the amount, the more need for additional description. By using the [F5]-Expanded Description hotkey, you can expand the description field for ease of typing. Whatever is typed in the Description field will appear in the General Ledger NOTE: If using the ZZMISC vendor you will want to leave the Vendor Name in the description, so you know who you paid later on. |
Quantity |
The associated with the purchase can be used to record the number of units bought. Quantity may be hidden if not in use. |
AFE #, Stage, and Deck # |
The fields are available for those companies that use the JIB/AFE (Authority for Expenditures) feature in the system. These fields are associated with the billing account/Sub-Account in A/P. |
When everything on the expense line is correct, press [F10] or click on "Save" to save your changes.
Routing Tab
If the Approvals feature (Part of the optional Scanning add-on) is turned on, the Routing tab will be displayed. This tab provides information about what user ID's are on the routing path, any comments, and the flag.
Events Tab
The events tab will record any changes to an invoice after its initial posting to include the type of change, the user ID, the Date/Time, Description, and Line #.
Documents Tab
The documents tab will display the document(s) associated with the invoice.
Duplicates Tab
The duplicates tab will display any possible duplicates for dollar amount or invoice number for the invoice displayed.
History Tab
The history tab displays up to two years of invoice history, prior to current system date, based on GL (General Ledger) effective date.
Move to Already Paid button
This feature allows the user to move the invoice to Handwritten Checks/Drafts, after determining it has already been paid, without having to delete the current invoice and recreate another invoice.
Menu items
Del - Deleting the Invoice prior to updating
To Delete the invoice prior to updating it to the General Ledger, find the invoice on the Enter Invoices to Pay Screen then click on Del at the bottom of the screen. This will delete the invoice from the enter invoices to pay screen.
List - Listing the entered invoices
Edit List - When all the invoices have been entered, you can print a listing to the screen or a printer. This is a quick way to review the entries before you post them. The report lists both sides of the entries you entered, in entry/sequence order. If the AFE # and/or tax authority are coded on the entry, they will appear on the listing. You have the option of including or excluding possible duplicates and/or print associated documents. You can also sort the report via the Print Sequence option; select Vendor #, Vendor Name, or Sequence Entered.
Voucher list
The voucher list will print a voucher listing of each invoice, one per page.
Q-Check - Printing a Quick Check
Utility:
Looking for Duplicate Amount or Invoice Number(VDups) |
The system automatically checks for duplicate invoice numbers or amounts on the posted and unposted invoices if duplicate checking was enabled at the Company (See Company A/P Entry Options) or if it duplicate checking was set at the vendor level (See Sub-Account). If matches are found, they will be displayed. If duplicate checking was skipped, once the G/L information has been entered on the invoice entry screen, duplicate invoice checking can be done using the V-Dups option. A pop window will display all duplicates, you must click Continue to proceed. |
Detail Line Maintenance |
Puts the cursor in the detail (bottom) portion of the screen to make corrections. |
Allocate Difference dollars to each line item |
If you change the invoice amount and want to allocate the change to the expense accounts, select this option and the difference will allocate based on the percentages of the whole. TECH TIP: If you have an invoice to several departments and want to allocate sales tax without having to use a calculator to figure the allocation, enter the amounts per department and select Alloc, the system will automatically pro rata the difference. |
Undo Allocation |
This will restore the expense amounts back to their original amounts prior to the allocation. |
This allows you to save the expense account/Sub-Accounts and percentages as a "Code Set" for this vendor. This is the recommended process for setting up Default Expense accounts. |
|
Transfer from another User ID |
This allows the invoice entries to be transferred from one user ID to another user ID. For example, an AP supervisor has the ability to transfer unposted A/P invoices from a user ID who only does not have security authorization to post invoices. |
Transfer from another company |
Gives ability to transfer A/P invoices from another company using the same User ID. Select the company to transfer from, then select the invoice(s), then click on the Import button. This utility moves the invoice from the other company into the current company. |
This AP Import. allows entries to be imported from an Excel spreadsheet. Also see Accounts Payable Import. |
|
Export to Excel |
This feature will allow users to export from one set of books and import into another license set of books.
|
View A/P documents |
Works with the add-on scanning feature in Pak Accounting.
|
Process Batch AP documents |
Allows scanned images to be imported by batch. See Process A/P Batch Documents.
|
Import Credit Card CSV - (WolfePak Only) |
The credit card import will import credit card transactions from your credit card provider. Typically credit card companies allow their subscribers to access their account information online and they have a function that will export their transactions to a CSV file. You can then import that CSV file into the system, thus saving time by not having to key each and every credit card transaction throughout the month (or any range of dates). At this time, this option only works with Discover Card and Capital One. |
See Also: