Basic Security
•If you only need to keep other users completely out of a system, use the password option found on the Maintenance screen in General Ledger and Payroll. Each set of books and each major system can have its own password.
•The user will be denied any access to that company after three unsuccessful attempts.
•If more complex access control is required, then security can be set up by user-id. Each user-id can have a password. See below for more information.
User Security
Pak Accounting has a complete range of security options, ranging from simple password access to complex selective access for each function. This flexible setup allows for ease of use in a single-person office, as well as more robust arrangement for networks or large systems.
•Security is set up by User-ID
•Each user can have a password
•Easy Setup
oStep 1: Setting up the individual users
oStep 2: Enabling the security system: System Options
WARNING! Make sure you have the users set up (step1) before you enable the global security option (step 2)! If you do step 2 first, there will be NO authorized users -- including yourself -- and everyone will be locked out. Make sure you have a user authorized for everything, specifically the global file which sets up Security.
NOTES for User Security:
•If user level security has been enabled and a user does not have access to a specific company, that company will not show on the company drop down list when that user logs in.
•A user cannot delete their own security account or remove their own ability to get into security maintenance.
•Right-clicking in the bottom half of the "Security Maintenance" screen and choosing "List User/Company Access" provides a Security Master Listing for one user or range of users along with the options to print security for one or all companies and overridden detail.
Setting up Users
This is done from the Utilities / Global / User Level Security.
Basics: Adding a New User - User Security not required
1.Click on Add to add users (make sure one user has all access rights by setting default access to Full Access).
2.Enter the user ID and Name typically their initials. Can be 1, 2 or 3 characters - alpha-numeric field. NOTE:The following characters are not allowed in the UserID: [.'\','/',':','*','?','"','<','>','|'])
3.Classification is used with multiple posting dates, if not using multiple posting dates, keep all users at Class 1). There can be 3 different classes if desired. This will require 3 different posting dates. Determine which users you want to be in each of the three classes and define them in their individual user level security. Also make sure that the posting dates for each class are defined in the Posting Allowed Date Range.
4.Password not required- Check the box to not require a password to be entered for this users. User just enters user ID to get into Pak Accounting. If a password is desired, the password will be entered the first time the user goes into Pak Accounting. If a manager desired to set a password for a user, simply login as that user and set the password. If a user forgets their password, the manager (user with Full access) can select the Reset Password button, and the User can enter a new password the next time he/she logs into Pak Accounting.
The password can be up to 30 characters long, but must be at least 8 characters long. It also must have at least one letter and one non-alpha character (i.e. number, special character, etc). It also cannot be the same as the current and the prior 9 passwords used.
5.Days before Password resets- This field is optional. Entering a number will turn on the feature (0 keeps the feature turned off, password will not expire). Set the # of days that the system will require the User to enter a new password (ie. the prior password will expire).
6.Optional Restrict Sign on to Network User name- Restricts the Pak Accounting User ID to the Network user. If a network User I.D. is specified and the option checked, then only a user logged into the specific workstation with that network I.D. would be able to log-in into Pak Accounting with this Pak Accounting user I.D.
Advanced:Adding a Company Level Security to a User - Security required to be turned on once finished
1.Enter the user Default Access Level (the level most used by this user, can override at company level)
•No Access
•List/View Only
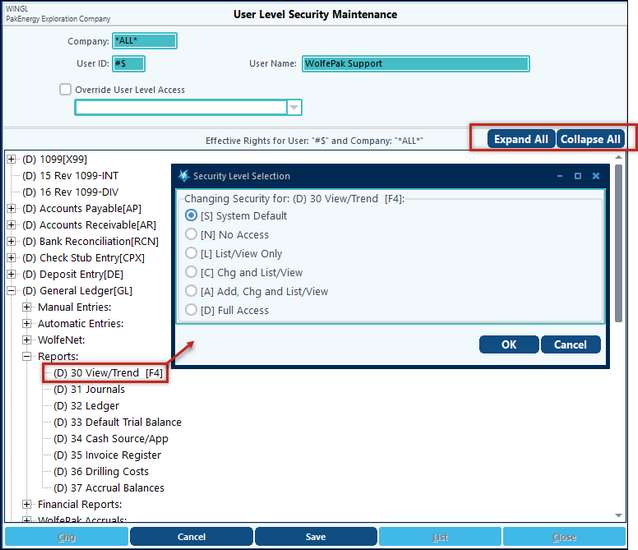
•Chg and List/View - Users with at least a Change security level can:
oMake real time changes in the View Trend - View Detail by Journal Screen
oChange and/or move entries, account # Sub-Account, effective date or invoice date via right click on the View Detail by Account screen.
oChange Discount Values (Right click on View Detail by Journal.)
•Add, Chg and List/View. Users with at least an Add security level can:
oAll the above plus
oSplit or Unsplit transactions into two transactions (right click on the View Detail by Account screen or by Journal screen)
•Del, Add, Chg and List/View (Full Access). Users with Full Access (Delete) security level or Unpost Entries can:
oAll the above plus
oUnpost by Journal or Journal/Reference (right click on the View Detail by Account screen or by Journal screen)
NOTE: To inactivate a user, uncheck the Active box next to Access Level which will automatically change the user to no access and remove all company overrides. This event will be logged in the Change Log, on the Security Master Listing and Security Grid Views.
2. View/Change Owner Tax ID (applies to Revenue/Billing owners only):
• Full Access - user can view/change the Owner Tax ID.
•View-Only - user can only view the Owner Tax ID.
•View Last 4 Digits - user can only view the last 4 digits of the Owner Tax ID.
•View Presence - user only sees Has TaxID, Has Acct or item is "Blank".
3. View/Change Owner Bank Account: select one of the four options for each user:
• Full Access - user can view/change the Owner Bank Account.
•View-Only - user can only view the Owner Bank Account information on the ACH tab.
•View Last 4 Digits - user can only view the last 4 digits of the Owner Bank Account.
•View Presence - user will not see the ACH tab.
4.Set user access by company or for all companies set up on Pak Accounting. *ALL* is automatically added once you save the User ID to allow you to set user access for all companies on Pak Accounting.
•Double-click on *ALL* (or individual company if set up) to edit the company level access
•Right-click in the empty space in By Company Security tab to add an individual company.
•Note: If a user has access to only certain companies, these are the only ones they will have access to in company lookups.
5.Once in the company level, set user access by individual screens within each systems. Click on the "Expand All" or "+" to expand the menu. To collapse the menu click on the "Collapse All" or "-" button Double-click on the item to bring up a pop up box and specify the level of security for the current item. See example below.
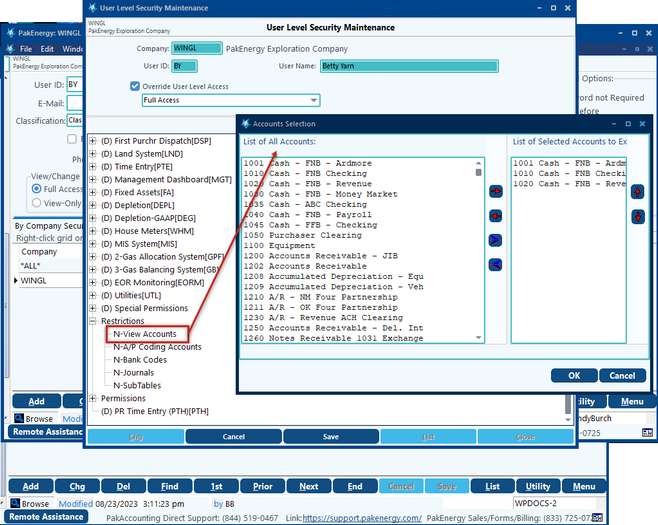
6. At the company level you can also restrict access by Account, A/P Coding Accounts, Bank Code, or Journal. Under Restrictions, double-click on the category and then select the items to restrict access.
•This is only available on the individual company level setup. Not on the *ALL* company level setup
•The intent of restrictions is to limit viewing/reporting, not coding or input.
7.If it is necessary for a particular user to not view certain account(s), simply choose the account(s) in the View Accounts restriction and use the red/blue arrows (the red arrow will move one account at a time,the blue arrow will move all accounts) to move them to the right side of the Accounts Selection screen, and then save. When that user logs in, they will not be able to view the selected accounts in View Trend (F4), run a ledger listing, or view the restricted accounts in a journal listing. The user will be able to make an entry in General Ledger Entries or, if the restricted account is a cash account, choose that account to pay an A/P invoice.
•The A/P Coding Accounts restriction allows for selected accounts to be restricted for coding A/P invoices.
•The Bank Account restriction limits viewing in regards to bank codes chosen to be excluded. The user will not be able to view a check register, export a positive pay file or view cash disbursements for the excluded bank codes.
•If selected journals are restricted, the user will not be able to view a journal listing for those journals. View Trend (F4)/View by Account level will "black out" the detail on the part of the entry that pertains to the restricted journal. The "Detail by Journal" level will only allow the user to view the part of the entry that does not pertain to the restricted journal. The ledger listing will let them view a total amount for an entry that is restricted but will include "restricted entry" on the ledger listing for the journal that is restricted.
•The Sub-Tables restriction will allow the user to see the name/address only of the Sub-Accounts within the restricted Sub-Table(s). The security is consistent with the fields displayed within the look-up function.
8. Directly underneath the Restrictions menu is the Permissions menu. The permissions menu allows a user to have permissions for certain functions only in regards to Account, Time Entry, Number Master, and Journal Entry.
NOTE: The intent of permissions is to allow a user to have a certain capability.
•The Account permissions allow the user to enter an account. The Account(s) that are moved to the right side of the screen via the red/blue arrows are the accounts that the user will have access to.
•The Time Entry allows the user to enter time for selected employees. The employees that are moved to the right side of the screen via the red/blue arrows are the employees that the user will have access to in order to enter time.
•The Number Master Permission allows selected System ID's (modules) to be accessed in regards to next number assignment. found in the Utilities module/Next Number Assignment. This is accomplished by moving the modules to the right side of the screen that the user is allowed to change the next number assignment in.
•The Journal Entry Permission allows for selected journals to be accessed in regards to journal entries by moving them to the right hand side of the screen using the red/blue arrows. This allows the user the ability to make entries to the selected journals.
NOTE: Right clicking in the User Security Maintenance screen will provide a list feature that will show the security listing, or "tree", for that particular user.
NOTE: Security on View Trend
View Trend is divided into three screens: Summary, Detail by Account, and Detail by Journal. The ability for a user to view or not view either of these screens is determined by this one setting:
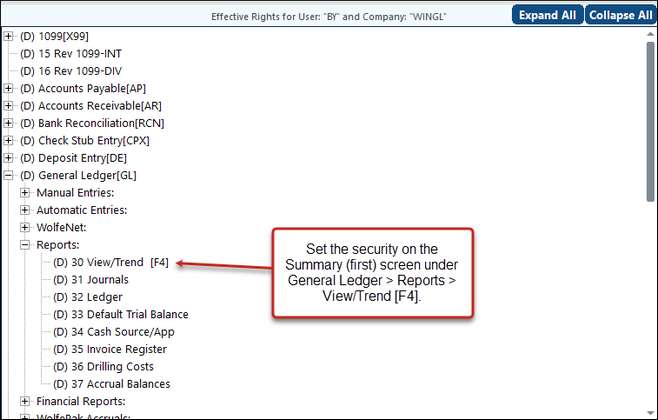
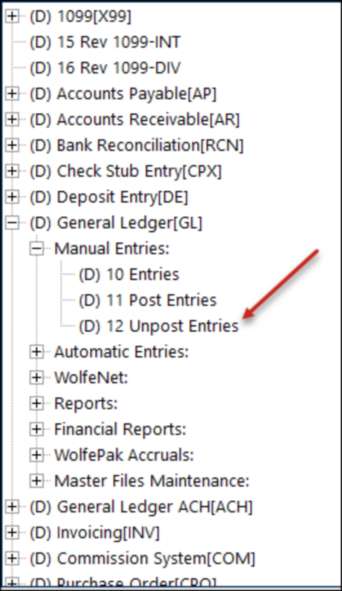
If a user can view the F4 view screen the security on the Real time change functions of both Detail by Account and the Detail by Journal screens is based on the user's access to the Unpost Entries screen (General Ledger > Manual Entries > Unpost Entries).
List - the security listing provides information about the security settings for each user, including the date the security originated for the user and any changes.
Utility - 1. Utility to copy one user security settings to another user.
2. Can copy from a user in another company. This utility will also copy company level security to another company for the same user.
3. Ticket Security
Also see: Alerts