Scanning is a very useful Pak Accounting tool. This optional add-on module has the ability to save your company money and time during an audit. Another benefit of scanning is that the invoice can be printed to a PDF for auditors from the ledger. All of your company documents will be easily accessible for auditor verification with the click of the mouse instead of having to search through piles of files stored in boxes in hopes that the invoice is in there somewhere. Scanning invoices into Pak Accounting ensures that there are no lost invoices.
The Scanning module includes AP Routing/Approval. This is a highly effective internal control tool to safeguard against fraud. Invoices are sent along a routing path to be viewed and approved for accuracy by those on the routing path. Scanned invoices can be viewed during the approval process, when approved, while awaiting check writing, and from any coding line in View Trend. If you forget to scan the invoice in upon AP entry, the document can be easily appended to the coding line in View Trend.
The scanning option adds functions to the modules you already own. By being FULLY integrated with the system, it can utilize the existing viewing and reporting thus minimizing the effort to get the scanned documents into the system and maximizing their usefulness.
Note: Scanning is an add on to any Pak Accounting system. Contact Pak Accounting for more information.
Minimum Hardware Requirements…
•Additional Memory (on workstation with the scanner): 2G ( 6G total workstation memory recommended)
•Additional Hard drive space (on the computer where the data files are stored): at least 3 times the size of the G/L Posted file (based on Black and White and lower resolution on most scans.) Color scanning or greater use of higher resolutions can be as much as 300 times more space as the lower resolutions.
•Reliable Backup system large enough to support the additional data.
•Highly recommended:
oWorkstation scanner with TWAIN driver which will allow you to scan directly into the system.
oPak Accounting is optimized to run with Kodak workstation scanners.
Notes:
Non-Kodak Scanners: There are a large number of scanners on the market which Pak Accounting has not tested. Some of these will not work with Pak Accounting or will provide unsatisfactory results. Many will work just fine, but will give you larger scan images and might require higher resolutions to get the same degree of readability. They must support a standard TWAIN interface to have a chance to work.
Pak Accounting has been extensively tested to work with Kodak scanners. Kodak workstation scanners are relatively inexpensive, hold up to daily usage, has overnight replacement with extended warranty and has an outstanding imaging cleanup circuitry (Perfect page) that: cleans up the image making them much easier to read, reduces the file size, and speeds up processing.
64-Bit Operating system: Some older scanner models do not have 64-bit drivers and won’t work on the 64-bit operating systems. If you are running the 64-bit version of the operating system, or plan on upgrading to one soon, check with scanner manufacturer.
Remote Users: At this time, additional 3rd party software is required for scanning while running via Window’s built-in remote access or Microsoft Terminal Services. For more information see their website at: http://terminalworks.com/
TECH TIP: Having a 2nd monitor connected to your PC can improve your productivity when working with images. The system can display the entries on one monitor and the images on the 2nd monitor allowing both to be viewed at the same time. Note that additional setup is required by professional Information Technology (IT) services when using Remote Desktop connection for computer stations with two (2) monitors. |
Once you are licensed for Pak Accounting Scanning and your scanner is setup ready to go. What’s next?
1.Turn on the documents tab on each Sub-Table you would want to scan into.
2.In Utilities > Global > Default Scan Settings, set your resolution by module. Recommended is Black and White 200 x 200. Any other option is a trade off of quality of picture verses file size. Note: Resolution can be overridden at scanning.
Resolution verses File Size – example of a One (1) page document:
Note: non-Kodak scanners will typically have larger numbers in all categories. As the content of the page varies, so will the sizes.
Example 1:
Example 2: Fed-Ex Invoice:
Pak Accounting has several places for the defaults to be set. The first and most important one is found under Utilities Menu, Global -Default Scan Settings.
The scan setting in the General Ledger module > Company Maintenance > Company Options > Optional Add-on Tab – isn’t used any more now that we have the above Settings by Application. The option to automatically Tag or not tag pages of documents to be included on Electronic Billings is used. This option is also found in the General Ledger module > Company Maintenance > Company Options > Optional Add-on Tab.
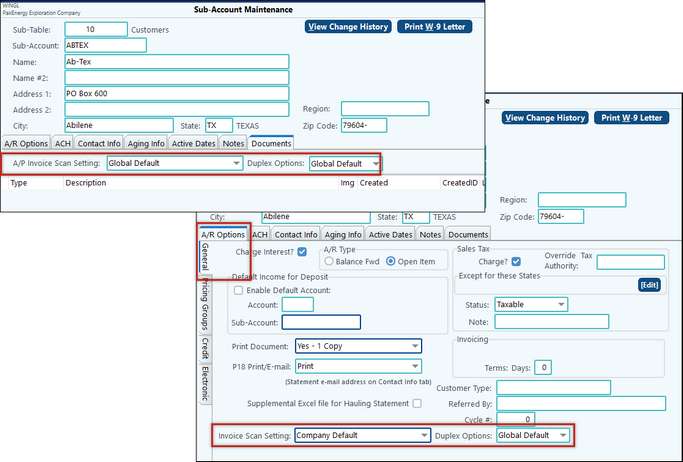
When dealing with a specific Vendor’s invoices, you may find that their invoices don’t work using the normal settings. You can set the default setting for the Vendor (or customer – same applies to scans attached to invoicing & service ticket). For example, your default setting for most vendors is single sided, but you have a vendor that uses both sides of the page for invoicing information, then you can override their duplex option to Auto-detect or 2-sided. There are two places you can get to a Sub-Account’s scan settings: On the top of the Documents tab, or near the bottom of the A/R Options Tab.
If importing from PDF or TIFF from outside source (not using the scanner), the size can also be determined by the file. If the PDF is scanned in with a different setting, then the quality may not be the same. File size can be larger, image not as sharp. Also when importing the scanned images from another source, the system does automatically delete that scanned image file in that source so the image isn’t duplicated.
TECH TIP: Having a 2nd monitor connected to your PC can improve your productivity when working with images. The system can display the entries on one monitor and the images on the 2nd monitor allowing both to be viewed at the same time.
Approvals Along with the Scanning module, there is the ability to Route/Approve invoices as stated above. The system also has the ability for Approval prior to checks being written. The process can have one or multiple approvers before the checks are written, both in A/P and Payroll. The system also has the ability for Routing/Approval before items are purchased with our optional PO system. |
Setting up Scanning for SaaS/Remote Users:
•Make sure you are not currently connected to the SaaS server •Go to the following website: •There is a Download button on the Home page. Click on it. •Download the Client installation file to you local computer. •Follow the Install Client instructions listed on the same Download page.
Troubleshooting: If you are experiencing a problem being able to batch scan try the following steps: •Solution is to check the "feeder" option within the RemoteScan user interface or the option to do a batch scan from the application •To do this: |
➢Attach master file documents at the Sub-Account level: Employee, Sub-Account (vendors and customers), Revenue Owner, or Oil & Gas Property. Each gives you the ability to maintain an unlimited list of scanned images or pictures associated with each employee, etc. Even if File Sharing is turned on for Sub-Accounts, properties, etc., the system still provides the ability to scan documents into the child company that is sharing Sub-Accounts.
➢A/P Invoice Entry: Scan in the Vendor’s Invoice. Also adds ability to electronically route A/P for approval.
➢Deposit Entry: Scan via fast batch matching process the check and its check stub. Then add supporting docs.
➢Check stub entry: Scan in the purchaser’s check stub detail for each check stub deposit header.
➢General Ledger: Scan image while entering a journal entry.
➢Bank reconciliation: After you reconcile a bank statement, scan the actual statement into the bank reconciliation history.
➢Oil and Gas Production/Run Ticket: Scan individual Run Tickets.
➢Land: Scan Land Contracts into Contract Maintenance.
➢Mineral Interest System: Scan mineral deed or assignment.
➢Service Ticket Entry: scan in the signed ticket. The image(s) are associated with each ticket as they are entered or via a fast batch matching process.
➢General Invoicing: when using the ticket option of invoicing, an image of the ticket can be associated with the ticket.
➢Field Ticketing: can scan the hand written field tickets and/or can scan the approved (signed) field ticket.
➢Fixed Assets: scan a copy of the accounts payable purchase invoice and/or warranty into the asset maste |
When scanning an image into the system it will create and store a .TIFF file. However, the system can also pull in a .PDF document rather than having to print the document out and scan in using your scanner.
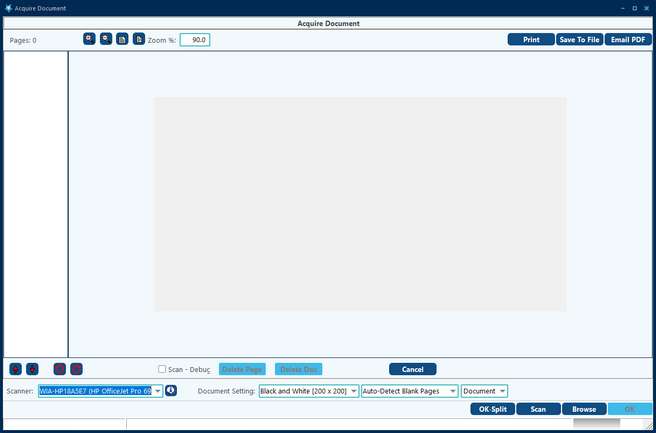
•To start, click on Scan or Document Maintenance on your screen. Or, if you are in a grid view (View/Trend or Document tab) right-click in the appropriate field and select Add Document. •On the Acquire Document screen select your settings and options:
Notes: •Secured PDFs with passwords will be able to be saved when using the correct password. Once in the system, a password is no longer required to access or append to it. Secured PDFs scanned using an incorrect password will not be able to be saved in the system. •To pull in a PDF document simply choose browse on your scan screen and find the PDF you would like to pull in. If you have more than one PDF that you would like to merge together to create only one image in the system, browse for the first PDF, then the second, etc. •You cannot, attach one PDF document and append that document with a .TIFF (i.e. scan one item with your scanner and pull another PDF item in). To accomplish this you must print and scan the PDF using your scanner. |
The real power of the scanning is when it is combined with entering of Accounts Payable Invoices. The paper invoice and/or other supporting documentation is easily and quickly scanned in and automatically associated with the A/P and the expense or JIB entries.
1)Enter Invoices to Pay – scan invoices at time of data input or browse to previously scanned image and attach. Additionally, the system has the ability for an image (PDF, TIF, TIFF, BMP, JPG) to be dragged and dropped into the "Acquire Document" window from other applications such as Microsoft Outlook. Non-PDF files are converted to TIF files for storage purposes.
2)Enter Checks/Drafts – same as above
3)Add Ck# to Updated Inv. – can add invoice or append to previously scanned invoice
4)Reporting/ Viewing images: a.Open item reporting – option to print images b.A/P’s Mark Invoices and Change Due Date screen, both have indications if the invoice has an image(s) associated with the invoice and the image can be viewed from either of these screens. c.A/P Approval Routing screen and Pending Invoices Screen, the images can be viewed directly from the summary grid.
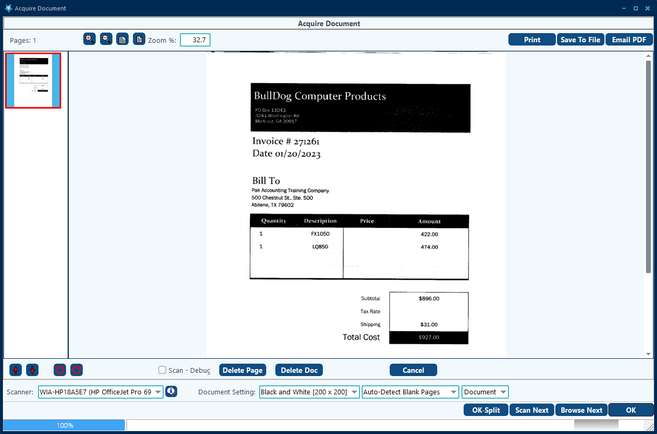
Example of a Scanned A/P invoice.
TECH TIP: Right beside the Scanner Selection field in the bottom left-hand corner of the screen is an information button
Image(s) are automatically associated with all the G/L entries (both the a/p and expense entries) that are created when the Invoice is updated. Images can also be viewed during the duplicate checking process and from the "Mark Invoices to Pay" screen in Accounts Payable.
To view the document in View Trend from the posted detail, simply right click on the image field found on any leg of the entry and select View Document. Documents can also be added after the fact through View Trend. Documents can NOT be deleted from posted detail once a check is written. |
Images can be matched up with each check being deposited either as they are entered or via a fast batch matching process. When the deposit is updated, the check image can be viewed via any entry created by the deposit.
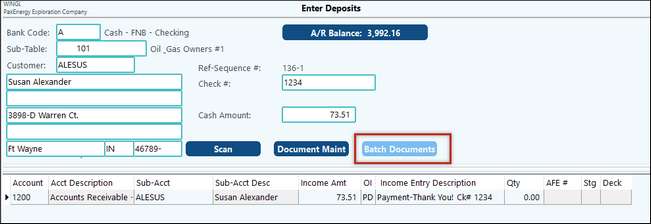
Associate scanned check and stubs 1.The Check # field must be populated 2.Scan each check individually with each deposit entry and/or 3.Input all checks and batch scan checks then have them attach to the deposit record. The batch scan is designed to rapidly and easily associate one scan page per deposit. The yellow status bar will track the importing process for you.
NOTE: Additionally, the system has the ability for an image (PDF, TIF, TIFF, BMP, JPG) to be dragged and dropped into the "Acquire Document" window from other applications such as Microsoft Outlook. Non-PDF files are converted to TIF files for storage purposes.
The grid display is used to verify the batch matching process and only shows deposits that don’t have an image associated with them yet. Once “Save” is selected, each image is automatically attached to its corresponding deposit and can then be viewed via the Document Maintenance button. Before you update, you can add or remove documents to the deposit thru the same option.
NOTE: Once the deposit is updated, any scanned documents entered via View Trend will be attached to all entries in the deposit entry batch. |
The Master Documents add-on feature gives you the ability to associate scanned documents (images) with the master files (Employee Maintenance, Sub-Account maintenance, property master, and land contracts).
Employee Maintenance (example documentation: W-4, pictures of employees, etc) On the Employee Master/Documents Tab; click on the green “+” sign to add a new document . Choose Document or Picture depending on what you are adding.
If your computer is connected to the scanner, right-click and select “Add Document.” The document will automatically scan and will add to this employee.
Or you can scan from a common scanner, and browse to find the document.
Batch Documents allows you to scan multiple images and to associate one, or all, to each employee.
To view the image: right-click to view, edit, print, save, or process batch documents.
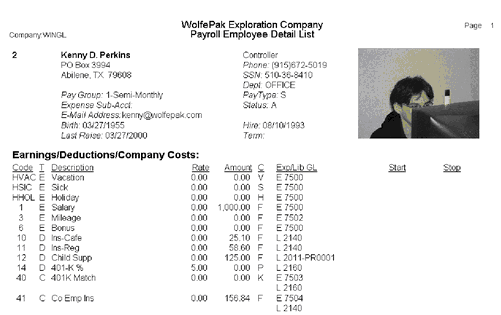
Employee pictures can be scanned into documents at a "P" type. After the picture is attached to the employee, the detailed employee listing will print the picture with the employee information. The same procedures can be followed to attach scanned documents to Sub-Accounts, properties, and Land Contracts.
The same procedures can be followed to attach scanned documents to Sub-Accounts, properties, and land contracts. |
Document will NOT Scan…
Are you using the correct driver – TWAIN (Some scanners will also support an ISIS driver. If you have both drivers installed and are having problems – uninstall the ISIS driver) Is the scanner connected to a USB 2.0 port (Some older machines have both the older USB 1.0 ports along with newer, faster USB 2.0 ports, be sure you are plugged into a USB 2.0 type port)
Scans are too light…
1.Global default verses Sub-Account selection 2.Resolution: 200 x 200 minimum
|
