Adding a New employee
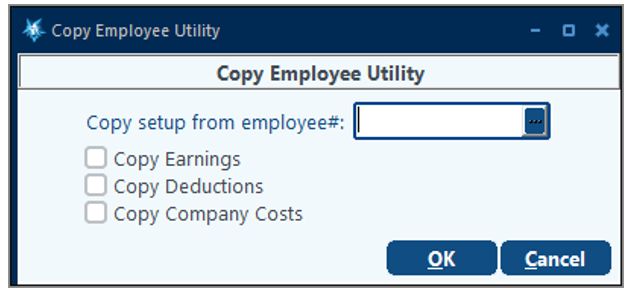
To add a New Employee, click on the Add button and enter the Employee Number. The system will prompt with the following screen

Leave blank to start from scratch (you can also create a “dummy” employee to copy the basic set up from). On the first employee, the prompt should be left blank. On the second and subsequent employee, time can be saved in adding new employees if some of their setup information can be automatically duplicated from an existing employee. This screen covers basic employee information such as name & address, social security number, hire and termination date. When finished, press F10 to save your entries.
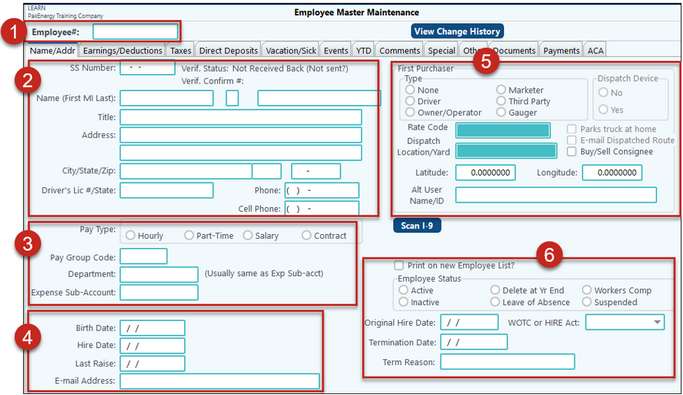
This next screen covers basic employee information such as name & address, social security number, hire and termination date. When finished, press F10 to save your entries. If you used the Add New Employee option to access this screen, the next screen in the sequence will automatically display.

NOTE: If the same employee is entered twice the Sub-Table/Sub-Account Number Change utility (Utilities module > Company Wide change > Sub-Account) can be used to combine the two Sub-Accounts (employees) into one. If the Social Security Number was entered incorrectly for an employee and cannot be changed, create the employee again with the correct Social Security Number and use the Sub-Table/Sub-Account Number change utility (Utilities module > Company Wide change > #71-Sub-Account) to combine the two Sub-Accounts (employees) into one. When this utility is used, the changes cannot be undone. Please backup the company BEFORE using this utility. Both employees cannot be on the current payroll cycle when trying to initiate this correction.
Name/Addr Tab |
|
|---|---|
1. Employee Number |
This is a manual field much like Sub-Account Maintenance. •If you would like the system to auto-generate an employee # go to Advanced Options > Other Options tab – select “Automatically assign new employee numbers?” box. •Per the setup in Basic Options > G/L tab – Maintain Employee…field, once you create an employee here, a Sub-Account will also be created in Sub-Account Maintenance. |
2. Personal information on the employee |
|
SS Number |
Employee's Social Security Number. This field will print on the TWC quarterly report listing and on the W-2's at year-end. If a Social Security Number is entered that is already in use by another employee a warning message will appear and a different Social Security Number (or all zeros) must be entered to continue. Zeroes can also be used when an employee's SSN has not been received to allow the company to file W2s with the SSA. For employees with zeroes a warning message will be displayed on the W-2 Edit Listing with a message to correct either now or send in a Corrected form from the SSA website once the SSN is received. |
Name, Address Phone, Cell Phone |
Last name (1 to 20 characters), First name (1 to 15 characters), and Middle initial of the employee. Phone numbers are for information only. |
Title |
Used on certified payroll register. |
Driver Lic#/St |
Driver’s license number and state. |
3. Pay Information |
|
Hourly, P/T Hourly, Salary: Which Item of pay the employee receives. If you are using the vacation accrual option, and you code a P/T Hourly on an employee, the employee will not receive any vacation accrual amount. |
|
Pay Group Code |
Which pay group this employee belongs to. Pay groups are set up in Master File Maintenance > Basic Options > Employee Pay Group screen. |
Department |
(1 to 6 character code): Used to determine the sequence of employees on reports. Field is used for description only on reports unless a Sub-Table is entered on Company > Basic Options > GL tab. |
Expense Sub-Acct |
(1 to 6 character code): This is important if any of the Expense accounts are sub'd by these Sub-Tables. Used when posting Earnings and Company Costs to the General Ledger. |
4. Important Dates |
|
Birth Date |
Employee's date of birth. Used for information only. |
Hire Date |
Date of hire. If the vacation accrual option is used, length of employment is calculated using this date. |
Last Raise |
The last date this employee received a raise. You must maintain. |
Email Address |
Enter employee email address, used with emailing check stubs for direct deposit employees. See Email Emp stubs for more information. |
6. Employee Status Information |
|
Print on new Employee List? |
Check if employee is a new employee. Will print on New Hire report at the end of the Payroll Register. |
Employee Status |
Active employee Inactive employee Delete at Year End (Rarely used, contact your Customer Success Team) Leave of Absence Workers Comp Suspended
Normally, only active employees are paid. Employees that are temporarily not working can be coded as Inactive.
If you attempt to pay an employee with a status of Inactive or Delete, the system will issue a warning before processing the employee.
If a terminated employee's hire date is updated and their status is changed to Active, the termination date will be cleared out. |
Original Hire Date |
Original Hire date for employees who left (terminated), but returned to employment. |
Term Date |
Termination date. Once this date is entered, no further checks may be written to the employee. It is better to wait until the last check has been written before entering a date here. |
Term Reason |
If Termination reasons were set up on Company Basic Options > Codes tab, select the termination reason for this employee. |
WOTC or HIRE Act |
Select HIRE Act if employee qualifies for the HIRE credit. ONLY VALID for 2010.
If you need more information on the new HIRE Act, please visit the IRS web site for Questions and Answers! All other selections are future enhancements. |
Other |
|
Optional EEOC Location Sub-Table # |
This field provides the ability to code a location for the employee for EEO reporting purposes. This option must be "turned on" by adding an EEOC Location Sub-Table in the Master File Maintenance > Basic Options > GL Tab. The reports that have the ability to utilize the location field for reporting purposes are the E-8 Summary by Job Category, Sex, and Race, Employee Master Views, and the E-2 Detailed Employee List. See Basic Options/GL Tab. |
Scan I-9 |
Using the Pak Accounting Scanning feature, scan in the employees I-9. Once scanned in, the button will change to View I-9. Click on the button to view the scanned image. |
5. First Purchaser Options (This section will only appear if authorized for First Purchaser) |
|
|---|---|
Type
|
None-This indicates a regular employee and is not seen in First Purchaser/Dispatch. Driver - Owner/Operator - Marketer - Third Party - Gauger - These options are seen in First Purchaser and Dispatch. They provide the ability to track driver's pay for the cost of crude and to create driver's payment reports. The driver's pay is extracted to Payroll. |
Dispatch Device |
Select which device to be dispatched to. |
Rate Code
|
Select which rate to be used for each driver from the Driver Rate Codes set up in First Purchaser. |
Dispatch Location/Yard
|
Select the location/yard. This is a starting point for Dispatch mapping and routing. |
Parks Truck at Home
|
Select this option if the driver does not have a location/yard and takes the truck home. This option acts as the driver's starting/ending location. |
Email Dispatched Route
|
Select this option if the driver is to be emailed from the Dispatch module. This option will also require the employee's address to be set up to be used. |
Latitude, Longitude, Welltrax |
This information is utilized in certain First Purchaser integrations. (If using the Welltrax integration, the Welltrax UserName will be required and Latitude and Longitude will be required for Drivers if "Parks truck at home" is checked.) |