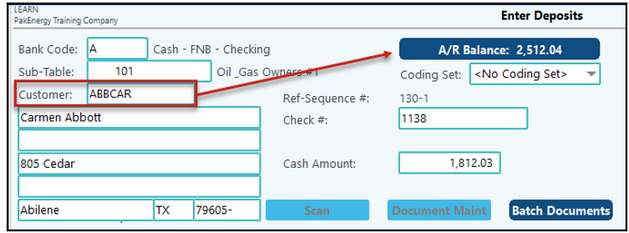
The Enter Deposits screen in the Deposit Entry Module is where you enter cash or checks received by your company.
Deposit Entry Steps:
1.To enter a transaction, click on the Add button.The screen will change to edit mode, and the cursor will move to the Customer field.
2.The Bank Code and Sub-Table will default from the company options, but you can override these if needed.
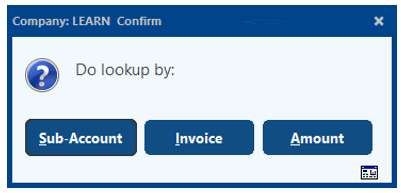
3.In the Customer field, enter the Sub-Account. If you click on the lookup while the field is empty, you will get the following window. Selecting on Sub-Account will take you to the Lookup Screen you are familiar with. Clicking on Invoice or Amount will open a field allowing you to enter in the information.

4.Once you have the Customer (the person or entity that sent you money), you will notice a section called “A/R Balance: $$”. This will show the current A/R balance for this customer. Clicking on this button will take you to View/Trend. From here, you will have all the View/Trend capabilities.
NOTE: After entering the Customer, using Tab will take you to the address field, and using Enter will take you to the Check # field.

5.After the deposit is entered, [F10] or click on Save to save the deposit.
NOTE: The information entered into the bottom half of the screen as you tab through will duplicate to the consecutive lines unless the deposit zeros out. This information can be overridden to reflect the information necessary.
Entering Deposits |
|
|---|---|
Bank Code |
The bank code can be changed if the deposit needs to be posted to a different cash account. Default set up in Company Maintenance. |
Sub-Table |
Enter a new Sub-Table if the Sub-Table is different from the default. |
A/R Balance |
Gives customer's current A/R balance, clicking on box will take you to View Trend to view the detail that makes up the balance. |
Customer |
Customer number where this receipt will be applied. Press [/?] for a look-up of existing customers. The list is from the Sub-Table specified in your Deposit Entry Options. Selecting a customer inserts the customer name & address. If the customer is not in the table, and you won't need them in the table for future reference, just press Enter and you can enter a name or comment for a one-time entry. If the customer in not in the table, and you want them set up as a Sub-Account, press [F12] for Sub-Account maintenance. |
Check # |
The number of the check you are receiving. If a check number is not entered, then the system assumes you received cash and will accumulate all the cash amounts together into one line item called "Cash" when printing the deposit slip. |
Cash Amount |
Dollar amount of the payment you are receiving. |
Scan Document/ Document Maint |
Ability to scan in a the check to have a picture copy associated with the transaction. Must have the scanning feature. Also see Deposit Entry Scanning for more information . |
Batch Documents |
1.Enter in all deposits. 2.Scan all documents into a folder. 3.Browse to that location to pull in scan(s). 4.Order scanned images in the same order as the deposits. There can only be one page per deposi screens. Also see A/P Bach Documents |
Account |
Account number coded for the receipt. If you are receiving payment on account from a customer, the number would be your Accounts Receivable account. If a default income account was entered in Setup, that number will appear by default. Typing over will change it. Also, a list of all accounts may also be viewed with the [/? ] key. |
Sub-Account |
Used to classify the entry by customer, location, etc. A Sub-Account may only be used if the receipt is being posted to an account number that contains a Sub-Table. If a default Sub-Account was set in the Deposit Entry screen, it will appear in this field. The special code "*CUST*" (specified in company options for default Sub-Account) can be used to cause the customer # to be automatically placed here. This may be overridden at the time of entry. A list of existing Sub-Accounts may also be accessed with the [/?] key. |
Income Amt |
This defaults to the dollar amount of the check received. If the money needs to be allocated to different accounts, type over the amount, and add another income account to receive the remainder of the money. Note: The total must equal the check amount. |
OI |
If customer is an Open Item Customer a table of open invoices will pop up for you to apply the payment. See Open Item Accounts Receivable. |
Description on Income Entry |
This will default to the description that was used entered on the Company Maintenance Setup called Default Descriptions for entries coded to an A/R account. This will print as the description on the General Ledger. The description may be overridden by typing over the default description. If the description is overridden, it will carry to the next line in multiple line deposits. The spell check feature has been added to this field as well. |
Quantity |
Enter in the quantity if needed. |
AFE#, Stage, and Deck# |
When using pre-payment account, these fields are required and are validated based on the prepayment account number. |
Receipt - a counter receipt can be printed by selecting the [Receipt] button on the menu bar. Company options allows you to select whether to print one copy or 3 copies of the receipt on the same page.
Find - Use the "Find" button to locate a deposit that was entered in the"Enter Deposits" screen. This is a very useful tool if there are many deposits existing in this screen. The look-up can be filtered by name, check number, amount, or sequence number. Additionally, the look-up screen offers a "Contains" field in which part of a name, check number, etc. can be entered for filtering to the correct deposit.
Line Mnt - Clicking on this button positions the cursor in the bottom half of the deposit entry screen.
Utility button allows you to:
Save above G/L Coding - set up and save a deposit code set at the company level (i.e. not at the Sub-Account level). The next time you enter a deposit you have the option of selecting the saved code set (i.e. the bottom part of the screen will prefill with the save accounts), or entering manually.
Edit G/L Coding - To change and/or delete an existing code set
Transfer Deposits from another User ID - allows the ability to transfer all of a given user's deposits to the current user.
Import from Clearing Acct - creates deposits from Invoicing entries made to a specified clearing account.
See also: