To enter a manual journal entry, select the General Ledger Menu > Manual Entries > Entries screen.
There are a number of important fields on all G/L entries. Understanding the significance of each is important for you to be able to take full advantage of the power of Pak Accounting. Remember that regardless of the sub-system, ultimately, all sub-system entries flow into and/or out of the General Ledger.
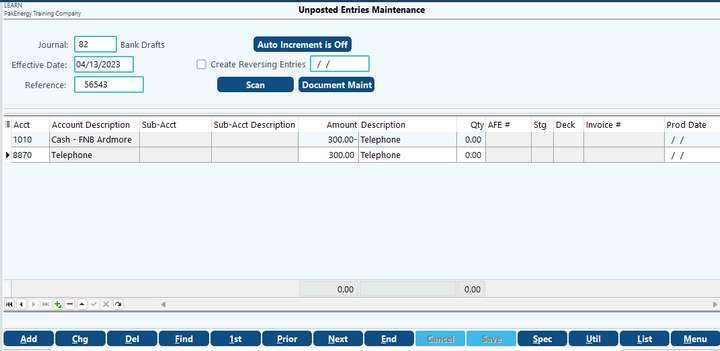
To start a Journal Entry, click Add at the bottom of the screen. Enter in the Journal, Effective Date, and Reference number for this entry.
Use the Scan or Document Maint buttons to attach accompanying documentation.
Enter in the Account / Sub-Account combinations with amounts that you are needing. Credit amounts are entered with the “-“sign either before or after the amount. Enter a description to print on the G/L Listing.
When you are finished entering the amounts, the journal should balance. When the “Net Amount” is zero, the entry is in balance and can be posted. Click on Save then Add to save your current entry and start on another. An unlimited number of entries can be made before posting.
Journal |
A journal groups like entries together by date for reconciliation purposes. Unique journal numbers allow you to search for specific items faster with the ability to filter out any unwanted journals. |
Effective Date |
An effective date is the date you want your manual entry to be recorded in the General Ledger. The system is capable of having several different years open at the same time. However, it is much like you not giving a loaded gun to an untrained user, or even a trained user shouldn’t be pointing a loaded gun at someone, having multiple years open at the same time is EXTREMELY dangerous. Use the Posting Allowed Date Range option to set open date ranges. |
Reference |
A reference number helps to uniquely identify the entry within the journal which provides the ability of allowing you to search and filter a listing by the reference number. The system will group entries together by month, year, and reference number; so it’s VERY important that each entry have a unique reference number. |
Auto Increment is Off |
Use this option to activate the temporary auto increment – simply click on the button “Auto Increment is Off”. This can be clicked before or after beginning your first entry. Before you proceed notice the current reference number. When entering in the next Journal Entry the reference number for the second journal entry has increased by one. When you menu out of this screen the “Auto Increment” will default back to “Off”. |
Create Reversing Entries |
This option will create a reversing Journal Entry in a different period. This entry will not show in SPEC or on the Listing. However, you will be able to see the entry in View/Trend or other reports after it has been posted. |
Scan/Document Maintenance |
Uses the optional scanning feature to allow you to scan an image (invoice, contract, etc) and associate it to the transaction. |
Account |
An Account Number can either be keyed in or the lookup can be used to find and automatically enter the account for you. If you know the account you want to key in is a liability account, then keying in a “2” then pressing the lookup key (/?) will start the lookup with the 2xxx series.
|
Sub-Account |
This column can vary by row depending on the account number immediately to the left. The system will automatically skip this field or stop and want a value to be supplied based on if a Sub-Table is attached to the account number in the chart of accounts. |
Amount |
The amount can be keyed in with or without a decimal place. The decimal is always assumed and the number is automatically reformatted as it is entered to include commas to help improve the readability. Negative amount (credits) can be entered by pressing the “-“ (dash or minus sign). If a negative is accidently keyed when it shouldn’t be, then a “+” (plus key) can be pressed to change the sign of the amount. Unlike other systems, the minus/plus key can be pressed at any time while you are in the field and the system will automatically put it on right side of the number (before, after or during the entry of the number). The amount field is a little different than the others, in that instead of duplicating exactly like the previous entry, it will contain the amount necessary for the entry to balance. On “classic” single line Debit/Credit entries, this is a nice feature that can help speed up data entry. |
Description |
Enter a description to print on the G/L listing. This is an unlimited length text field that can contain free flowing text. “Hard” carriage returns can be inserted into the text to force the beginning of a new line but are generally discouraged, in that the text will wrap as needed depending on the report. Standard Windows Keystrokes can be used to copy (Ctrl+C) and paste (Ctrl+V) text from other sources into this field. |
Qty |
(optional field) If you enter a quantity, the quantity rate will automatically calculate. The rate equals the amount divided by the quantity |
Deck and AFE number/stage |
These fields will only be available for entry for Oil & Gas accounts. |
Invoice # |
This field will only be available for entry for A/R accounts. The following special characters are not allowed: / ; ' " |
Prod Date |
Allows you to enter in a Production/Service Date on a line item basis as the entry is being added, without having to go into the Spec option to add the date |
NOTES:
•Watch the video on Journal Entries for more information.
•DEL at the bottom of the screen will delete the whole entry. Using the navigational grid tools will delete an individual line.
•Select Save or press F10 to save the entry.\
•Once the entry is on the screen, click on Chg and make the correction. For an EASIER, QUICKER way of making changes see below for more information on Special Mass Maintenance (Spec).
•When you are finished entering the amounts, the journal should balance. When the “Net Amt” is zero, the entry is in balance and can be Posted.
•The entries will remain in Unposted Entries Maintenance until posted to the General Ledger. See Post G/L Entries.
•If you try to post an entry to a cash account in a time period that has been reconciled in the bank reconciliation module, the system will not allow the entry to post and will list the error on the Error Listing (located under the List button at the bottom of the screen) and in Special Mass Maintenance (Spec) (See below for more information). However, a Class 3 user, defined in User Level Security, can continue the posting process. The entry will be logged to the Change Log. This will also allow for adjusting entries to be made when a dual currency is used.
•Links for additional information: Journal Number; Effective date; Reference; Account number; and Sub-account (if applicable)
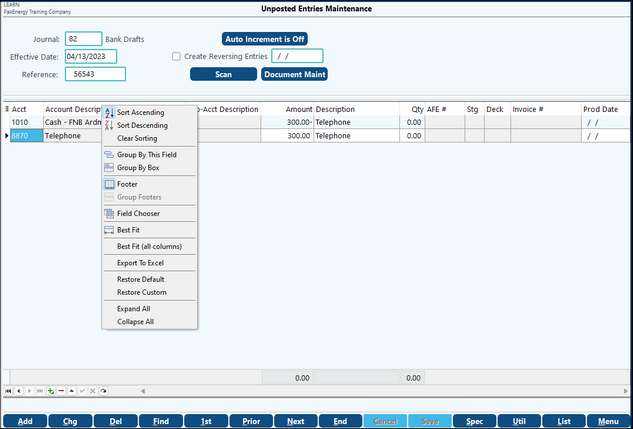
•Right-click on the column header for sorting options.
Menu Bar Functions along the bottom of the UnPosted Maintenance screen:
Add/Chg/Delete an individual entry
Find/Next/Prior - The Next and Prior options allows the display of the entries, either in a forward or backwards direction. The Find option will display entries by "Sequence (# of entry)", "First Error" or "Next Error". If you have entries that have been automatically created that have an error (such as an account # that does not exist) the "Find" "First Error" will find the first entry that has an error, allowing the user to correct the error before posting.
1st /End - displays to the screen the first or last entries on the unposted file.
Spec - Selects the Special Mass maintenance screen, for making mass changes to journal entries.
Util - Utility to Mass delete entries based on a range of Sequence #'s, Substitute Field Values, transfer from another user ID, and export to CSV.
List - Produces a list of UnPosted transactions to either the screen or printer. The list can be printed in Journal # order or Sequence # order, and can be ranged by Sequence #, Reference #, or Journal #.
Menu - Returns to the G/L System Main Menu ([ESC] can be used as well).
When the journal entry is in balance and without error, you are ready to post to the General Ledger. The entries will not affect the General Ledger until they are posted. See Posting journal entries. |
The Journal Entries List produces a list of unposted transactions to either the screen or printer in order for the user to review them for accuracy before posting. The list can be printed in "Journal #" or "Entry Sequence" order. Additionally, the list can be generated by sequence number, reference number, or by a journal range. This option is located in the General Ledger module/ Entries. Click on the "List" button at the bottom of the screen. |
Mass Delete The Mass Deleter utility provides the ability to mass delete unposted entries by sequence # for a range of entries. Exercise caution using this option.
Export to Excel This utility provides the ability to save entries in a CSV format. Enter the location to save the file to and select "OK."
Substitute Field Value This utility allows the user to correct entry errors made on every entry in the unposted file. (Note: if you have already posted the entry to the general ledger, you must unpost before you can use the Substitute Field Values utility). Some examples for using this screen would be to correct misspelled words in the description field, correct the date for all entries, change the journal number for selected entries, etc. On the left side of the screen, specify the criteria for the entries you want to change. On the right side, specify what to replace it with. All entries selected will be changed.
Transfer From Another User ID This option is located in the General Ledger module / Entries / Utilities button. Since journal entries are separated by User ID (only entries recorded by your user id will be on the screen), the import utility gives management the ability to import another user"s journal entries to review and post. Once imported, the entries will no longer be available for the original User ID. Also, by changing the import company to another WP company in the "Transfer from Company" field, you have the ability to import journal entries from a different WP company. |
If there are corrections that need to be made to the unposted journal entries after you have entered them, there is a way to see all the debits and credits entered for ease of error correction: the Special Mass Maintenance (Spec) screen. (Click on Spec button at bottom of Entry screen). Any field in red must be corrected before the system will allow the entry to post.
Originally designed as a way to make mass changes to large journals, this screen is a convenient way to view and change Unposted entries. Anything, except adding a line, can be done on the Spec screen in terms of editing an entry.
By clicking on the Chg button, you can edit the journal, date, reference, account, Sub-Account, description and amount. Either click your cursor on the item to be changed or the Up Arrow and Down Arrow on your keyboard move the cursor from one line to the next. The Tab and Return keys move the cursor to the next field (to the right), and Shift-Tab moves the cursor to the previous field (to the left). Once changes are complete, press F10 or click on Save at the bottom of the screen.
To Delete an entry, click on the Del button at the bottom of the screen and the whole entry will delete. To delete a line item within an entry, check the "D?" box and then "Save."
The Invoice Number field will accommodate up to 25 characters.
The List and Utilities functions on the bottom of the screen are the same as in Entering Journal Entries |