Frequently Asked Questions about General Ledger Reports
Click on the blue link for the answer.
If you run a Default Trial Balance and see that your G/L is out of balance, one source to look at is the BPM found under Management Dashboard. You can run a listing to see if any batches have a status of non-zero. 1=Did not finish posting all the entries 2=Deleting Unposted 3=Unposting has started 4=Unposting A/P – deleting posted entries 5=Posting A/P (Void Invoice) 6=Unposting A/P (Void A/P Check) A non-zero status indicates something happened in the update process. This could cause out of balance journal entries to be created. If this does happen, your Customer Success Team can help assist in getting these corrected. Another scenario, you run the Default Trial Balance and it is out of balance, but all of the journals are in balance. Make sure you have your account range blank thru 9999. This is an indication that your G/L Summary file does not match your G/L Detail file. This can be caused by your server crashing or a power failure and the UPS on the server didn’t work or you don’t have one! |
1)Print Default Trial Balance or Ledger is OOB – verify OOB? a.Do NOT trust financial Reports 2)Get everyone out of the company for the whole process. 3)Create a full company backup in the Utilities module / Backup WolfePak Data 4) Utilities: Rebuild Data Files: a.(GLPost) b.(GLPSMF) 5) Utilities: Resummarize – G/L Posted - Verify/Fix balance a.Check #2 Verify Posting Batches, “OK” (run). b.It is possible that all batches of Posted GL tranactions are in balance, if they are, then proceed to the next step. c.For each “Batch xxxx is out of balance by”, run: i.UnCheck #2, Only have #6 checked: ii.Run for each batch listed on a. d.Run #2 again to be sure it is clean e.Note: if “Batch xxxx Dual Date Account is out…” then those are taken care of by the Resum Posted Detail. 6) Utilities: Resum posted detail (#40) f.This will correct any OOB Dual date entries and/or if the system has summarization problems. 7 )Run the default trial balance to be sure all is in balance |
You can import report definitions from the test companies on your CD. The import feature is in Report Definitions, see Find/Add Reports for more information. Once the definitions are imported they can be tailored to fit your company's needs. |
Is your A/P or A/R Open Item reports out of balance when you process those reports? One report you can use to see those easily is under Accounts Payable – Reports. On the Open Item tab, OI-6 – Verify Open Item by G/L Balance. This report will verify both your A/R and A/P Open Item to the G/L and show you any Sub-Accounts that are out of balance. The Revenue/Billing Cycle will also double check that the open item matches to balance for the A/R and Prepaid account(s). If it finds something out of balance, it will automatically un-flag the dates that are out of balance. Any action it might take gets automatically logged to the system’s error log. |
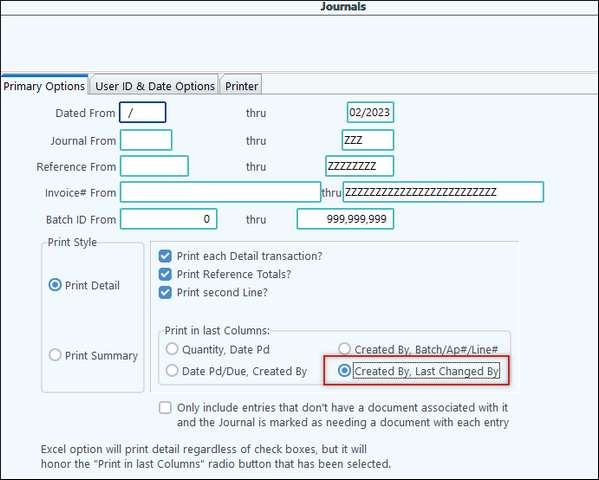
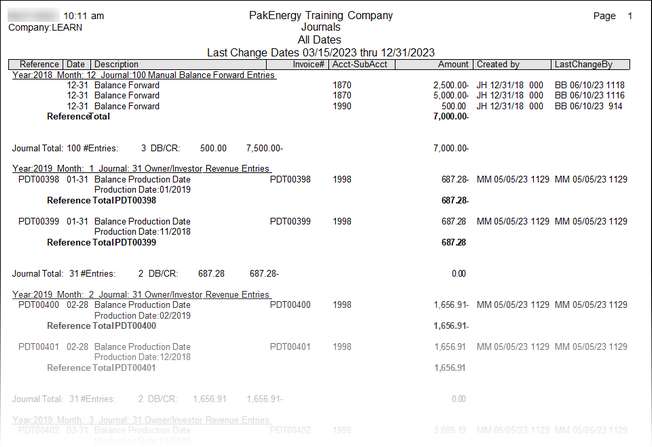
Journal listings can be used to find changes made to data. You can run a Journal Listing in the General Ledger menu, #31-Journals. The illustration below will demonstrate some of the relevant options that will provide the “Created by/Last Changed by” information.
Leave the Dated From blank thru 12/9999 for all entries. Or, enter dates if looking for something specific. For example, for all the previous year's entries, enter 1/1/2022 - 12/31/2022.
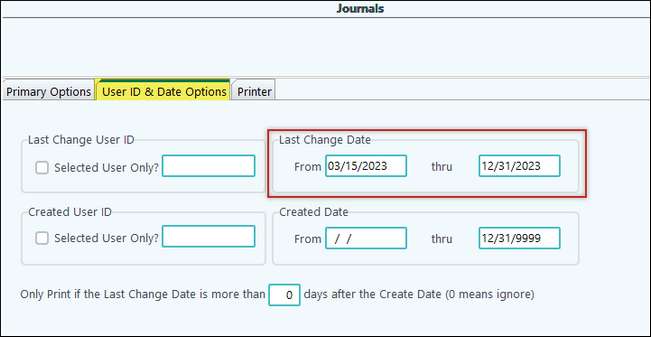
Run it by Last Change Date for items that were changed. Then, fun by Created Date for anything newly created.
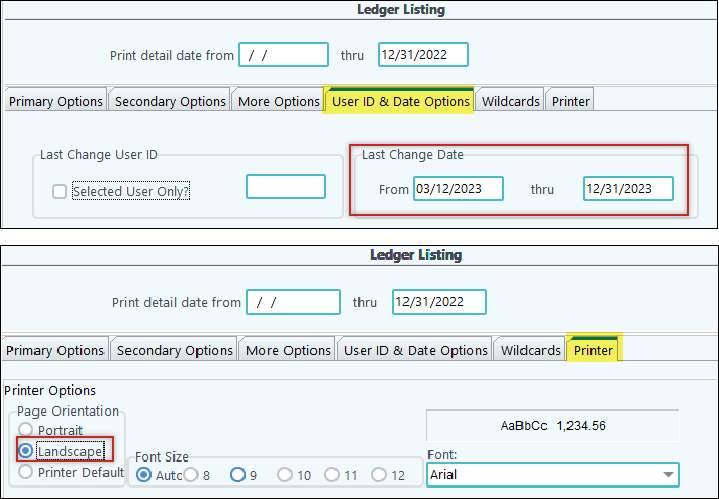
Another option would be the “Ledger Listing” > On the Printer tab, the landscape option will print columns for the last change user ID and date/time. The “UserID & Date Options” tab has an optional last change date range.
|
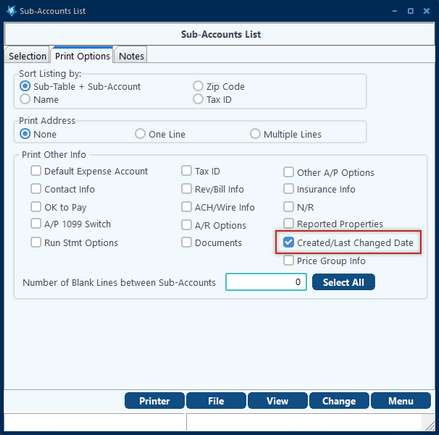
Go to Sub-Account Maintenance (F12) > List > Sub-Account Listing. This report gives many different filters to find what you need. For this example, enter in your criteria on the Selection tab. Then, go to the Print Options tab and check the box for Created/Last Changed Date. Click View.
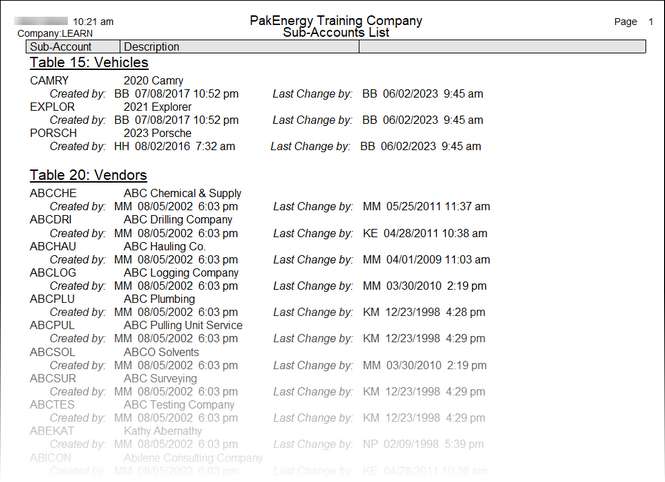
This report lists the last time the Sub-Account was changed and by whom. Selecting the 'Print Created/Last Change? with no 'Created From - Thru dates” (on the “Selection” tab) gives you a list of the changes made for each Vendor.
|
The Spreadsheet Trend report requires that a Financial Summary Group be specified on the Groups tab.See Financial Summary Groups for steps to setting up a group. |
View Trend is an awesome reporting tool that provides the ability to review accounts and Account/Sub-Account combinations. Within the View Trend function is a Ledger Query found on the Summary screen that allows for account and Account/Sub-Account combinations to be viewed in a grid format. See Ledger Query to learn all of the different characteristics and components that the Ledger Query provides. Another option is to review transactions by journal. This option is found in the General Ledger module > Reports > Journal. |
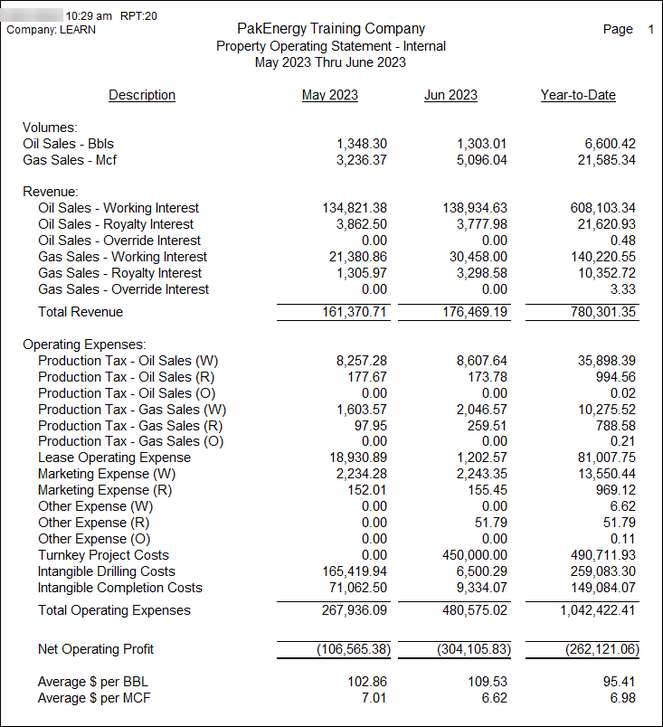
Pak Accounting has a Property Operating Statement that can be run as a Trend Report or Property Operating Statements that can be run as Spreadsheet Trend Reports for Internal or 100% reporting. These reports can be imported from WINGL into your company.
Trend Report:
|
A Profit and Loss Statement is also known as an Income Statement. An Income Statement reports the effect of revenue and expenses for a selected time period. The Income Statement is located in the General Ledger module > Financial Reports > Income Statement. Reserve your seat at one of Pak Accounting's Quarterly Financial Reporting Classes to learn how to "build" an Income Statement tailored to your organization's needs. Call your Customer Success Team at the Direct Support phone # shown on the bottom of your screen. |
Check the report definitions to make sure that the account for ORRI Gas Revenue is included. More than likely this is the problem. If it has not been included in the report definitions it will need to be added in the appropriate place using the appropriate report definition if necessary. See Report Definitions. It is a possibility that the account range on the report definition this account should be included in stopped just short of including it. This would just require adding the account in the account range on that definition. Pak Accounting offers a quarterly Financial Reporting Class that will teach you how the financial report writing process works in Pak Accounting and have you writing your own reports. Contact training@pakenergy.com to reserve your seat! |
1.In Sub-Account Maintenance (F12) > List > Sub-Account Views once the Sub-Table for your vendors has been selected, click Next. Use the Show/Hide Button
2.To bring up all the possible fields to choose from to customize your report, one of which is Tax ID. Once you have selected all the fields you want on the report, click outside of the fields screen to see all columns selected and current information. Use the filter button at the top of the Tax ID column to filter for blank IDs. This grid works like Excel.
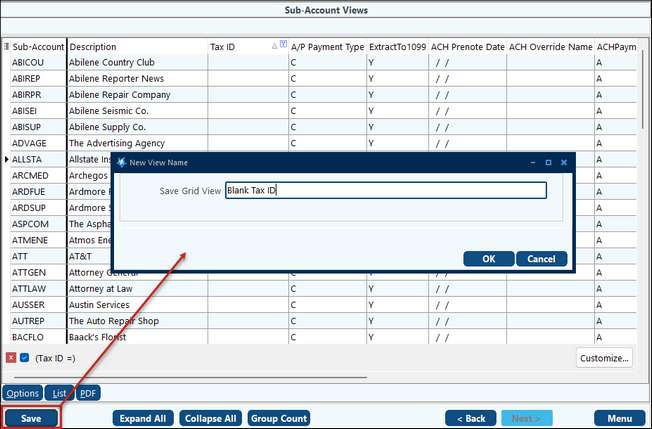
3.The information can then be Exported to Excel or saved as a PDF, by clicking on Options. Grid Views Reports can also be saved for future use, by clicking the Save button and naming the report.
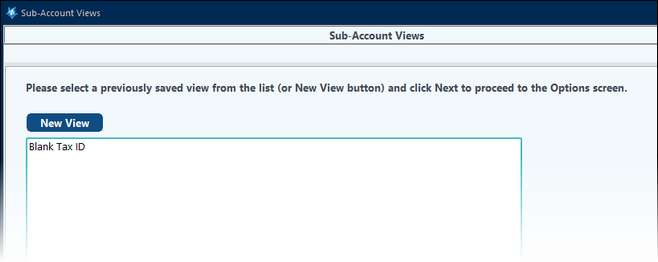
The next time Sub-Account Views is used there will be a choice to use an existing report or button to create a New View.
|
![]() Exporting Doc images out of Pak Accounting.
Exporting Doc images out of Pak Accounting.
The general ledger process to export the documents is a two step process:
Before beginning, create a folder where your PDFs will be exported to. In my example, I created a folder called Export Docs from GL and saved it in my WPA folder. Also see Folder Transfer/Compare.
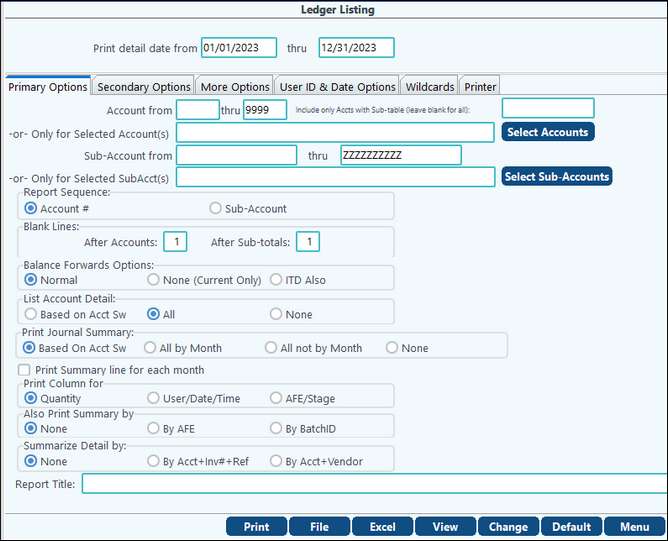
Step 1: Export EntriesThe first step involves selecting the criteria you are wanting to export on the ledger listing. In our example, we are going to do a full year’s worth of data for all accounts:
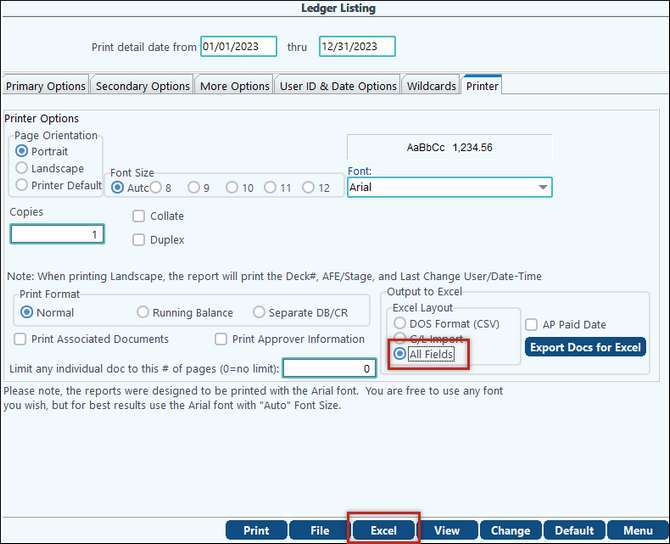
After clicking on Excel, save the file into the folder that was previously created. After clicking on save the file will be created. Pak Accounting will offer to open it for you. You are welcome to open it, but make sure you close it before performing the next step.
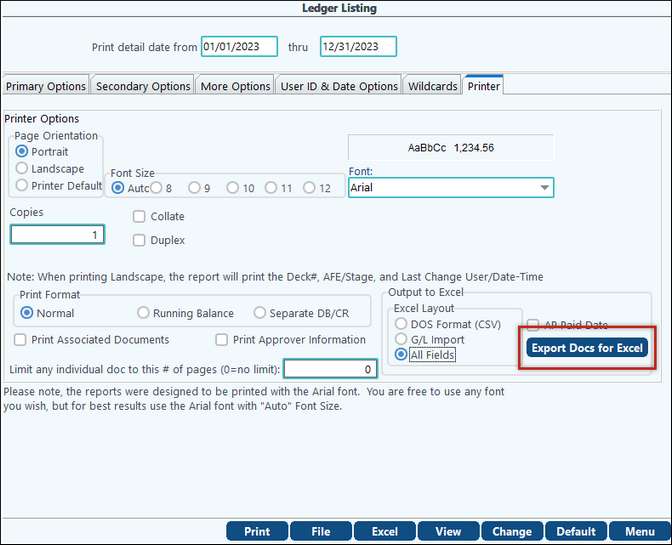
Step 2: Export the DocsThe second step is to click on the “Export Docs for Excel” button:
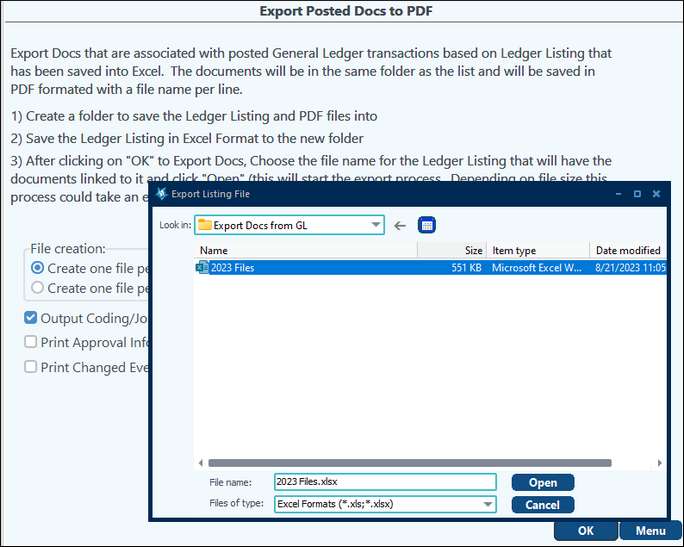
This will bring you to the “Export Posted Docs to PDF” screen and you will click on “OK”. A window will display labeled “Export Listing File” – choose the file that you just saved and click “Open”. We recommend browsing to your local folder to save the file.
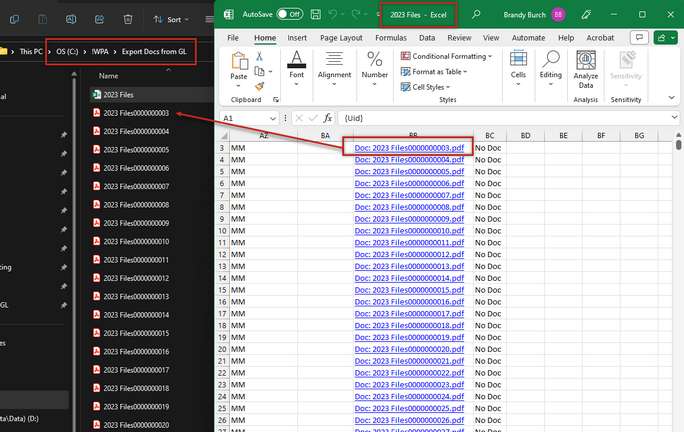
This will create multiple PDF files inside your folder and will have links to the doc image that pertains to the file.
Double clicking on the link will open that file. If the words “No Doc” appear the Document column in your file, this means that the particular item doesn’t have a scanned image, but the link will still bring you to a ledger listing for that particular line.
Tech Tip: This is very helpful during an audit, as the whole folder can be zipped up and given to the auditor to save time.
|
