Pak Accounting Alerts Module
Alerts option for Pak Accounting adds functions to the modules you already own. Alerts give users the ability to alert one or more persons for specific tasks in individual Pak Accounting Companies. In, addition a reviewer can easily be set up to be required to respond to any given alert. To use this module, you will have to be setup to send Email inside Pak Accounting.
Define the Alert Groups (the group of users that will receive alerts) in Utilities > Alerts > Alert Groups
Define the Alerts in Utilities > Alerts > Alert Definitions. This is where management should take the time to discuss and set company policy as to what tasks will become the basis for the Alerts Definitions.
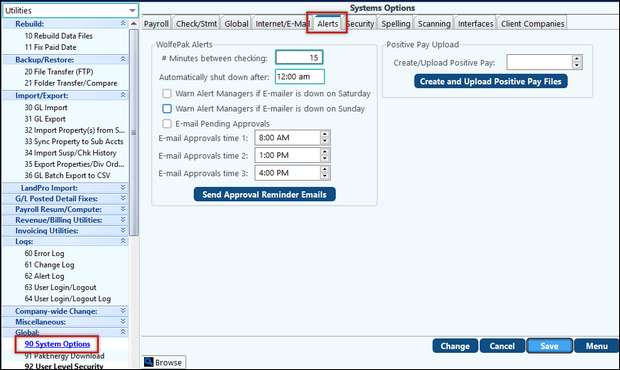
Alert options – One set of options for ALL companies (Global) Global > System Options > Alerts tab: •# of minutes between checking - to see if anything was changed based upon your Alert Definitions. Recommended 15 minutes.
•Automatically shut down after – is the time that the emailer program will shut down. New alerts will not be processed and sent until the program is launched again. This should be set to 5 pm. This does not impact your ability to get alerts such as changes in Sub-accounts. oWhy would you need to shut the program down? So that your systems automatic backup can process and/or any other server process!
•Warning alert manager if Emailer is down on Saturday/Sunday – a user can be set as an alert manager and will be notified (via popup in Pak Accounting) that the emailer is not running. These will be suppressed on weekends unless these options are checked.
•Email Pending Approvals - If using AP approval as well as PO approval you can set up 3 different Email times to have the pending approvals alerts be emailed in addition to the popups within Pak Accounting. Typically, this is used when approvals are to individuals who are not always in Pak Accounting.
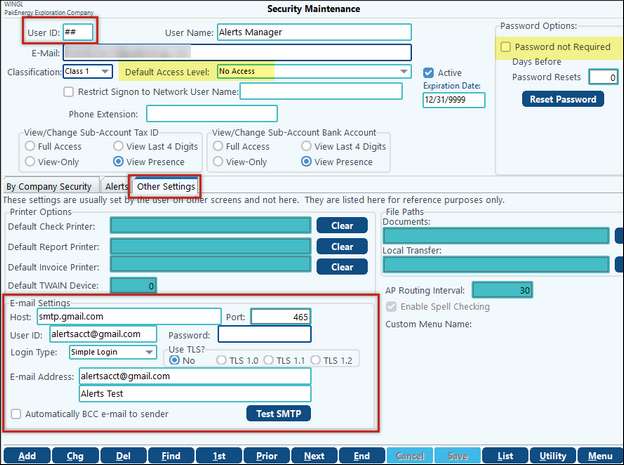
Set up a ## user in User Level Security. This user should have no access to any companies, set default access level to No access and no password required. Under the Other Settings tab, Email Settings box set up the SMTP settings for the email address that will be sending the alerts. This would typically be an account set up specifically for this, and not another user’s account.
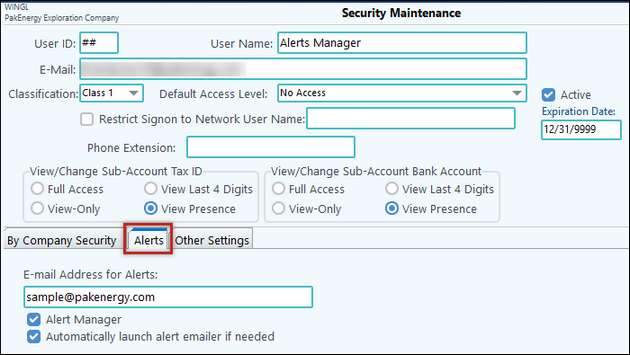
Set up User Level Security Email Address for Alerts: For each user that is defined on an Alert Group an email address will need to be set up to where they want the alerts to be sent to. Define this on the User Level Security, Alerts tab, Email Address for Alerts.
•Alert Manager option on the User Level security is only for “manager(s)” not normal users so that if the “auto emailer alert” is not emailing it will notify the “alert manager” that something is wrong. This ‘alert’ will alert the alert manager 2 minutes after they log into a company and then every 30 minutes thereafter if the “auto emailer” is still down.
•Automatically launch emailer if needed is a manager’s option just in case the server did not launch automatically for you.
•Up to three (3) different email time(s), based on the global setting, are available for this user to be notified if they have any outstanding A/P Invoices or PO’s to approve. NOTE: Define approval time in the Global/System Options/Alerts tab. Each user can select to have one or all the email times. |
Alerts can be seen and reviewed in the Alert Response menu.
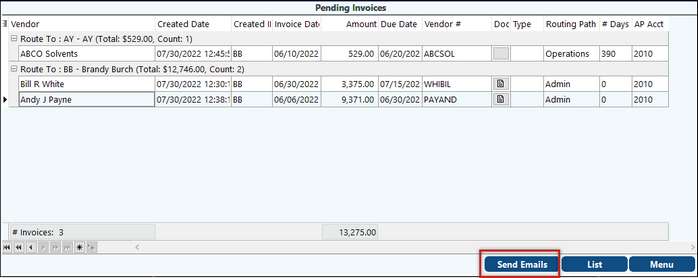
In addition to the up to 3 daily email reminders, the A/P supervisor can send email reminders on demand to those with outstanding Approvals. Located on the AP Pending Invoices menu is a Send Emails button that will send an email to all approvers with pending invoices.
|
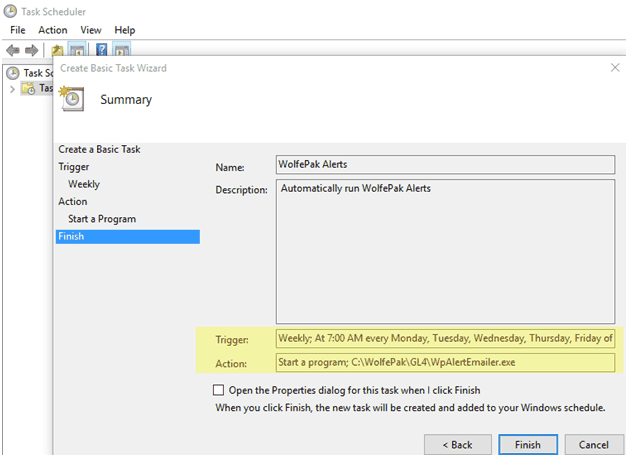
It is recommended to run the alert program on the server. You, or your IT group, can set up a task within Windows to automatically run the alert program for you but it can be manually executed.
To keep from interfering with weekend IT related upgrades, backups and such, we would strongly recommend running the alerts only during normal working hours!
Example of creating a basic task: To launch the Task Scheduler, click Start, type Task Scheduler, and click the Task Scheduler shortcut or press enter. Once the Task Scheduler is open locate the Action option in the upper left, click the Create Basic Task. This link opens an easy-to-use wizard that will walk you through the process of creating a task; it is recommended that you set the task to weekly. The Action should be Start a program you can browse for the exe or you can type in the path. The exe that you need to launch is WpAlertEmailer.exe located in the GL4 folder.
|
