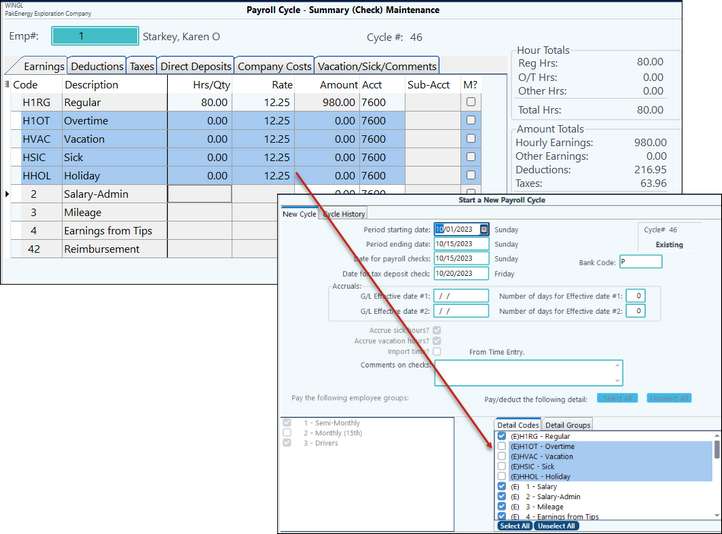
When you start a payroll cycle, a file is created containing a record for each employee to be paid. You can use the Next/Prior selections to scroll thru this file. The previous setup of the groups and employee maintenance is what determines which employees are listed, and their default values shown.
Each employee to be paid in this payroll should be displayed. If an employee was selected and he/she should not be paid on this payroll, select the Delete option when that employee's record is displayed on the screen. Keep in mind that this deletes the pay record in the work file, not the employee.
NOTE: Careful setup in the company and employee sections can greatly reduce the amount of data entry required in this section. The only changes you should need to make are for variations or exceptions to the "standard" payroll.
An employee can have only one pay summary record per pay cycle. It can represent either a manual check (a check you already have written by hand), or a computer written check.
If an item is highlighted in blue (as shown in this example) then that particular detail code was not selected to be included on the Start Screen. Simply go back to the Start screen, and check that detail code for it to be included.
NOTES:
•Right click to Add / Change / Delete / Add duplicate
•If a line item is changed for any reason, the box in the M? column will be checked. This is to indicate a manual change. If an item needs to be changed permanently, use the Emp Mnt button at the bottom of the screen to change it in Employee Maintenance.
Earnings Tab |
Allows the hours and amounts displayed (such as salary, overtime, mileage) to be changed. This is also where you are allowed to scan in a document by clicking on the "Document" button (i.e. a time sheet) if you have The Scanning module. The document can be viewed in the Employee Master on the Payments tab. |
||
|---|---|---|---|
Deduction Tab |
The Deductions Tab shows all the different deduction codes (i.e. withdrawals that are not taxes) that will decrease the employee’s net pay. The dollar amount can be changed if needed. However, this should auot-fill from the Employee Master setup and is typically only done if there is a special circumstance. |
||
Taxes Tab |
The Taxes Tab shows the detail that makes up the total amount of taxes being deducted from an employee’s check. It is not recommended that any of the tax amounts on this tab be manually changed. The system calculates tax amounts based on current Federal guidelines. |
||
Direct Deposit Tab |
The Direct Deposit tab will show the amount and the bank if the employee is set up for Direct Deposit pay. If needing to manually cut a check for a single cycle, simply delete the amount from the Amount Field. This will force a check to print for this cycle. |
||
Company Cost Tab |
The Company Costs tab shows what the company incurred for the employee’s check. The dollar amount can be changed but it is not recommended unless there is a special circumstance. These amount do not effect the employee’s pay. |
||
Vacation/Sick/ |
Shows vacation and sick accrual usage and any comments NOTE: Any comments on the comment screen of Pay Summary will print on the Payroll checks. |
||
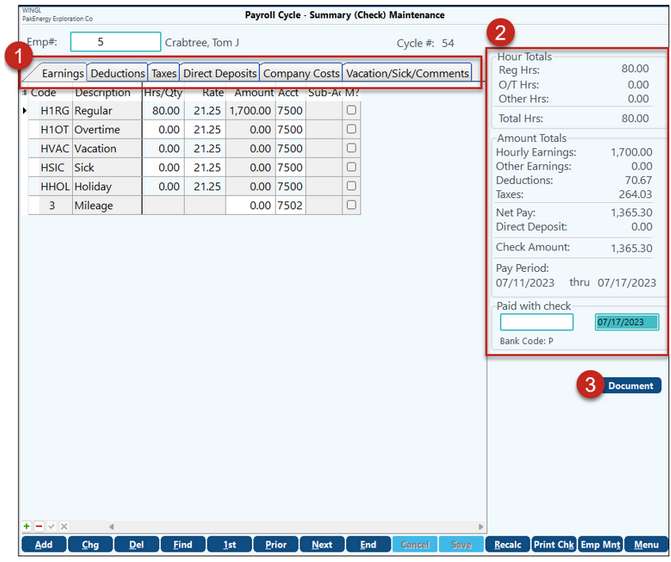
Totals on Right Side of Screen |
The right-hand side of the screen will give a summary of hours and totals. This is a great way to review the check at a glance. •The final check amount will either show in the Direct Deposit OR the Check Amount unless the amount is being split. •The Paid with Check will be blank until further in the process. However, if this is being entered in after-the-fact, enter in the check number originally given to the employee. •If the dates or Bank Code are incorrect, the cycle will need to be cleared and re-started. |
||
Document Button |
If the scanning add-on has been purchased, use the Document button to attach any files you may need. |
||
There are several options at the bottom of the Pay Summary screen. These are used to scroll thru the payroll file, and to make changes to the pay record. Each selection is described in detail below. |
|||
Add |
Used to or add new employee to the current cycle, or to add a new detail to the employee displayed on screen. |
||
Chg |
This selection is used to change information about the pay record currently displayed on the screen. After you have made a manual change to the Pay Summary, the Manual? box will be checked to let you know which has been changed. |
||
Del |
Deletes the pay record currently displayed on the screen from the pay cycle. |
||
Recalc |
Recalculates the check for any changes that were made. If you make changes to your Company or Accrual Account options on the setup screens, you can use the Recalc button to update one or all employees' current cycle settings or calculations to include the changes. |
||
Prt Chk |
Prints the payroll check only for the employee displayed. This can be used to pay a single employee ahead of time. You must enter the check number to be paid before clicking on the Prt Chk button. |
||
|
Takes you to the Employee Master Maintenance screen to allow you to make permanent changes to employee's files. The changes will reflect in the current pay cycle. |
||
Go through each record to make sure everything is correct.
1.The different tabs will break out the different types of detail codes. Be mindful when making manual changes on this screen. Is this a one-time override? Or a permanent override? If permanent, you would be better to go into the Employee Maintenance (use the Emp Mnt button at the bottom of the screen).
2.The right-hand side of the screen will give a summary of hours and totals. This is a great way to review the check at a glance.
a.The final check amount will either show in the Direct Deposit OR the Check Amount unless the amount is being split.
b.The Paid with Check will be blank until further in the process. However, if this is being entered in after-the-fact, enter in the check number originally given to the employee.
c.If the dates or Bank Code are incorrect, the cycle will need to be cleared and re-started.
3.If the scanning add-on has been purchased, use the Document button to attach any files you may need.
Note: If a line item is changed for any reason, the box in the M? column will be checked. This is to indicate a manual change. If an item needs to be changed permanently, use the Emp Mnt button at the bottom of the screen to change it in Employee Maintenance
Next Step: Payroll review
Also See: