Payroll ACH (Direct Deposit)
Why use ACH Direct Deposit????
Direct deposit saves time and money. For employers who have multiple locations, no more over-nighting checks or buying massive amounts of check stock. Employees don’t have to worry about finding time to deposit their check or about getting paid if he/she is out of town.
Pros |
Cons |
•No need to buy payroll checks •No over-nighting of checks to remote offices •Saves employees time •Prevents checks being picked up by an unauthorized person. •Supports emailing check stubs •Can also be used to take back amount paid in error |
•Must transmit file to bank 2 to 3 days prior to pay day (check with your bank) •Some banks charge fees per transmission or per transaction that are higher than the check charge •Additional one time setup |
Steps for Use:
Step 1: Set up ACH Direct Deposit
Step 2: Set up ACH Bank Accounts
Step 3: Set up Employee Master Direct Deposit
Step 4: Set up Employee Email to send Payroll Check Stubs
Step 5: Run a normal payroll cycle
Step 6: Direct Deposit/Sending the ACH File to the Bank
Step 7: Sending Payroll Check Stubs for Direct Deposit Employees
PLEASE NOTE:
It is advisable to start the ACH setup process two to three weeks ahead of the first payroll cycle to use ACH. This ensures that pre-notes are accounted for and that a test file can be sent to the bank.
You will want to check with your bank regarding pre-notes requirements. See Pre-Note information under Step 3. Also, depending on how many employees you have, this process can be lengthy. You may want to start this process well in advance of your next payroll cycle.
Also see
Step 1: Set up ACH Direct Deposit
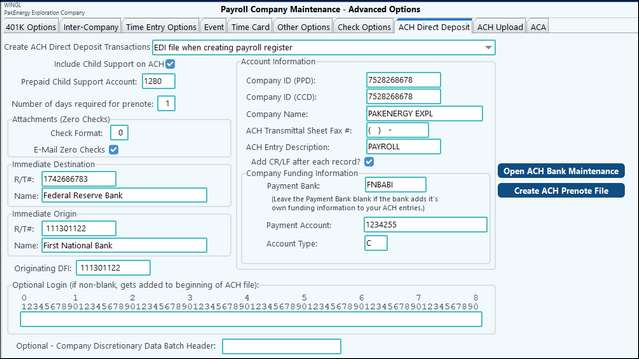
Setup the company information in Payroll > Master File Maintenance > Advanced Options > ACH Direct Deposit. The bank will supply all the information you need.
Direct Deposit Company Options |
|
|---|---|
Create ACH Direct Deposit Transactions: |
Use the drop-down menu to select when the EDI file will be created. Or select NONE, to not create one. |
Include Child Support on ACH |
Check to include child support transactions on the ACH file. |
Prepaid Child Support Account |
Enter the prepaid child support account in this field. |
Number of days required for prenote: |
If your bank requires a prenote, to test the ACH setup, enter the number of days required here, this indicates how long before the employee will begin receiving their ACH deposit. Ex. if 10 days, then it will be 10 days from the prenote date that the employee will still receive a physical check, if 0 days, then the employee will receive the ACH immediately. |
Attachments (Zero checks): check format: Print: |
This is the format for the pay stubs that will print to reflect ACH information. By default, check format 9 prints the information, 1 employee per page (8½ x 11). The format can be modified as required |
Email Zero Checks |
Select to send an email check stub for payroll checks with a zero dollar amount. |
Immediate Destination/Origin |
|
R/T#: & Name |
The bank should provide this information of the Federal Reserve that the bank is transmitting the entries to. |
Originating DFI |
Defaults to Immediate origin Routing #, enter optional DFI (Depository Financial Institution) origin if required. |
Optional Login |
Rarely Used, specific for companies whose bank requires a different header line on Direct Deposit files. |
Account Information |
|
Company ID (PPD) Company ID (CCD) |
Your bank should provide this information. The PPD files are ACH's to employees and the CCD files are for business to business which includes payments for Child Support. |
Company Name |
The name is a shorter version of what you want to appear on the employees deposit transaction. Check with your bank for more information. |
ACH Transmittal Sheet Fax Phone # |
Enter the phone number which you want printed on the ACH transmittal sheet |
ACH Entry Description |
Description to be included on each ACH transactions. Example: “Payroll |
Add CR/LF after each record |
Adds a carriage line return after each line. |
Company Funding Information |
|
Payment Bank |
This is the six-character bank code of the account your funds will be coming out of. This must be set up in the Bank Master Maintenance screen that is on the ACH Direct Deposit Menu. If this is left blank, the system will create only employee deposit entries without a company payment entry. |
Payment Account |
This is the numeric bank account number the funds are coming out of (optional). |
Account Type |
C = Checking Account or DDA S = Savings Account |
Other |
|
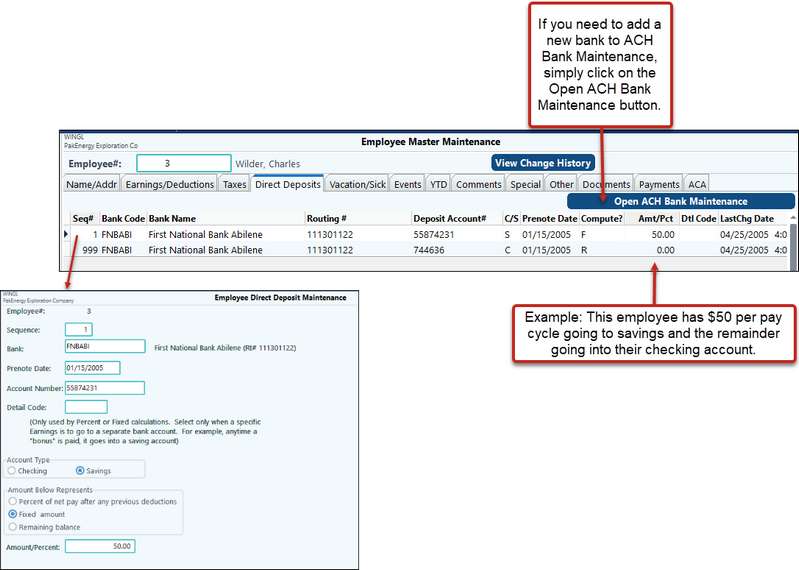
Open ACH Bank Maintenance |
Also see: ACH Bank Account |
Create ACH Prenote File |
This option will create a prenote file with all employee banking information to be sent to the bank for verification purposes. When the prenote file is created, the system will enter the date on the Employee Master/Direct Deposits Tab/Prenote Date field. |
NOTES:
•The file created during the cycle is located at GLN32\ccccc\ACHccccc.txt (ccccc represents your company code). The file is in a sub-directory called \EDI under their company file directory. ALL ACH files will go into this directory, not just those from payroll system. When the ACH file is created, and ACH file older than 60 days will be deleted.
•If submitting CCD type transactions, please notify your bank so that they can make preparations to receive these transactions.
Step 2: Set up ACH Bank Accounts
All bank accounts (to include the company and all employee banks) are setup here. Employee bank information can be obtained from a voided check.
•Enter up to a ten digit identifying code for the bank being set up. This code will be used for ACH transactions only and should not be confused with Sub-Account or Bank codes.
•Enter the bank name
•Enter the routing number for that bank.
NOTE: Many credit unions will use a different routing/transit number for direct deposit vs. what is encoded on their checks. It would be a good idea to call the credit union to verify the number.

Step 3: Set up Employee Master Direct Deposit
Setup the Employee information in Payroll > Employee Master > Direct Deposits. The employee can have unlimited bank accounts. Enter the employees’ bank, bank account number, account type, and how the deposit is to be allocated.
Step 4: Set up Employee Email to send Payroll Check Stubs for Direct Deposit Employees
1.In Payroll > Master File Maintenance > Advanced Options > ACH Direct Deposit tab, check the box for Email Zero Checks.
2.In Payroll > Employee Master > Name Address tab, enter the employees email address.
Note: If setting up for the first time, you will need to exit Pak Accounting. The next time you go into payroll there will be a new option on the “Payroll Cycle Menu” called “# 9 E-Mail Emp Stubs”. You do not have to run a special payroll cycle for email check stubs, just run your normal payroll cycle.
When you print payroll checks, you can view all the check stubs that will be emailed using the View All option.
Printing Historical Check Stubs
If you are printing a historical check stub, the vacation/sick hours for that check stub will be the current vacation/sick hours. For example, if you are printing a June historical check stub, the vacation/sick hours that print are for September, not June.
Step 5: Run a normal payroll cycle.
You can print a stub for the employee using the Zero Amt button on the Print Check option. Or even email the check stub to the employee.
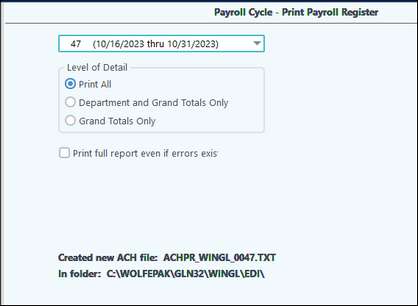
When you print the Payroll Register, an ACH summary page will print giving an ACH authorization fax sheet with the transmission information. It also gives you the location of the ACH file for you to send to the bank.
Step 6: Direct Deposit/Sending the ACH File to the Bank
Tip: when processing payroll and using the ACH feature, you don’t have to update the cycle before you send the file to the bank. The ACH file is created at the time you print your payroll register. Note: Pak Accounting provides the path of where the file is located for you to upload to the bank. When ACH is not set up this will not show on the screen.
Sending the file to the bank BEFORE you update your payroll cycle, will help if your bank finds any errors with the file. You will be able to change any bank information and resubmit the file. Or if you have accidentally put the wrong check date on your file, it is easy to recreate this file to send to the bank!
BEWARE though, there is a downside of doing it early before you update! If you submit the file to the bank and then someone comes along behind you and make changes to the cycle you will have a mismatch of data on your hands, i.e. what you sent the bank will not match what was recorded and updated via the payroll cycle!
Step 7: Sending Payroll Check Stubs for Direct Deposit Employees
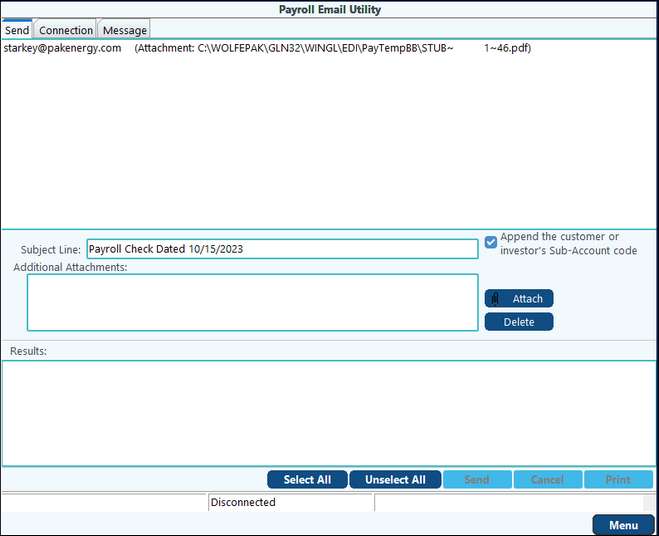
Use payroll cycle option #9 E-Mail Emp Stubs to extract the PDF file to send employees. There is a drop down to select which payroll cycle to send the stubs for and it will default to your most recent cycle. Select your Payroll Cycle, then click on Extract.
After you have extracted the information, the email utility will display on your screen.
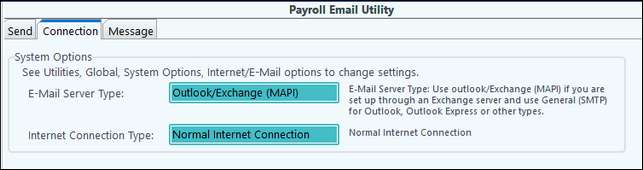
Depending on your type of email system you will need to fill in the “Connection” information on the “Connection” tab of the emailer. This is a one-time setup. For a “non” Outlook/Exchange Server setup, you will be using an “SMTP” connection (for common email providers such as Gmail or Yahoo). The login information (such as “Host”, “Port” and “User ID”) will need to be provided to you from either your IT department or your email provider.
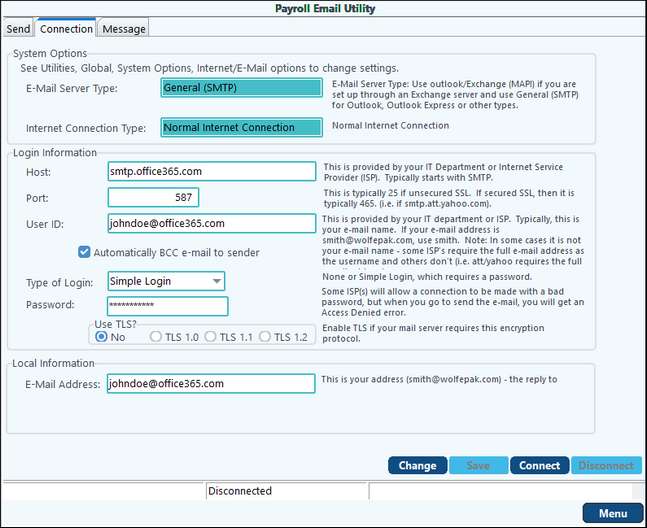
If you are using an Outlook/Exchange Server, your connection is called “MAPI” and the connection screen will look like this: