Adding a Group
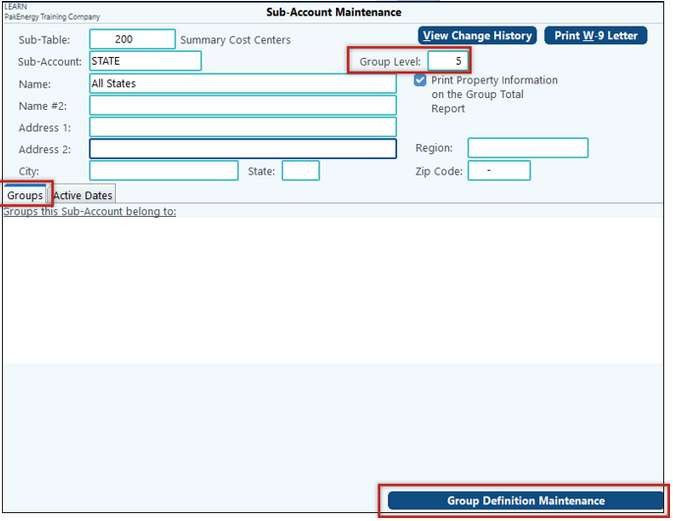
To set up a new group in the system, first go to Sub-Account Maintenance [F12] and click Add from the bottom of the screen. Groups are defined in Sub-Account Maintenance using Sub-Table 200. After you type 200 into the Sub-Table field, a slight restructuring of the Sub-Account Maintenance screen will occur. Each group must be assigned a unique Sub-Account. Also enter a numeric Group Level. After the group's name and level are entered into the Sub-Table 200, save the group. Now, on the Groups tab, the Group Definition Maintenance button is visible.
NOTE: When adding a new Group, the Group Level is automatically defaulted to level 5.
After the group's name and level are entered, press [F10] to save the new group, then click on the Group Definition Maintenance button on the Groups tab in the bottom right corner of the screen. A new screen opens: Reporting Group Definition Maintenance.
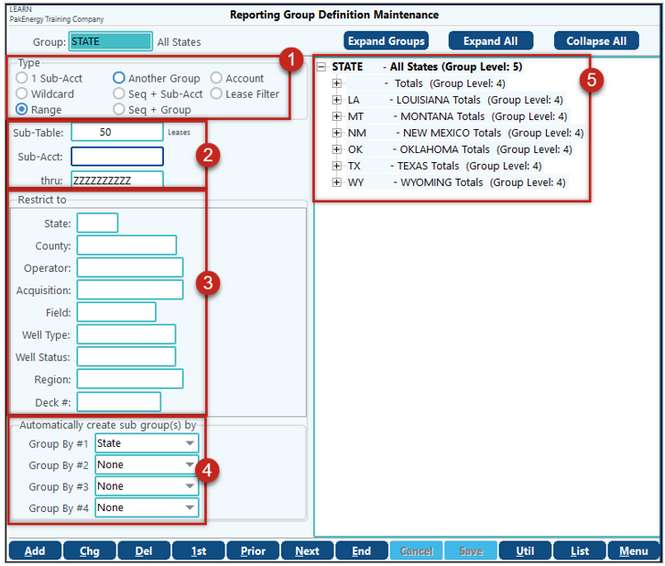
1.The Type sections will determine how you will pull in your Sub-Accounts. Range is typically the easiest and what we will discuss. There is more information on the other options at the end of this doc and in the Help menu.
2.Select the Sub-Table and Sub-Accounts. The Financial Group option was designed to work primarily with the Lease Sub-Table. It can be used with other Sub-Tables; however, you will notice there are not as many filtering options. The available filters are: State, County, and Region. All of which can be setup on the Sub-Account Maintenance for the individual Sub-Accounts.
3.The Restrict To section will allow for other filters. These fields can be found in Property Maintenance.
4.The Automatically create… section will sort the data. These fields can also be found in Property Maintenance.
5.The right-hand section will show the items pulled in per the filter and sort options. You typically will need to click on the “+” button next to the item to expand the list. Or, click on the Expand Groups or Expand All button at the top.
In the example above, all the leases will be sorted in State order. I selected Type: Range, used my Property Sub-Table and left the Sub-Accounts wide open to include them all. I didn’t add any filters and selected State as a Sub-Group. Notice, this will group my Sub-Accounts by state on the right-hand side. Any leases that don’t have a state defined will show at the top under a blank field.
The system allows you to set up the definition of the group's "members." Notice that there is a section on Reporting Group Definition Maintenance for making a Type selection. Select the option that best represents what the group is comprised of to create manual groupings. Individual Sub-Accounts can be associated with one or more summary groups. There are currently 8 methods that can be used to establish this association or link. The most common option is "Range" which will allow you add a range of Sub-Accounts at once. The Lease Filter will take you to a Grid Filter which will give a lot of filtering options.
|
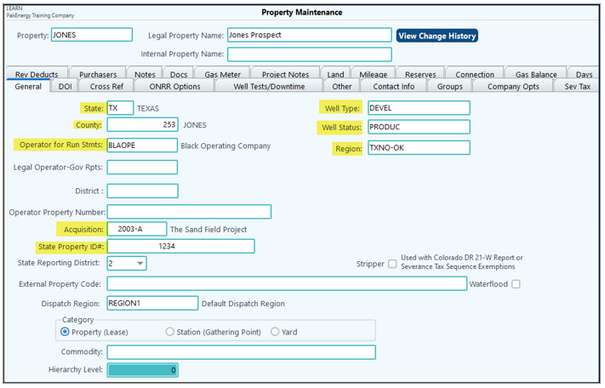
This section allows you to further filter your group. This is most commonly used with the "Range" Type. All these options are found on the property maintenance and must be populated for the Sub-Account to pull into the Group using these options.
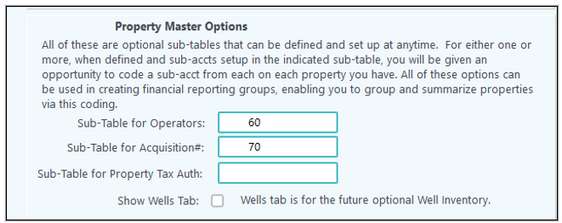
Note for setting up Operators and Acquisitions: Setup a Sub-Table for both Operator and Acquisition. Enter the Sub-Tables in Check Stub Company > General tab > Property Master Options.
In Sub-Account Maintenance (F12), add the operators and acquisitions information for each new Sub-Table. The above fields are found on the Property Master and should be populated when the property is entered. General tab: Acquisition, Operator, State, or State & County, State Property ID, Well Region, Well Status, and Well Type. Other tab: Crude Buyer and Field. Severance Tax Code is found on the Sev Tax tab.
|
Automatically create sub groups by: The preferred method for Oil and Gas users is the auto-grouping feature of properties. We have fourteen auto groups available: State, State & County, State Property ID, Operator, Field, Well Region, Acquisition code, Recode, First 3, First 4, Well Status, Well Type, Crude Buyer, Severance Tax Code and Civil Township. First 3 and/or First 4 (looks as the first 3 or 4 digits of the Sub-Account code and creates a group for like digits). Groups using these “auto” features automatically reflects the adding of new properties or changes made to existing ones (i.e. no manual maintenance of the groups is required).
NOTE: Civil Township is available for users licensed for Land. Additionally, Civil Township is an option only associated with Ohio properties.
For example, the "Group by #1" field, will be set to "StateCounty". The system will group the properties by state. Within each state grouping, the system will group by county. See below:
Note: The recode option allows for Sub-Accounts within a financial group to be recoded to view by groups. This is done by selecting the 'Use the "Optional Recode Investor Entries to Sub-Account" (found on Company Opts of Property Master". Next, on the Company Master > Company Opts tab, Enter a Sub-Account in the "Optional Recode Investor Entries to Sub-Account" field. |
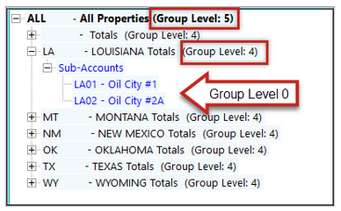
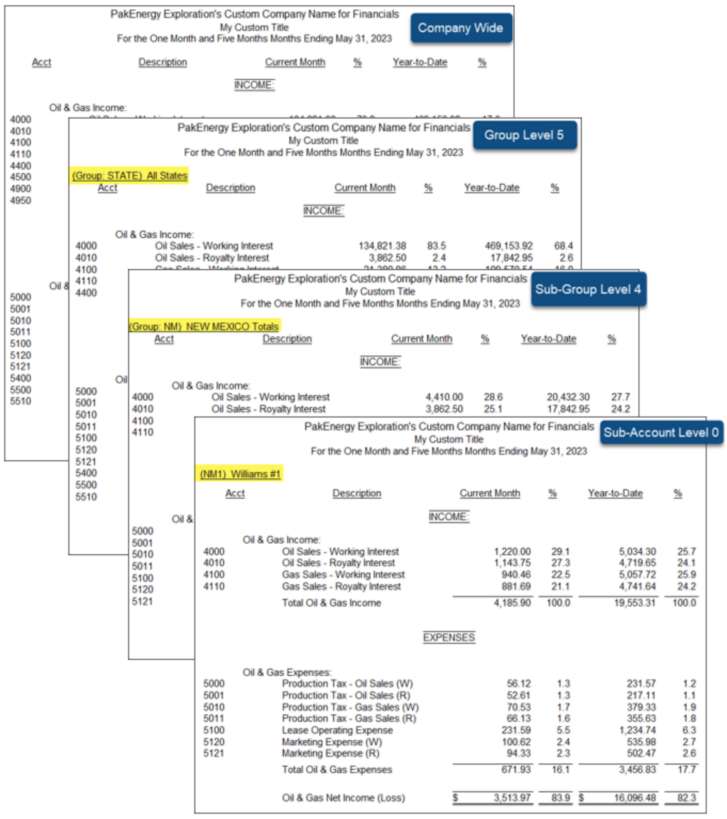
Demonstrated in the visual aid below is the hierarchy to the levels that are assigned to a Financial Group.
In the above example, each individual Sub-Account (Property) is at the lowest level, zero (0). Each State is at level 4 and the top group, All States, is at level 5. The maximum Group Level that can be assigned to a group is 9; the lowest level of detail is the Sub-Account level at 0. The Group that is all-encompassing should be designated as 9. Note that the system defaults the Group Level as 5 when a new Group is added, but it can be changed to whatever value is appropriate for that Group.
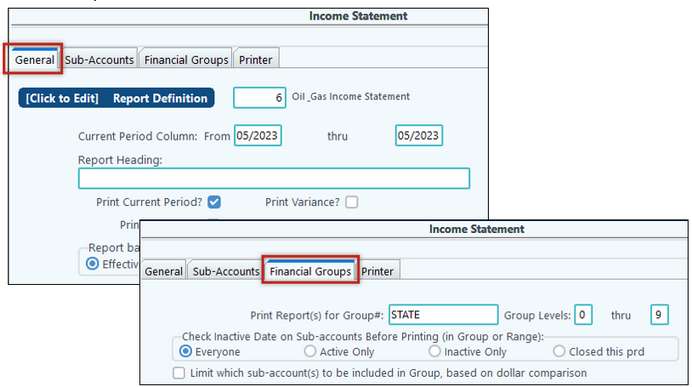
But, what does all of that mean? These levels indicate at what level we can run those reports. So, for example, if we just wanted state totals but not the individual wells, we could run our reports for Level 4. Once you “Save”, the groups are automatically created and available for printing financial statements. For example, running the Income Statement for financial group STATE will produce a statement for the entire company (if the option is checked on the Sub-Accounts tab), a group-wide statement for all groups together, a group statement for individual groups, and statements for the individual properties within the group that have activity
|
•Changing a Group (via Sub-Table 200)
If a group's definition(s) are to be changed or a new definition added, you will need to first pull up the group via Sub-Account maintenance (Sub-Table 200, Sub-Account is the Group Code). This can be done by using the Find, Next, Previous options or immediately after adding the Sub-Account. With the group being displayed on the Sub-Account maintenance screen, select the Group maintenance option. This will allow you to perform maintenance (add, change, delete, etc) on any of the definition types for this group.
•Adding a Sub-Account (property) to an existing group
After a new property (Sub-Account) is added, it will either be automatically associated with one or more groups (if the groups are defined with ranges and/or wildcards) or it will need to be manually associated with the proper group(s). If it is to be manually associated with a group, select the Group Maintenance option immediately after the new Sub-Account is added (i.e. the new Sub-Account is still on the screen). Then select the "Add To Group" option. The system will then prompt you for the group you wish this Sub-Account to be added. A pop-up window is available via the "?/" key if you are unsure of the exact group code. The “Add to Group” option can be performed multiple times for the Sub-Account if it is to belong to more than one group.
If you want to see which groups this Sub-Account is already a direct member the Group tab will list all of the groups that the Sub-Account is a direct member of (i.e. individual definition, wildcard or range). The list will not include any indirect memberships (groups of groups).
•Group List Options
There are two different types of group listings. Groups for a Sub-Account will list each Sub-Account in a specified Sub-Table and Sub-Account range. Under each Sub-Account, the system will list the group or groups that this Sub-Account is a direct member of. For each of these group(s): it will list by which definition it qualifies for, the group name, the group level, and the inactive date of the group.
The second type of listing is by Groups. The Group Definitions listing will list each group in the specified range. Under each group, the system will list each definition that is used to define the group's membership.
Also see:
Financial Summary Groups for description of groups
Financial Group - Account Option
Financial Group - Lease Filter
