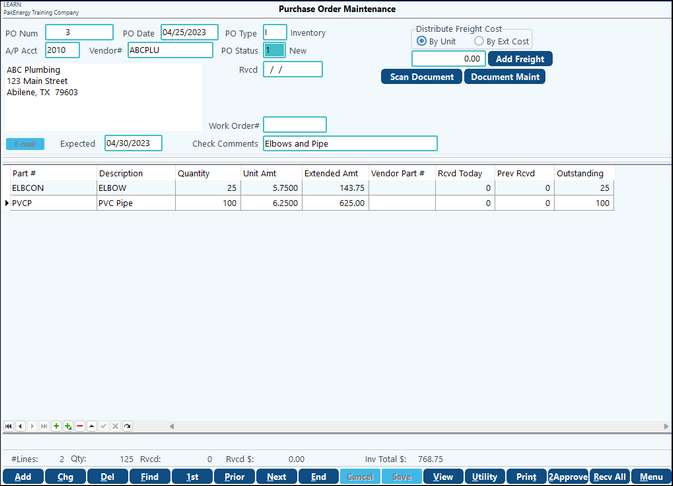
The purchase order maintenance screen is used to enter and update purchase orders. It is very similar to the invoice entry screen.

Enter |
|
PO Number |
If the system is automatically assigning this number (see Next Number Assignment), leave it blank, the number will be filled by adding (1) to the last purchase order number. If this number is not acceptable, it can be changed by typing over it (up to 8 characters, alphanumeric). Duplicate numbers are not allowed. |
PO Date |
This will be filled in automatically with the current date, if you are entering past POs, fill in the proper date. |
PO Type |
This field represents the type of purchase. I - Inventory: Indicates the purchase of a normal inventory item, which become part of your stock-- either for resale, or for use in the manufacturing process B - Buyout: Items bought as a one-time purchase T - Transfer: Used to transfer a product from one store (ie. separate Pak Accounting company) to another. V - Value-Added: Used to indicate a product temporarily removed from inventory in order to modify it, thus adding value. For example, if your company sells plastic-coated wing dings, you might remove 6 wing dings (part# WD-200), plastic-coat them, and add them back to inventory as plastic-coated wing dings (part# WD-201), at an increased value. |
Vendor # |
Enter the vendor's Sub-Account code that represents the company you are purchasing the product(s) from. The system will display the name to the right of the number. NOTE: This Sub-Table/Sub-Account is shared with the Accounts Payable System. |
PO status |
1: New, 2: Printed, 3: Received Partial, 4: Received All, 5: Approved for pmt (only if sending entries to A/P) |
Distribute freight cost |
Freight can be allocated on a pro rata basis to the parts either by Unit or by Ext Cost. Enter the freight amount in the field and select Add Freight. |
Work Order # |
Reference field for a work order |
Expected |
Enter the date you expect to receive the order. This date appears on the List By Item Number report. |
Check Comments |
You may enter any comments about the purchase (unlimited text), or leave the field blank. This field prints on the Purchase Order and on the Purchase Order Listing. If you have the PO Approval enabled so your A/P entries are generated automatically, this field will be used as the A/P entry description on the General Ledger entries. |
BOTTOM OF SCREEN - The remainder of the purchase order input screen is used to enter items bought. When you enter the part number, the system inserts the default price per unit and description in the appropriate fields. |
|
Part Number |
Defining your parts with a sensible naming scheme like this can simplify data entry considerably. Enter the Part # to be ordered (as set up in Parts Maintenance). If necessary, use the lookup to look up the number in the parts file. If the unit price is changed, arrow up or down to recompute the extended amount. |
Description |
The first line of description from the parts files is displayed. If the field Allow Description to Be Overridden on the parts master is marked Y, then the description can be modified here. |
Quantity |
Enter the number ordered for the item |
Unit Amount |
The average price per unit of items previously purchased |
Extended Amount |
The total dollar amount for the item. If you entered the Price/Unit, the system will calculate the Ext Amt for you. If you enter a value in this field, the system will calculate the individual cost for each item, by dividing by the quantity. |
Vendor Part# |
The vendor part number from the parts master. This can be changed here, but it does not permanently change the part master. |
Rcvd Today |
If the stock has been received, enter the number of items received today. If this is simply an order, leave this field zero |
Prev Rcvd |
Running total of items received for this purchase order. |
Outstanding |
Number of items not yet received |
NOTE: The Find menu allows you to find a particular record and display it on the screen. If you have a Prefix defined for your invoices, the prefix will show as part of the prompt in the Purchase Order: field
Util button in Purchase Order Maintenance:
Copy Intercompany Transfers – allows the transfer of inventory from one store to another.
Copy PO – If Split PO between received and outstanding is checked this will copy entries from PO that are not Recd All to a new PO. Also allows for a new vendor to be assigned, ie. BACKORDERS. If the box is not checked, copies exact PO to a new PO.
Apply Receipts to PO’s
To Apply Receipts (record the arrival of ordered stock at the store) use the Enter PO screen.
To revise a purchase order with the quantity received, use the Find, Next, or Prev options to locate the purchase order that the merchandise relates to.
Click on the bottom part of the screen and enter the total received in the Rcvd Today field. You can change the PO line-by-line, or choose the Recv-All option to indicate that all merchandise ordered on the PO has been received.
Approve PO’s

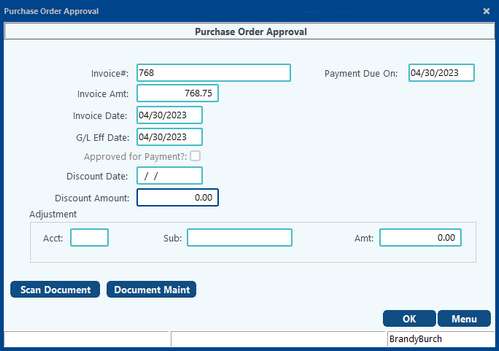
When you are ready to create the General Ledger entries (inventory and A/P if fully received) click on the 2Approve menu at the bottom of the screen. Enter in the information you would like on the A/P Invoice. The Approved for Payment box must be checked to create the A/P Entry when PO is updated. Click OK. The entries are now ready to be created during the Update step.