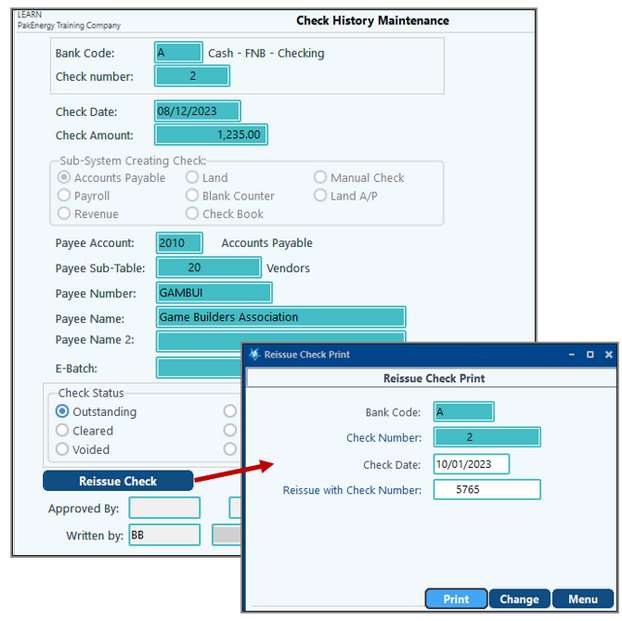
Before going into how to void a check, let's review how to REISSUE a check.
This option is useful in the event where the check was lost, misplaced, or accidentally destroyed. This feature can be found in the Bank Reconciliation module under Check History menu item. You can easily print a replacement check for the participant thru Bank Reconciliation.
NOTES:
•If you have already voided your check or it is not currently Outstanding DO NOT USE THIS OPTION. Call your Support Team for further assistance.
•Even though we are talking about A/P, this is also available for Payroll checks.
•This will make an in and out journal entry into the cash account so there will be a paper trail. No other journal entries are needed.
•This is not a 1099 or W-2 (if Payroll) event, so if reissuing checks for a previous year you can still use a current date and will not need to worry about correcting or manually overriding your tax forms. The original check date will be used for reporting purposes.
Go to Check History and “Find” the check that needs to be replaced. There is a Reissue Check button – click on it and the system will use the next check number to print your replacement.
You will only see this button if the check is still outstanding. If this option is not available, call your Customer Success Team for alternative options.
The Reissue Check Print screen will appear. Click “Print” for the new check to print. This feature does not honor any signature files that are enabled.

Void A/P Check
The Reissue Check option is only if the payee and amount are correct. If something is incorrect, then the check will need to be voided and replaced. When a check is voided, it makes reversing entries for the payment and flags the payable invoice(s) as an open item to be paid again. If the invoice(s) should not be paid again or changes are needed, you can use the Un-Update Open Invoice or Void Invoice options from the Accounts Payable menu.
Enter in check to be voided
•Enter the Bank Code,
•Check # to be Voided
•Optional Field: The "Only look for invoices dated on/after" field allows you to tell the system how far back to look for various invoices that make up the check. This would be used to help make sure all related invoices are put back into open item status. If we go back to the beginning of time looking for invoices that are associated with this vendor and check #, the higher our chances of finding an invoice that doesn’t actually belong to the check being voided. If the check chosen has already been voided, an error message will appear stating that the check has already been voided.
Review the information
•The system searches the bank reconciliation file to determine the status of the check.
•The system will either display the check detail or issue a message that indicates the check is not outstanding. (Check will not be eligible for voiding if it is not outstanding).
•If the displayed check detail is not the check you wish to void, re-enter the correct check number.
Finalizing the Void
•If the check detail is correct, click "OK" to begin the voiding process.
oWhen possible, use the same effective date of the check as the effective date for the check you are voiding. This is so the original entry and the void entries will be in the same month and will zero out during the Bank Reconciliation. However, if the bank rec period is already closed for the original date, then go ahead and use the current date.
oThe system voids the check in the bank reconciliation file, and creates a General Ledger entry that debits cash and credits the vendor's Accounts Payable account.
oAll invoices associated with the check for that vendor are placed back into open item status. The invoice does not need to be reentered in "Enter Invoices to Pay", the void will return the original invoice back to an open item status and be eligible for payment.
Next Steps
•Re-issue the A/P check OR
•Correct the invoice, if applicable. You can use the Un-Update Open Invoice or Void Invoice options from the Accounts Payable menu.
NOTES:
•Reference numbers for the void entries are automatically generated. See next number assignment
•If you back date a void into a period already reconciled in Bank Reconciliation, an error message will appear asking you to choose a void date that is not in a closed reconciliation period. If the void date must be in the completed reconciliation period, you will need to re-reconcile the applicable bank statements.
•Cash Basis Company: when voiding a check an additional box will pop up asking what to do with the invoice. You can either void the invoice along with the check or make the invoice an Open Invoice.
•Draft (E-check): Also see How do I void a draft? Remember, when a draft is posted, it is automatically marked as cleared since the system assumes the transaction is happening real-time. Since only an Outstanding Check can be voided, you will need to first change the E-check from Cleared to Outstanding before voiding.
Go to the Bank Reconciliation module/Master File Maintenance/Check History and "Find" the draft that needs to be voided. Make the draft outstanding again by choosing the outstanding option in the "Check Status" box. Then "blank" out the Date in the "Check Status" box. This can be done by placing your cursor in the month part of the date field and hitting the space bar on the keyboard twice. Then, follow the process to void as a normal check.