If you would like to determine which checks will be printed, review the Open Item Report. This report will show the invoices the system is going to print checks for. You can then decide which invoices to pay.
When you first click "Pay A/P," you will need to Select the A/P account from which to pull the open invoices.
Notice that you will be provided with a cash balance on the A/P Account Selection screen that will display what the cash is after checks are written. If a user has been restricted from viewing a cash account, they will be unable to see the cash balance on this screen. The balance will also be unavailable if the user does not have access to the Ledger Listing or View Trend (F4.
Enter the information for the checks you are going to pay.
1.The Bank Code will default based on the A/P Account number selected. However, you can use the drop-down menu to override this. Changing the Default Bank Code
2.The First Check # to print will default based on the next available check number for the Bank Code indicated. This should match up with your check stock. If this number does not match up with what you think should be your next available check #, call your Customer Success Team for suggestions on getting this fixed.
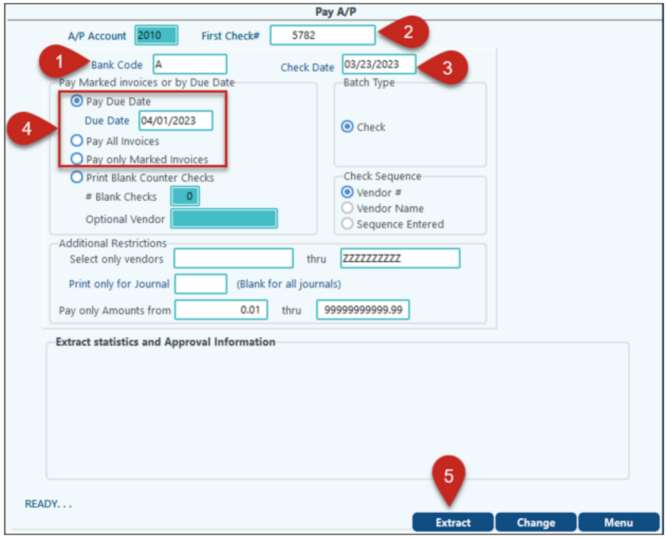
3.Enter the Check Date to be printed on the checks and the paid date to be posted in the G/L. This will default to the current date but change be changed.
4.Select a payment option:
A.Pay Due Date and enter the Due Date you wish to write checks through (pays all invoices open up to that due date),
B.Pay all invoices (pays all open invoices regardless of due date),
C.Pay only Marked Invoices if specific invoices were marked for payment on the A/P Mark Invoices to Pay.
D.Print Blank Counter Checks - prints preprinted checks using the MICR encoding and no vendor, amount, etc, so they can be used to write manual checks off site (i.e. Walmart). Option to include Vendor Payee information on the check. NOTE: Does not print a signature if using the digitized signature.
The rest of the options on this screen are rarely used.
Check Sequence - Enter the order you want to checks to print:
•Vendor # - Alpha/numeric order by Sub-Account code
•Vendor Name - alpha/numeric order by vendor Sub-Account name
•Sequence entered - the order it was entered into Enter invoices to pay.
Additional Restrictions
•You can select one vendor, a range, or all vendors to print checks. To select all vendors, range must be Blank thru ZZZZZZ.
•You can specify a certain Journal to print checks from.
•You can specify printing checks only over/ under a certain dollar amount. For example, to only print checks under $500, set range from 0.01 to 500.00.
5. Once you have selected the invoices to print, click on the Extract button.
•The system will calculate the number of checks/vendors to be paid, the check numbers required, and the total dollar amount and display the totals in the extract statistics section. Compare the totals on the screen to your Open Item report before printing any checks.
•If you wish to review the invoices to be paid, select the Review button. The expand (+) will allow you to review the open invoices for each vendor that will be paid as well as any associated documents.
oTo view the document, click on the document icon. The document viewer will retain the zoom setting that is user specified.
oClick on the Y/N in the AP column will take you to the A/P History screen, where approval and change event information is available for review.
oRight-Click on the detail invoice Grid to access options to View Journal, View Document (if applicable), or View A/P History.
•If information is not correct, select Clear Extract to start over.
NOTE: checks cannot be extracted or printed for a check date that is on/before the last reconciliation for the bank code.
6. If the information is correct click on Print Check. You have the option of printing one check at a time or all of the checks at once.
NOTE: If there is a password being used for A/P check writing purposes, the checks can still be printed unsigned if the password is not entered. See Bank Account / Signature Options.
After you have printed the checks, you will be asked, "Did all checks print OK?". STOP!!! We all know things happen. Checks get put in upside down, paper jams happen, toner runs out; this menu item can easily correct issues that occur during printing.
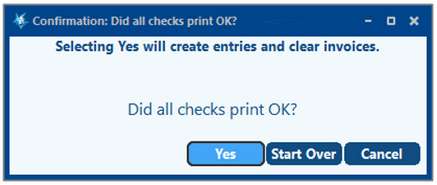
•Yes - will post the entries and clear the invoices from the Open Items list.
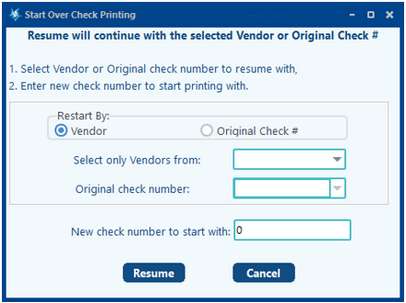
•Start Over – will allow you to restart the printing at a specific Check number or at a specific vendor. Say for example your check run consists of 100 checks, after printing the 50th check the printer jams. This will allow you to clear the jam, click on Start Over, then tell the printer to start reprinting at a specific Vendor and/or Check. If using blank checks, the Original and New check numbers can be the same. If using Pre-printed checks, these will need to be different.
•Cancel - will close the printing as if nothing ever happened. Meaning no entries will be made. Use extreme caution if using this option. Make sure if any checks are actually printed, they get shredded and not accidentally mailed. For example,
if checks are printed and mailed, but the Cancel button was selected, then during the Bank Reconciliation, there will be checks on the Bank Statement that are not recorded within the system.
When the checks have printed and are correct, they will be posted to the G/L accounts, and the bank reconciliation files will be updated. When the system posts the entries, it uses the default journal number 70 (Unless this journal number is changed on the bank account setup. Year to Date reports can then easily be produced using the normal ledger report with the journal range option.
NOTES:
•The system has space on the stub for two name lines, three address lines, and a memo line without overlapping the invoice box. If the AP stub data extends beyond one check stub, the information will overflow to the next check stub and void the check.
•If two users are trying to print checks at the same time, a Lock Error will pop up letting one of the users know that the table is currently locked and it will display the other user who is currently writing checks.
A check register can be printed if needed, under Check Register Listing.
See Also:
Recording Manual checks to posted A/P invoices
Voiding and reprinting A/P checks