Pak Accounting has the ability to set up a Sub-Account as an allocation for transactions (ie. Journal entries, invoices). Any place a Sub-Account can be coded (A/P Entry, Unposted Entries, Payroll, DOI, etc), a #Sub-Account can be used instead. Once an entry with a “#” Sub-Account is posted, the entry is “allocated” out to the various Sub-Accounts based on how the allocation is setup (Allocation Master Maintenance).
Set up a # allocation Sub-Account in Sub-Account Maintenance (F12)
1.Click Add, enter in the Sub-Table for the item to be allocated (for example, if allocating lease and well expenses use Sub-Table 50). The Sub-Account must start with a # sign. The name will be the full name of the allocation. Click Save.
In the example below, I'm creating allocation #TXALL for all of my properties in Texas.
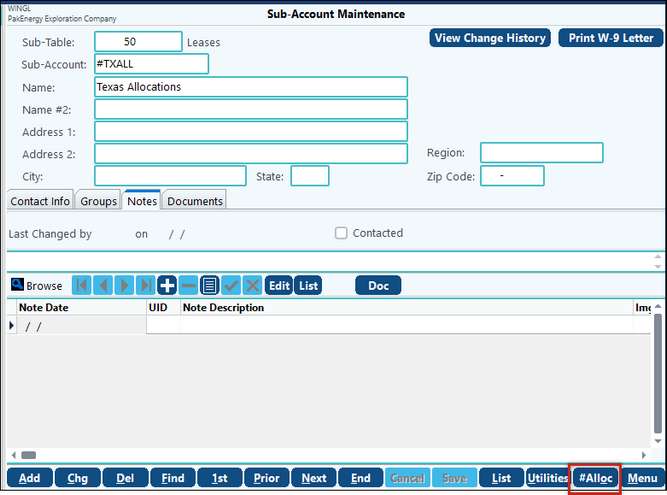
2.Once saved, click on the #Alloc button in the lower right-hand corner of the screen (see screen shot above). If you do not see this option then the Sub-Account code was not set up correctly; make sure it begins with the # sign. This will open up the Sub-Account #Allocation Maintenance window. (See example in the screen shot below:
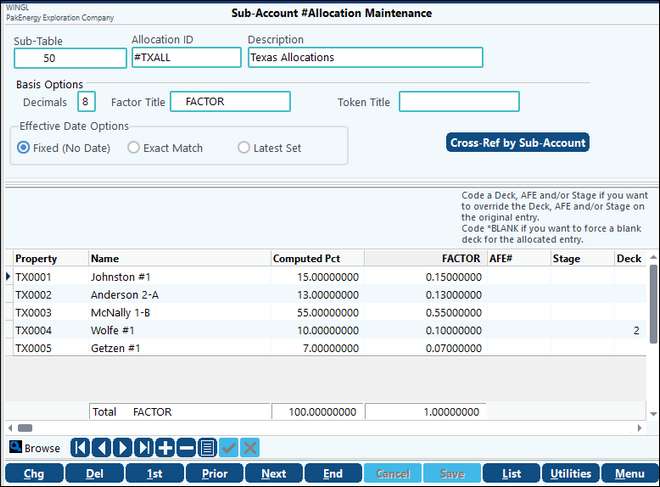
NOTE: Most allocations are setup on a % basis, where each Sub-Account gets a set % of the total amount being allocated.
3.Add the individual items that should be included in the allocation. Click on the plus button at the bottom and add the Sub-Accounts to which the entry will be allocated (the Sub-Accounts must already be set up in the Sub-Table indicated). See the table below for information on setting up the individual fields.
4.Once the allocation is set up, you are ready to enter in entries that use the # allocation Sub-Account (A/P entries, journal entries, Payroll, DOI, Check Stub, etc).
a.Upon posting the invoice, the allocation is generated and the entries are posted to the individual Sub-Accounts as defined in the # allocation. These can be seen in View/Trend and in other reports.
b.Deleted Interest may be used with this feature only if all properties have the same deleted interest percentage.
The List button allows you to print the Allocation Master Listing for selected Sub-Tables, Allocation ID's and for certain effective dates. The File button under list allows you to export the # allocation as a XLSX, XLS, or CSV file.
# Allocations |
|
|---|---|
Sub-Table |
Sub-Table used in allocation. |
Allocation ID |
The Sub-Account pertaining to this table. This must begin with a # sign. |
Decimals |
Sets the number of decimal positions in the allocation. |
Title |
You can change the word "Factor" to reflect any unit of allocation you need (i.e. wells, mcf). |
Effective Date Option: |
•Fixed (no date): This option is not date sensitive. This is typically used if the percentages to each property do not change. •Exact Match: Date field will appear for you to enter the exact date. You must have a specific Production Month for the allocation to work. (Normally used for Check Stub when you are sending revenue entries to be disbursed.) •Latest Set: Will allocate based on this set until a new one is created. |
Cross-Ref by Sub-Account: |
Click on this button to get a list of all of the allocations a Sub-Account is in. |
Sub/Property |
These are the Sub-Accounts to which the entry will be allocated. The Sub-Accounts you enter here must already be set up in the Sub-Table indicated. |
Computed Pct |
Computer calculated - read only field |
Factor |
Use the factor field to specify how you want the entries to be allocated. The ratio for the allocation will be based on the individual Sub-Account factor divided by the total factor. |
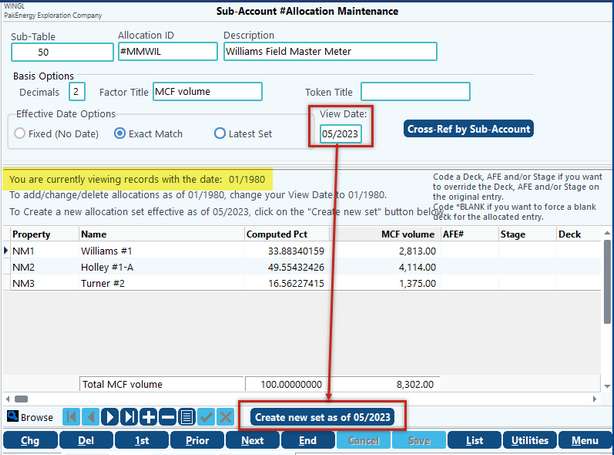
Example 1: EXACT MATCH. We need to setup a Master Meter for Williams field. For this meter the percentages change each month, so we will set this up as an Exact Match to we can enter in the MCF volume breakout for each production period.
1.In the General Ledger module > Sub-Account Maintenance (F12), the Master Meter is set up as Sub-Account #MMWIL in Sub-Table 50.
2.We are needing to add a screen for May 2023 so enter "05/2023" in the view date. Since an allocation doesn't exist for this date yet there will be a box at the bottom that says "Create new set as of 05/2023". Click on this button.
Note: Be careful when looking at the dates. The View Date will default to the month/year you are currently in since the system is assuming you are going to create a new date specific allocation. However, the date you are truly in will show just below.
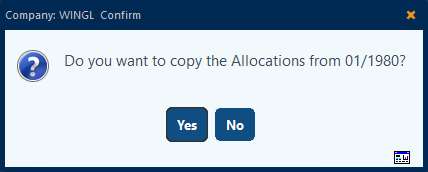
A popup will appear asking if we want to copy the Allocation from the previous period. In this case, the date is 01/1980, click Yes.
We now have an allocation for May 2023 that we can work with. Enter in the MCF breakout for this period, click Save.

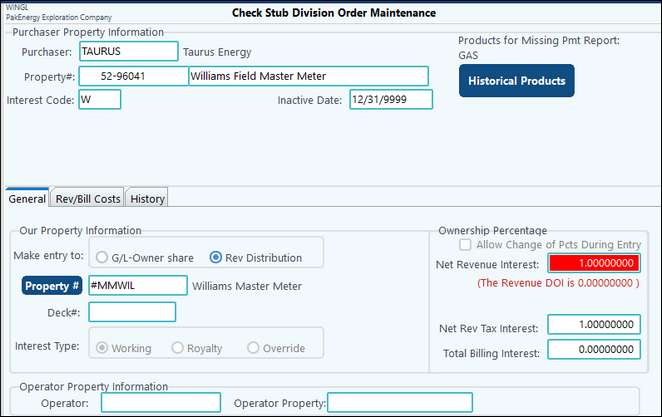
3.Set up Check Stub > Division Order: the Division Order for the Williams Master Meter using the Purchaser’s property #. The “Send Entries to” Property # is our new #MMWIL. If the NRI doesn't default to 1.0000000, change it so that it does. Don't worry that they NRI is red, this is because the #alloc is not setup in the Rev/Bill DOI, but the individual properties.
4.Once the Division Order has been created, look at our entries in Check Stub > Enter Deposits/Stub from Taurus (the Purchaser). Notice the volumes entered match the #ALLOC setup.

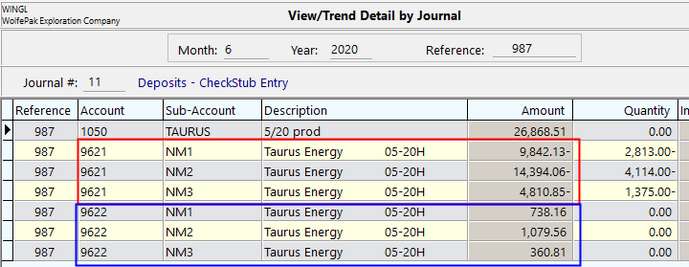
5.After posting the Check Stub we can look at the entries in View/Trend. We can see how the sales (red) and the taxes (blue) where broken out according to #ALLOC setup
 .
.
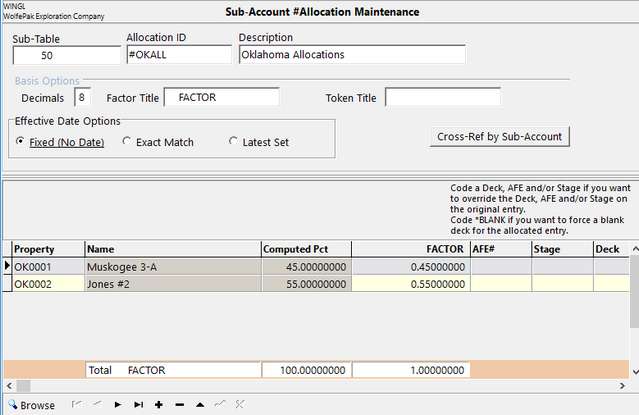
Example #2 - FIXED We are going to setup an allocation for our Oklahoma properties. The volumes change each month; however, the percentages to each property do not change. So, we are going to set up a Fixed (No Date) allocation.
1.In the General Ledger module > Sub-Account Maintenance (F12), set up Sub-Account #OKALL in Sub-Table 50.
2.Check the Fixed box and enter in the properties. The Factor will populate the Computed Pct fields.
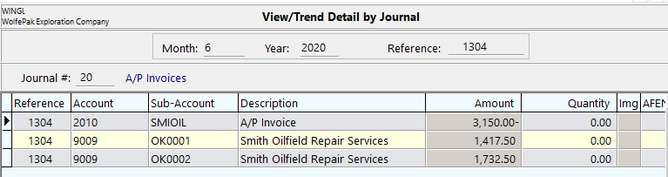
3. Since we showed and example in Check Stub, let's use Account Payable this time. Entering in an A/P entry via Accounts Payable Menu, Enter Invoices to Pay. Post the invoice.

4. After posting the invoice we can look at the entries in View/Trend. We can see how the billing account was broken out according to #ALLOC setup.
Example #3: Using the Token field.
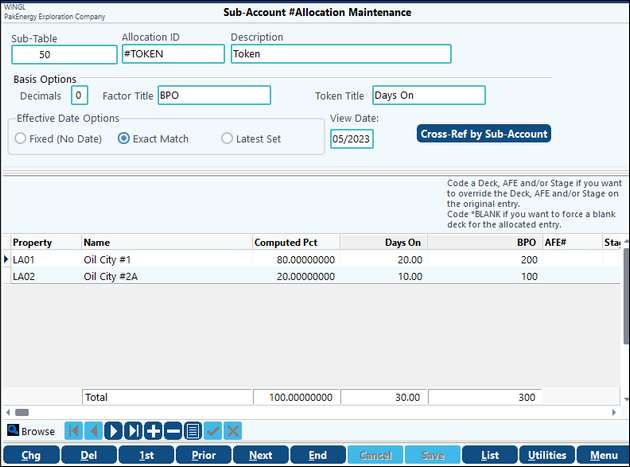
NOTE: Pak Accounting provides the ability to import from Excel. Click on the #Alloc button by the Menu button and then click on the Utilities button / Import Set to see the import format. Required Header Columns are: AllocID, Sub-Table, DateOpt. Optional Header Columns: AllocName, BasisTitle, TokenTitle,BasisNDec. Optional Detail Columns: EffDate, Property, DeckNum, AFENumber, AFEStage, Basis, Token.