Summary Report Level Options
If it is necessary to summarize a report that is too long, the new summary report level options will complete this task for you. The example below will show how the new Summary Level options work within the context of an Income Statement. Additionally, the example will show how to correct any errors that the Verify report feature may show.
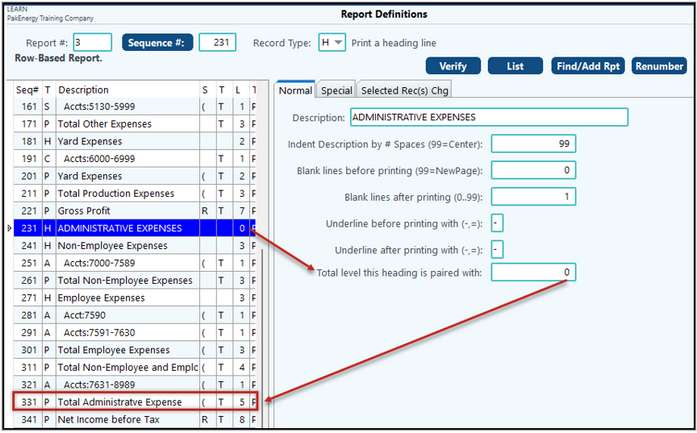
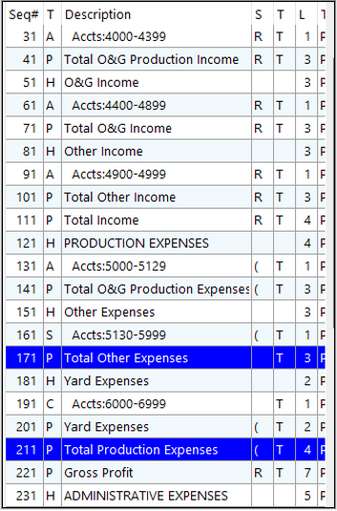
First, get familiar with the total levels that are being used on the report. Usually they start at 3, then 5, then 7, etc. There are two easy ways to do that: (1) the Trend Report’s Print additional column for Seq#-Total Level or (2) The Report Definition listing.
TIP: Keep Trend listing to double check. If changes are made to the report, rerun this same report and compare the two to make sure the original listing doesn’t change!
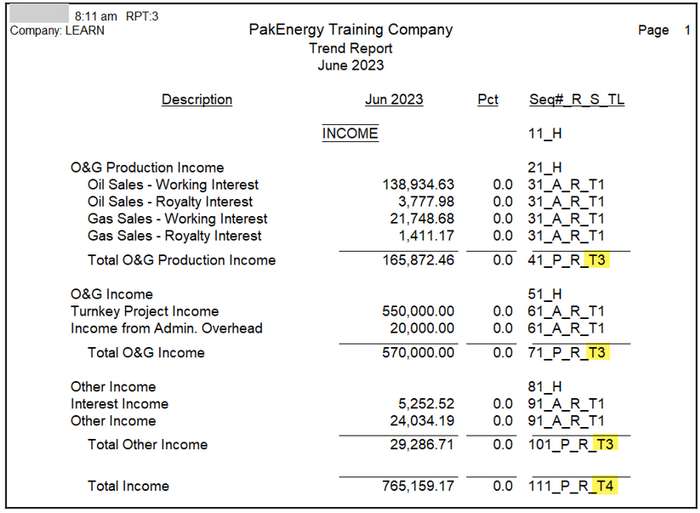
Trend Report with Print additional column for Seq#-Total Level specified:
Report Definition listing:
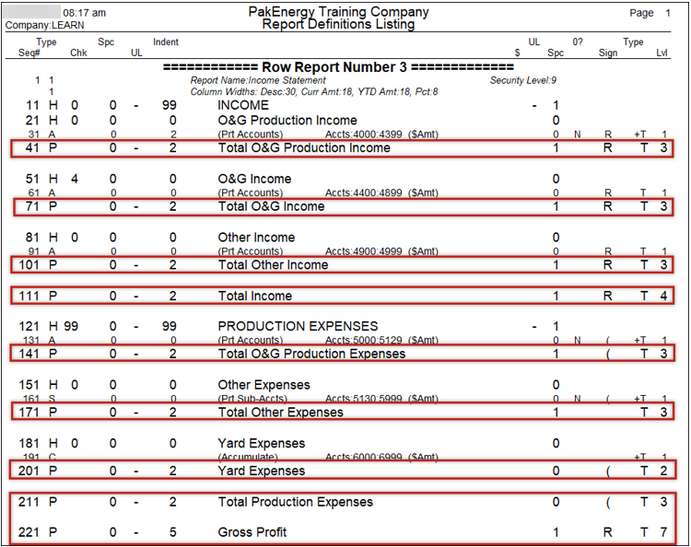
With either, you can quickly see that Level 3 is where most of our totals start, with the next level starting at 4.
We do note one odd-ball in the above listing reflected for sequence 201, Yard Expenses at level 2. Keep an eye on this guy!
Let’s see what our report looks like starting the printing at level 3. Our new feature is facilitated via settings on record type “1”. To begin our journey we will edit the report’s “1” record. This “1” record is always the first record (Seq# 1) of a report definition.
The first time we use this, we’ll need to change the “Optional Summary report level” from 1 (not used) to 3.
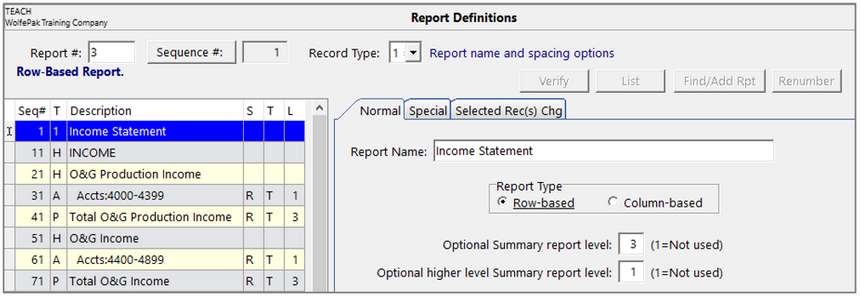
F10 to Save. Notice the system will ask the following question regarding automatically assigning total levels to the "H" record types.
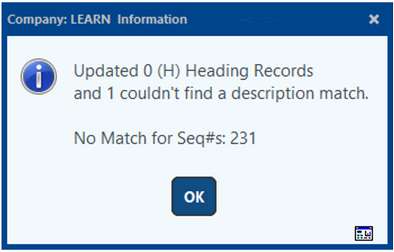
We will click on "Yes" and let Pak Accounting finish coding our “H” records for us, but may find one that it can't match up. This will have to be manually coded.
What the system did for us was assign the heading a level that goes with (i.e. matches up with) the total level.
The assignment/matching will automatically take care of the following items for you so that you do not have to go back and adjust report definitions. It automatically removes the word “Total” in front of the totals. It handles and matches up headings/totals where one is plural and the other was not, such as expense vs expenses. It can also handle spacing differences, and removes from consideration special characters such as : (colon) ; (semicolon) .(periods) and , (comma). What happened to Seq# 231?
Occasionally, you may need to make corrections for spelling as in the example below:
We’ll go ahead and manually code Seq# 231 “H” and put a 5 in the Total level this heading is paired with and then we’ll go ahead and correct the spelling on Seq# 331. Or we could correct the spelling and go back to Seq#1, change our Summary level back to 1 then back to a 3, and let the system make the assignment.
Run the income statement using either the “Income statement” format or the “Trend format”.
If we select the report, we’ll notice a new option on the screen:
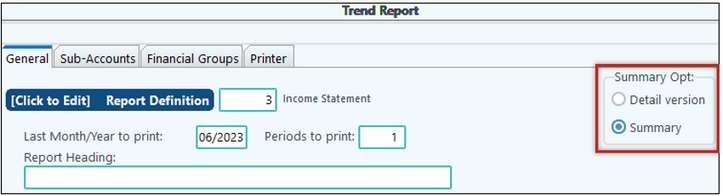
We’ll select the “Summary Opt” – Summary Option.
This option immediately scales the report to 1 page!
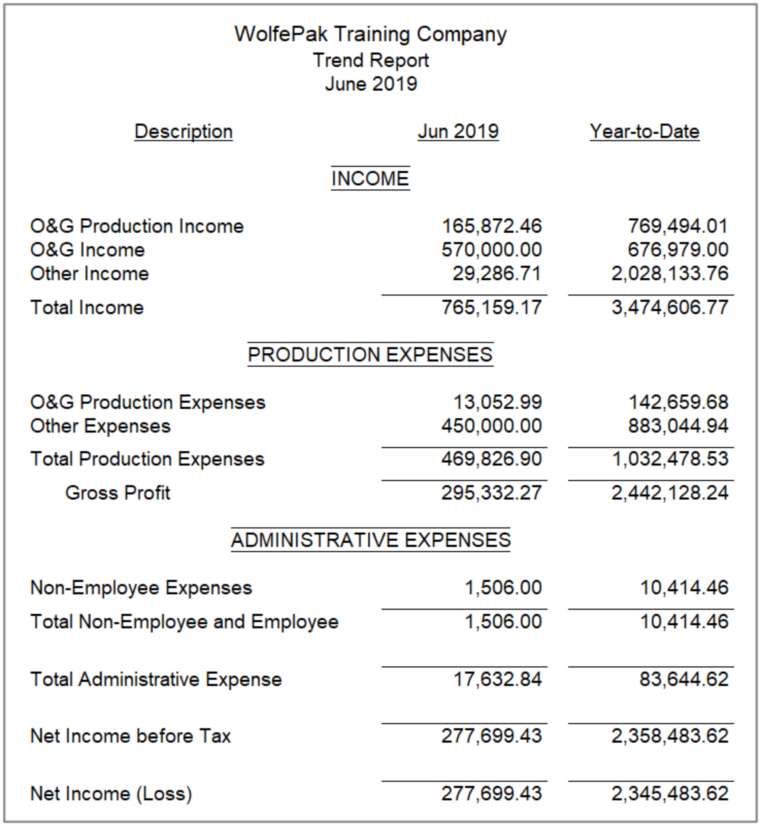
But how is the report? Are there any hidden amounts because of the totals levels? Go back into Report Definitions and run a “verify” now that we have level 3 defined as a summary level.
Click on the ![]() button.
button.
Then the ![]() button.
button.
Take the defaults and View the report.
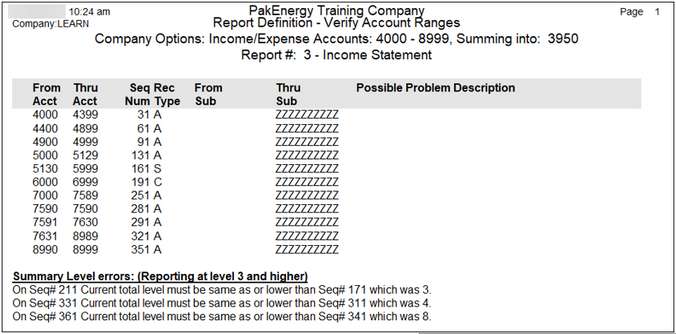
The Verify Report will show 3 “errors” that we’ll need to look at:
We’ll use the new “+” total level to fix this.
Click on Seq# 181 and Ctrl-Click on 201. This takes us into “Multi-Select” mode (i.e. we have more than one line selected at the same time.) That should highlight both the “H” and the corresponding “P” record. The click on the Total Levels’ “+” button.
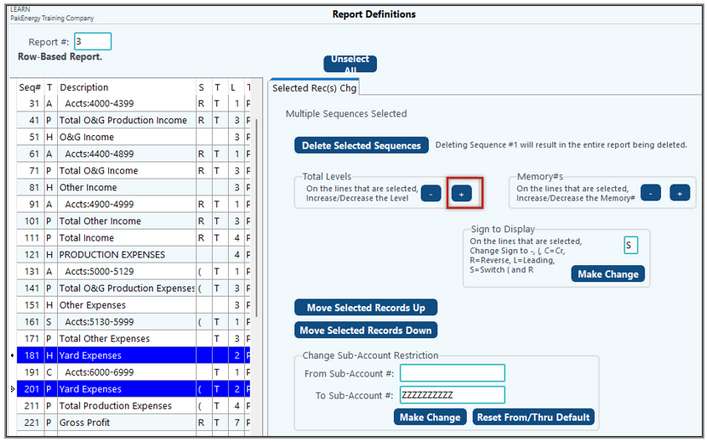
That will change the 2 on both records from a 2 to a 3.
Click on the “Unselect All” button to return to normal maintenance mode, return the “Verify” option, as well as all other tabs. Select it and run Verify again with the default options.
That got rid of the first “error”. We’ll move on to the next. (#331 & #311)
Since the Total on 331 is at a higher total than 311, 331 includes 311 plus the accounts that normally print in Detail on the detail listing without its own sub-total prior to the new Accumulative total “Total Administrative Expense”. Since our “Summary” starts at level 3, that means the accounts defined with seq 321 (Accts: 7631-8989) aren’t printing.
If we look at our original detail report, we’ll notice that perhaps we left out a total that we probably should include. We’ll add a new section heading and sub-total on the detail report.
We’ll insert a new Heading and sub-total for that series of accounts. In review of this section as a whole we see that this set should be at a level 4. Click on Seq# 311 (since we want to add a line directly below 311), then click the “Add”. The system will respond by adding Seq#312. Change the Record Type to an “H”, Description to “Other Administrative Expenses” and the “Total Level this heading is paired with” to a 3.
Now to add the sub-total:
Click on Seq#321. Add (system adds 322). Record Type “P”
Description: Total Other Administrative Expenses.
F10 to save.
Click on Verify to run the Verify Report again.
Down to 1 error!
This is the same type of situation, except after we look at the detail report, we notice only one account is being printed. Let’s take another approach to this range. Let’s raise the “A” record (Seq# 351) to be at level 3. Since the total above and below it are higher, it should have no affect at all on our original Detail version of the report.
Two ways to make the change after clicking on the Line.
1.On the “Normal” tab, change the Total or Memory Level Number from 1 to 3 and press F10 to save
-or-
2.on the “Selected Rec(s) chg” tab, click on the “Total Levels”’s + button on.
Run the Verify-no errors.
We now have both a Summary and Detail report using the same Report Definition!
NOTE: If the account detail and totals are all zero, the headings will be suppressed. However, if the detail needs to be printed even though it will be zero, manually code a total level on the "H" record that matches the "P" record to print.