Once all the errors have been resolved, it’s time to import the file. This screen does have validation and will not import if there are errors, but typically it’s easier to resolve them from the Edit List menu rather than run into them during the Import. See Edit List for information on resolving issues.
The Import Screen is where you define the deposit information for the General Ledger including the Clearing Account to be debited and the Description to use on the entries. This account defaults to the account number you have set up in Check Stub Company Maintenance.

•File Name: Enter in the saved name or browse to the location. If you accept the defaults for the remaining fields, all of the deposits will be imported into the Check Stub Entry program.
•The Transaction Dates can be left blank unless only part of the stub needs to be imported.
•Enter in the Check Number on the File. If the import is restricted to a single Check Number the system will validate that number on the Total Record line of the import. If that check number doesn't exist on the import file a message will alert you to what check(s) are listed in the import file.
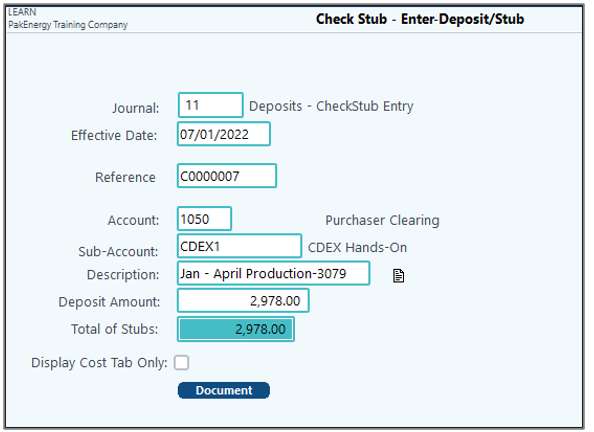
•The Journal will default per the Company Options.
•The Effective Date will default to today’s date but can be changed to match the date of the stub.
•Enter the Account / Sub-Account to be used. Typically, this will be the Purchaser Clearing Account and the Purchaser Sub-Account.
•Enter the Description to be used on the entries.
•The Exclude Missing DO errors button will allow all valid stubs to be imported but exclude any stubs with DO errors. The amount of the Check Stub imported will be reduced accordingly. This is helpful if there is a new lease that was included but you don’t have paperwork for it yet in order to set it up into the system. Any leases excluded during the import will need to be manually entered later.
•Clicking on Printer, File, or View will produce an Edit List and will kick off the import. Print or save the report, then go to #10 Enter-Deposit/Stub to review and complete the posting process.
NOTES:
•Pak Accounting has the ability to detect and utilize new four character Purchaser codes being setup and used by Oildex.
•If a user attempts to import a particular file a second time, the system will display a warning that the reference has already been imported prior to appending the reference with a suffix to the check number.
•Pak Accounting provides the ability to import values where the tax percentages are different than the revenue percentage and will also apply the percentage to the computed net share values.
•If a file is imported that is incomplete, an error will warn that the file was incomplete. The data that was imported will be available in a summary/total entry for you to decide to either delete or post the information that was imported.
•The CDEX import will validate to recognize any Division Orders that are inactive. In addition, the import can accommodate seven digits to the left of the decimal for the 100% tax column.
The CDEX import listing has the option to import excluding missing DO errors by checking the option on the screen. This option defaults to being unchecked and will have to be checked each time to be utilized. Any stubs that have errors will be removed from the deposit and the deposit amount will be reduced by the amount of the stubs with errors. A description will then be added to the Deposit Description that there were omitted entries with errors along with the number of errors. Any other error will not allow the import to proceed.
Completing the Process
After you have completed importing the CDEX data into the Check Stub Entry program, you can exit the CDEX Menu and resume your Check Stub Input Cycle steps. The Description field will also display the Check number from the import file. This includes printing the Edit Listing and updating the data to history and the General Ledger.
In the Enter – Deposit/Stub screen you will notice a couple of differences from a manual entry. First, the Reference # will start with a “C” and will auto-increment. Next, the CDEX file may have created more than one Reference #. This is because the file will be split out every 1,000 lines. This is to aid in posting and unposting efficiency