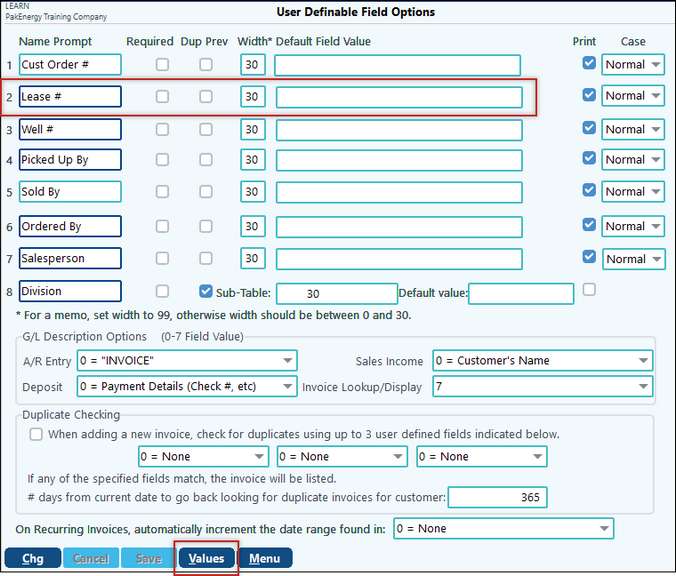
This screen allows the user to define the appearance of the invoice input screen. The screen can be set up to display information data obtained from the customer, and/or conditions about the sale. Fields 1-4 will default as shown when you initially set up the options. These can be changed to fit your invoicing needs.
Custom Fields |
|
|---|---|
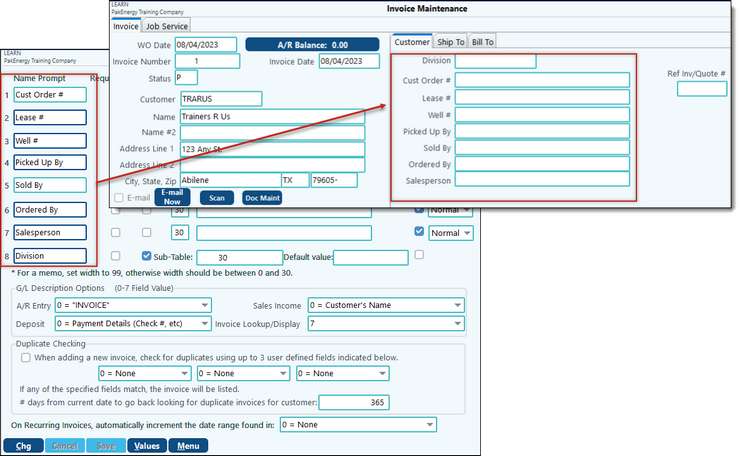
Name Prompt 1 thru 7 |
If you set these up, these fields will display in the upper right corner of the Enter Invoices screen. They provide additional information to the customer; or serve as a tool to provide you detail about the customer as you prepare the invoice. If the Name prompt and default field value are left blank, nothing will appear in that part of the enter invoice screen.
The name you enter in the Name Prompt field serves as the title either for information collected from the customer, or as conditions of the sale. |
Required |
When checked, this field is required when adding an invoice, a user will not be able to save an invoice if this field is left blank. When unchecked, this field is optional, a user will be able to type something in to print on the invoice, or can leave it blank |
Dup Prev |
Checked - The information entered from the last invoice is used as the default when entering the next invoice. Unchecked - The Default Value, which is explained and defined below, will appear on the line |
Width |
Defines the maximum number of characters allowed for the field when entering an invoice |
Default Field Value |
Enter a text description that applies to most of your customers for the defined Name Prompt. This value will appear on every new invoice (unless you set the Dup Prev (above) to "Y" whereby the information entered from the last invoice will appear). You can override this value during invoice entry as needed. You may also use Substitute Field values: “TERMS” – will pull in the terms from Sub-Account Maintenance, A/R Options tab and will fill in “Net xx days” “DUE DATE” – will fill in the due date based on the terms days from Sub-Account Maintenance, A/R Options tab. (For this to work, the Invoice Date must be specified before the customer# is entered. This does not automatically change when the Invoice Date is changed.) ^PHONE – will pull in the telephone number under Sub-Account Maintenance, Contact Info tab. For Name Prompt 8 Only: ^CYCLE - can be defined in Sub-Account Maintenance, A/R Options tab. Example: set up salesperson in a Sub-Table, then the code in the cycle # field will be pulled into the Invoice. |
When checked, this field will print on the invoice |
|
Case |
Specify normal, upper, or lower case |
Name Prompt 8 |
This line allows you to group information by a specific classification, such as division, salesperson, job #, freight company, etc. If you are using the WIP/Job Costing option, this prompt will reference the Jobs Sub-Table. (NOTE: You must enter a Sub-Table number on this line for this prompt to appear in the Enter Invoice screen).
|
G/L Description Options |
|
A/R Entry |
Description on G/L Entry, default is 0 = "Invoice" which will give the G/L entry the invoice number as the description, or can choose from any of the custom field values 1-7 instead. |
Sales Income |
Description on G/L Entry, default is 0 = Customer's Name, or can choose from any of the custom field values 1-7 instead |
Deposit |
Description on G/L deposit entry, default is 0 = Payment Details (Check#, etc), or can choose from any of the custom field values 1-7 instead |
Invoice Lookup – display field |
Custom field that will be displayed for 'Description' when doing a Find for a Customer Invoice in Enter Invoices, and when doing a lookup to Un-update an Invoice |
Duplicate Checking |
Check to allow duplicate checking at time of invoice entry. Select up to 3 custom fields that will be checked for duplicates. Enter the # of days from current date to go back and check for duplicates. |
Values
Clicking on Values within the Custom Fields menu will open up another window that will allow you to further customize these fields.
On the User Definable Field List Values screen, click 1st, Prior, Next, or End to access one of the Name Prompt items from the previous screen. Click on the “+” in the navigational grid to add Value items.
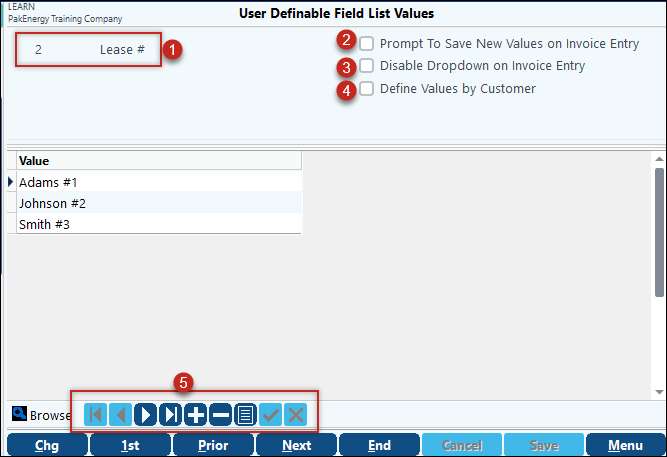
1 |
Clicking Next at the bottom of the screen will move you between the Name Prompt fields that were created on the previous screen. |
2 |
If users are allowed to type in the custom field on the Enter Invoice screen, then this option will save that value in this menu. When a new item is entered on the Enter Invoice screen, a box will pop up saying This does not exist for the custom field, would you like to add it? |
3 |
Checking this box will not give you a drop down menu when entering in information into the Custom Field (meaning you won’t see your Values but the system will recognize them if typed in). Leaving the box unchecked will show a drop down menu of the Values you have defined. |
4 |
This box allows you to add values to specific customers instead of to the whole custom field. The Disable Drop down on Invoice Entry option MUST be unchecked for this to work properly. To set up: –Enter in a customer in the field –Use the navigational grid (#5) to add values that this customer would use –Click on Save when all values have been added –To add the next customer just change the customer code in the above field (there is no Add button) and repeat the previous steps |
5 |
The Navigation Buttons allow you to add or remove individual Values. |
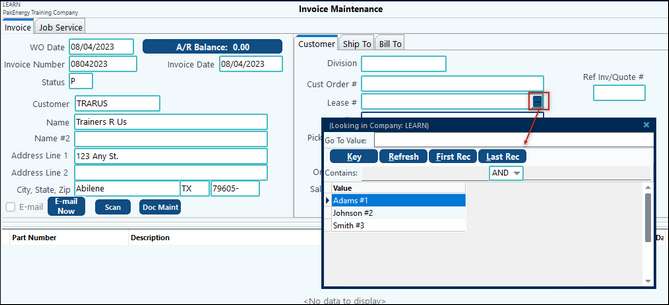
Example: I’ve added 3 leases. Since I have the 3 optional boxes unchecked, no one will be able to manually key into that field, there will be a dropdown instead, and the lease options will be available for all customers.