Pumper Hierarchy
Groupings, such as the example below, are used for reporting. They also limit the leases that can be viewed and/or processed. For instance a Pumper can only view and enter information for the leases in their route. The Foreman can only view and enter information for leases in their field office(s). Other users are limited to the leases in their area. The Area and Field Office for a production unit are determined by the pumper for the unit. The Reporting Company is set on the production lease/unit during maintenance.
NOTE: There must be at least one Area, one Field Office and one Pumper for the program to function.
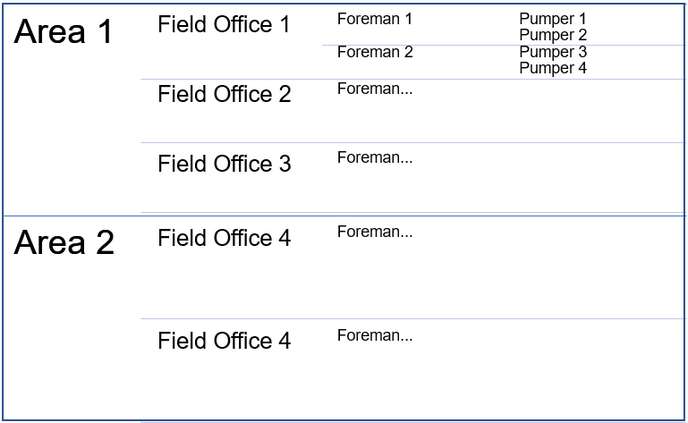
New Client Setup: Items must be setup in this order
An Admin User will be setup as part of the on-boarding process. This user will have access to the system and will be able to begin setup. This user will also be able to add other users.
Must be set up before field offices. This is the largest grouping mechanism.
An example would be a situation where a company has two main areas - one in West Texas and one in New Mexico. In this case, two areas could be set up – the West Texas District and the New Mexico District. This allows restricting users to reporting and/or modifying information for leases in their area only.
From the Main page, click on Office Tasks, then click on Areas.
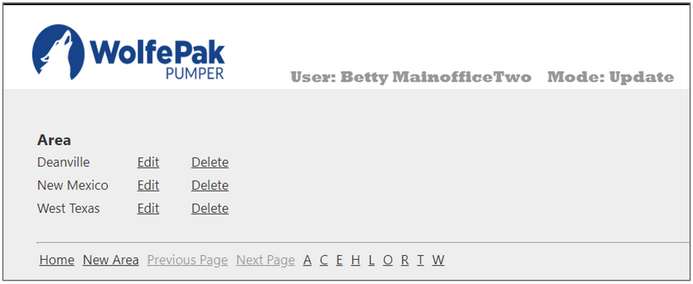
Edit
|
Allows a user to edit an area that already exists.
|
Delete
|
Allows for an existing Area to be deleted. An Area cannot be deleted if it is used for any field office.
|
New Area
|
Enter the following information and Save:
Area Name: The Area Name is an alphanumeric field up to 30 characters in length. It cannot be blank. This will be displayed on reports and used in selecting areas to report.
Short Name: The Short Name is an alphanumeric field up to 10 characters in length. It cannot be blank.
|
Also see: Area and Offices Report for reporting options.
|
From the Main page, click on Office Tasks, then click on Areas.
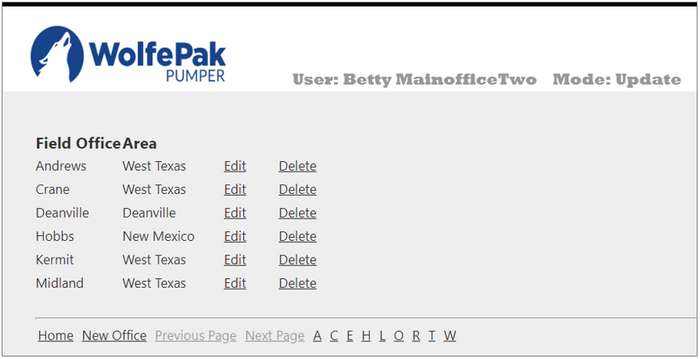
Edit
|
Allows a user to edit a Field Office that already exists.
|
Delete
|
Allows for an existing Field Office to be deleted. A Field Office cannot be deleted if it is associated with any user.
|
New Field Office
|
Enter the following information and Save:
Field Office Name: The name for the field office is an alphanumeric field up to 50 characters in length. It cannot be blank. This will be displayed on reports and used in selecting field offices to report.
Area: Select the area from the drop down. It is required.
|
|
These can be set up in any order. Examples are Pumpers, Foremen, Field Office People, Main Officer Person, Engineers (Optional), and Area Personnel (Optional). At least one Main Office Person should be set up. A user with Main Office privilege can modify and report on any lease for the company. They can select any pumper’s route. They can also perform maintenance on information contained in the master tables.
A user must have Admin privileges to complete this step. If so, the Users menu item is enabled in the Office Tasks screen.
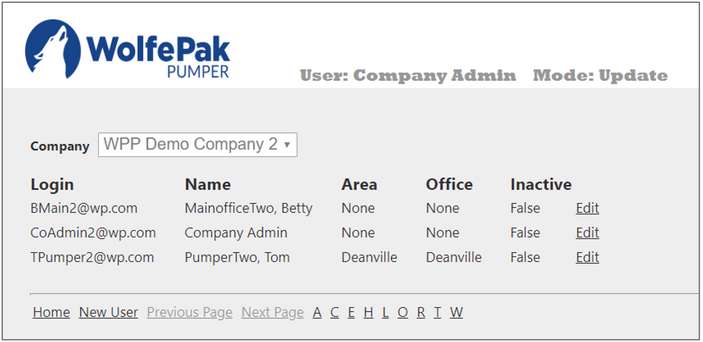
Company
|
Select the desired company to get a list of users for that company.
|
Edit
|
Allows an existing user to be edited.
|
New User
|
Setting up a user may be limited by the number of users licensed for the company. See below for more information.
|
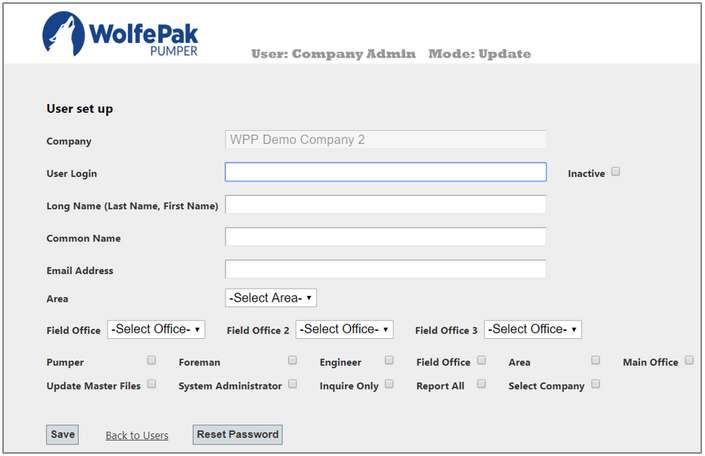
User Login
|
Login name can be up to 200 characters. It has to be in the format of an email address. Normally this should be the user’s actual email address.
|
Inactive
|
Check this box to make the user inactive. Inactive users cannot log into the program.
|
Long Name
|
Enter the long name for the user. This should be in last name, first name order. It is required.
|
Common Name
|
Enter the common name for the user. This should be first name last name order. It is required.
|
Email Address
|
This will default to the User Login value. If for some reason the User Login is not the user’s email address, enter the email address for the user. It is required.
|
Area
|
Select the area for the user. An area may be required depending on the Base Privilege User Type.
|
Field Office
|
Select the field office from the drop down. A field office may be required depending on the Base Privilege User Type.
|
Field Office 2, Field Office 3
|
If the user is a foreman, they can be associated with more than one field office. Select any other field offices for the foreman if they have more than one.
|
User Type and Special Privileges
|
Refer to Appendix B for more information
|
Reset Password
|
This will reset the password to be the same as the user’s login (case sensitive). The user will be required to change it on their first login. This can also be used if the user forgets the password. The Inactive status should also be verified. If the user has more than three unsuccessful attempts the account will be locked by marking the user Inactive.
|
|
The foreman must be set up under user maintenance prior to being added. The user needs to be set up as a foreman User Type and with the correct Area and Field Office. See previous setup steps for more information on bolded items.
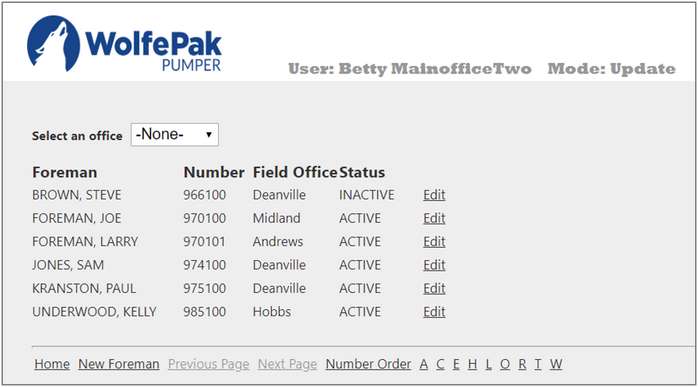
Select an Office
|
Select the desired office to get a list of Foremen for that company.
|
Edit
|
Allows an existing Foreman to be edited.
|
New User
|
See below for more information.
|
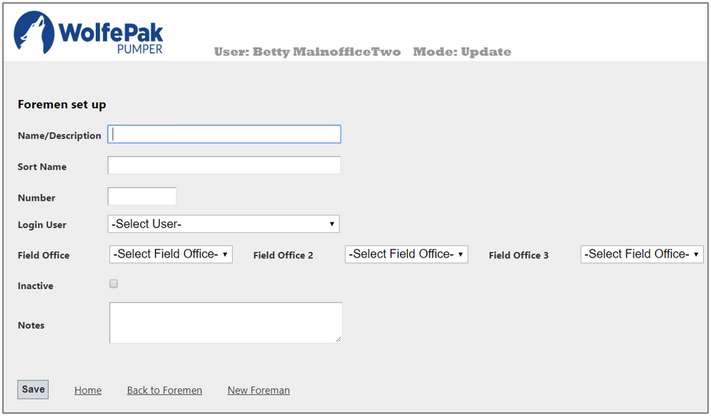
Name/Description
|
Name/Description should be first name last name format.
|
Sort Name
|
Sort Name should be last name, first name format.
|
Number
|
Enter the number for the foreman in the accounting system. If it is not known, leave the field blank. The program will assign a number. It can be changed to the correct number later.
|
Login User
|
Select the login user from the drop down. The user must be set up with the foreman User Type in User Maintenance. A user can only be associated with one foreman.
|
Field Office
|
Select the field office for the foreman. This will match the primary field office set up in User Maintenance. If the field office is changed, it will also be changed for the user.
|
Field Office 2
|
Select a secondary field office for the foreman if they have more than one. If the value is changed, it will also be changed for the user.
|
Field Office 3
|
Select third field office for the foreman if they have more than two. If the value is changed, it will also be changed for the user.
|
Inactive
|
Check the box to make the foreman inactive.
|
Notes
|
Enter any optional free form notes.
|
|
The pumper must be set up under User Maintenance prior to being added. The user needs to be set up as a pumper User Type and with the correct Area and Field Office. It may be necessary to set up Dummy Pumpers to account for routes that are not entered by the pumper.
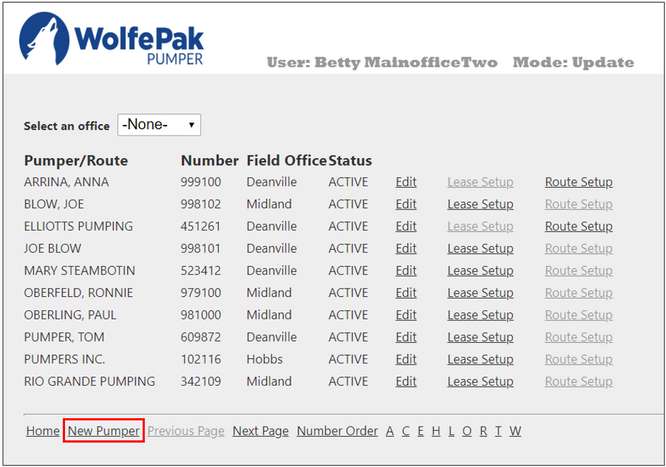
Lease/Route Setup Links
|
Used to assign leases (if not Relief Pumper) or pumpers (if Relief Pumper) to this pumper/route. Also see Add Leases to Route below.
|
Edit Existing Pumper
|
Allows an existing Pumper to be edited.
|
New Pumper
|
See below for more information.
|
In order to perform daily production entry a pumper must either:
•Not be a Relief Pumper and have Can Select Other Routes set.
•Not be a Relief Pumper and have leases assigned to their route.
•Be a Relief Pumper and have pumpers to relieve.
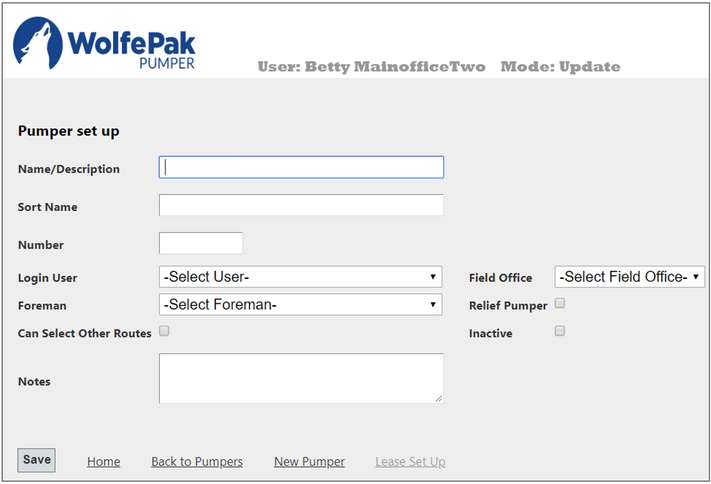
Name/Description
|
The name for the pumper/route should be first name last name format or the name of the route.
|
Sort Name
|
The sort name should be last name, first name format or the name of the route.
|
Number
|
Enter the accounting number for the pumper. If it is not known leave the field blank. The program will assign a number. It can be changed to the correct number later.
|
Login User
|
Select the login user from the drop down. The user must be set up with the pumper User Type in User Maintenance. A user can only be associated with one pumper.
|
Field Office
|
Select the field office for the pumper. This will match the primary field office set up in User Maintenance. If the field office is changed it will also be changed for the user.
|
Foreman
|
Select the foreman for the pumper. This is an optional field used for reporting purposes.
|
Relief Pumper
|
Check this box if the pumper is a relief pumper. A relief pumper processes routes for another primary pumper/route. They can relieve more than one pumper/route. If the pumper is a relief pumper, they cannot be associated with leases. Instead they will be associated with pumpers/routes. On the main page they will be able to pick from a list of pumper(s)/route(s) they relieve.
|
Can Select Other Routes
|
If checked, the pumper can access other routes in their field office. This is necessary for many field offices to allow pumpers to relieve each other.
|
Inactive
|
Check this box if the pumper is inactive.
|
Notes
|
Enter any optional free form notes.
|
Lease Set Up/
Route Set Up
|
The caption will change based on the Relief Pumper value. Use this link to set up the Leases/Pumpers for the pumper.
|
Also see Adding Leases to Pumper under the Other Setup below.
|
Other Setup
Many reports allow selection of the area and/or field office, can be sorted in area/field office order, and many subtotal by the office and area. The reporting company is used on various reports for selection purposes only.
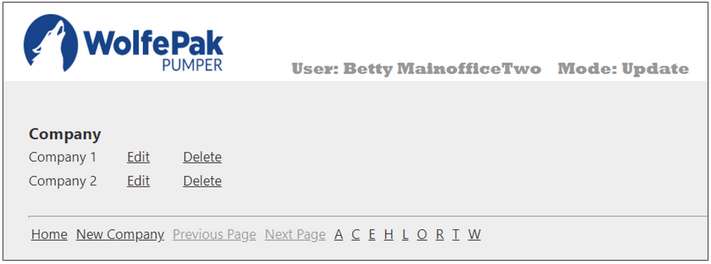
Edit
|
Allows for an existing Reporting Company to be edited.
|
Delete
|
Allows for an existing Reporting Company to be deleted. A company cannot be deleted if it is associated with any lease/unit.
|
New Company
|
Enter the following information and Save:
Company Name: The company is an alphanumeric field up to 30 characters in length. It cannot be blank. This will be used in selecting companies to report.
Short Name: The short name is an alphanumeric field up to 10 characters in length. It cannot be blank.
|
Also see Reporting Companies Report for reporting options.
|
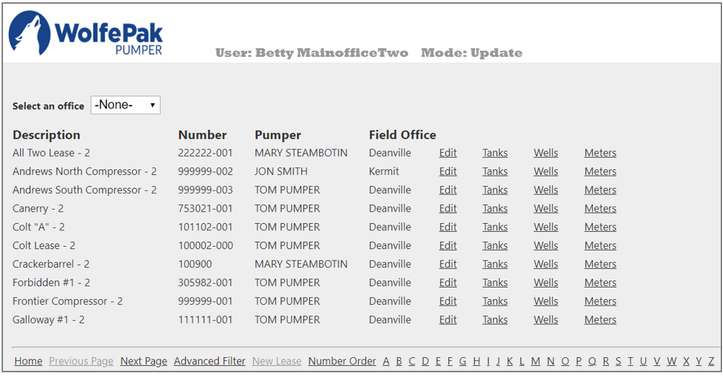
Any new items must be setup within Pak Accounting and then synced using the utility. However, many items can be edited from the screen found in Office Tasks - Leases.
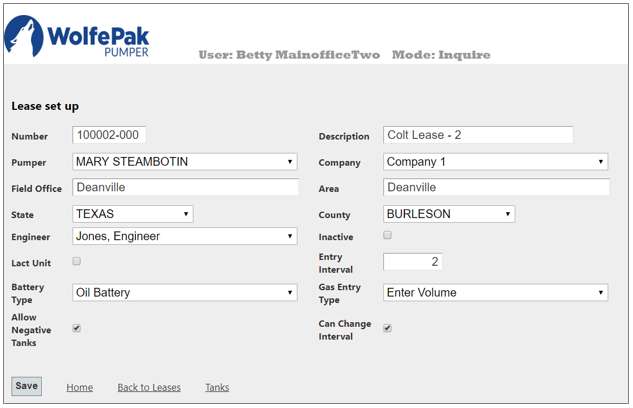
Number
|
Lease number has a format of up to six numeric digits with an optional hyphen followed by up to three alphanumeric characters. The number must be unique. Note: If interfaced with Pak Accounting, the number and number format is controlled by Pak Accounting.
|
Description
|
Alphanumeric field up to fifty characters in length. It cannot be blank.
|
Pumper
|
Select the pumper for the lease from the drop down. A pumper must be selected. Refer to Pumper Maintenance for more information.
|
Company
|
Select the company for the lease from the drop down. A company must be selected. It is used for informational and reporting purposes. It does not affect entry or processing.
|
State
|
Will pull over from Pak Accounting.
|
County
|
Will pull over from Pak Accounting.
|
Engineer
|
Select the engineer for the lease from the drop down. The field is optional. It is used for informational and reporting purposes. It does not affect entry or processing.
|
Inactive
|
Will pull over from Pak Accounting.
|
Lact Unit
|
Check this box if the battery sells its oil through a LACT meter. This will also require setting up a LACT meter under Tank Maintenance.
|
Entry Interval
|
Enter the entry interval for the battery in days. If the gauges are entered every day enter 1, enter 2 for every other day. The pumper can still enter to any date. This only establishes a default value.
|
Battery Type
|
Will pull over from Pak Accounting.
|
Gas Entry Type
|
Select the gas entry type from the drop down. It is required. Options are:
Calculate Volumes – the pumper will input the meter run, gravity, nitrogen, carbon dioxide, temperature and static values and the program will calculate the volume.
Enter Volumes – the pumper will enter a volume.
Metered Volumes – the pumper will enter meter readings or volumes and the program will either calculate the gas production or use the entered value.
Does not produce gas – the battery does not produce gas. Entry of gas volumes will be disabled.
|
Allow Negative Tanks:
|
Allows a tank to have negative production (today’s reading is less than the previous reading without a run or adjustment) as long as the battery does not have negative production. Normally this is checked.
|
Can Change Interval
|
The pumper will be allowed to change the entry interval. Normally this is checked.
|
Tanks
|
Brings up the page allowing maintenance of tanks for the battery. The lease has to be set and saved before this link is enabled. See the section Tank Maintenance for more information.
|
|
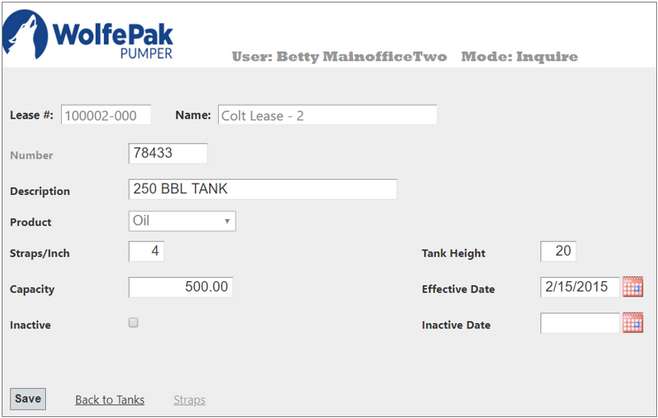
Number
|
Tank number is a free format with up to 15 alphanumeric characters. The number must be unique.
|
Description
|
The description is an alphanumeric field up to thirty characters in length. It cannot be blank.
|
Product
|
Select the product from the drop down – either oil or water. A product must be selected.
|
Strapping Scale
|
If the product is water, enter the strapping scale for the tank. Water tanks have only one strapping scale and straps are not entered under strap maintenance. If the product type is oil, this item will not appear on the page.
|
Straps/Inch
|
Will pull over from Pak Accounting.
|
Tank Height
|
Enter the height in feet as a whole number. It is required.
|
Capacity
|
Will pull over from Pak Accounting.
|
Effective Date
|
Will pull over from Pak Accounting.
|
Inactive
|
Will pull over from Pak Accounting.
|
Inactive Date
|
Will pull over from Pak Accounting.
|
Straps
|
Will pull over from Pak Accounting. Any new straps or changes to existing straps must be completed in Pak Accounting and synced.
|
|
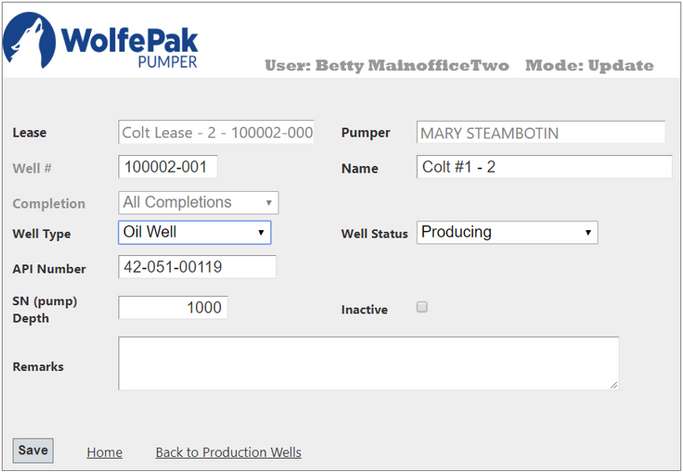
Most of this information will pull over from Pak Accounting. The only items that can be changed are Name and SN (pump) Depth.
|
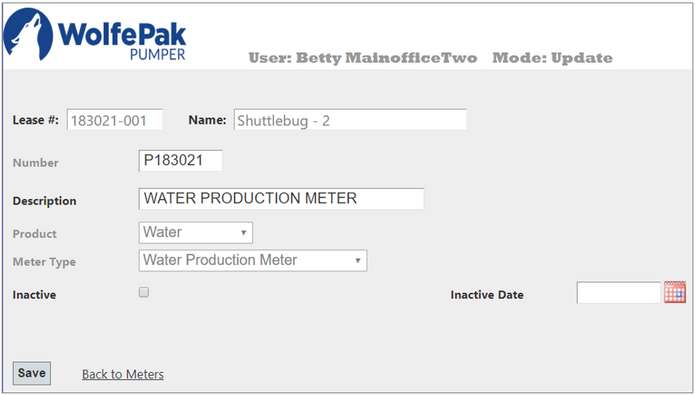
Most of this information will pull over from Pak Accounting. The only item that can be changed is Description.
|
|
A pumper must not be a Relief Pumper and have Can Select Other Routes set, to set their own routes. Otherwise, they must have leases assigned to their route or be assigned pumpers to relieve (Relief Pumper).
This menu can be found under Office Tasks - Pumpers. If the pumper is not a Relief Pumper use the Lease Setup link. If the pumper is a Relief Pumper use the Route Setup link.
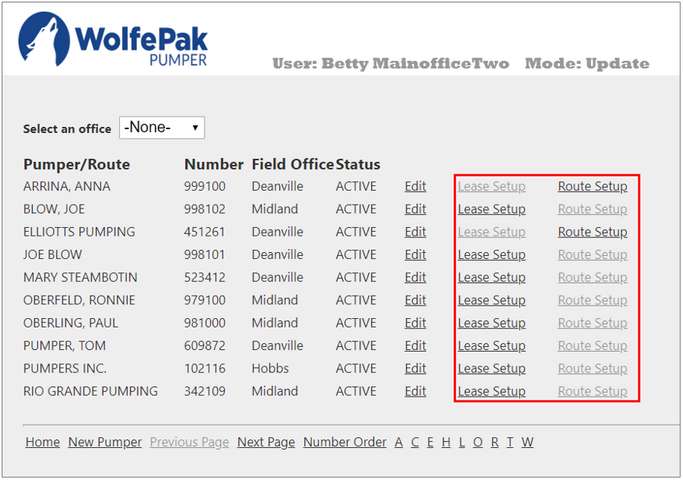
When the link is selected, the program will show the base selection page. The program operates the same whether the items being selected are leases or other routes. This will show an example using the Lease Setup link. After the link is selected, the following page will be displayed. It will show any leases/pumpers currently assigned to the pumper. Click on Remove to remove a Lease from the Route.
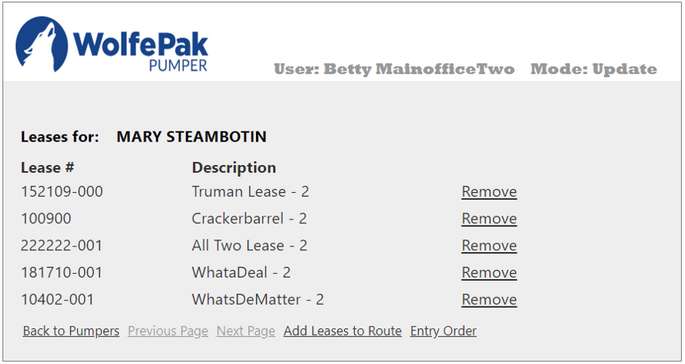
Click on Add Leases to Route to add to the Route.

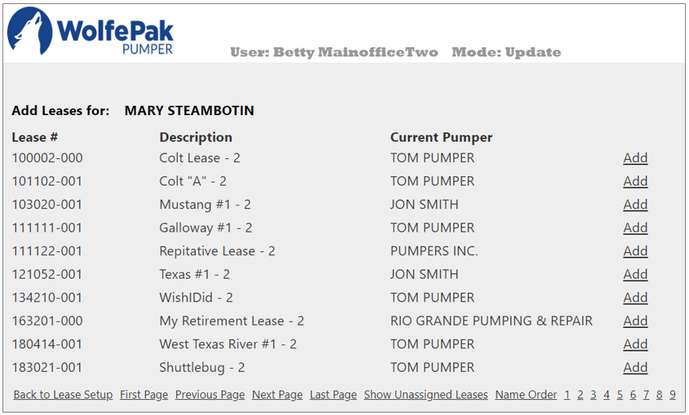
Then click on Show All Leases. This will show all leases set up in the system. Find the lease and click on Add to add it to the pumper's route.
If a lease/pumper that is currently assigned to another pumper is assigned to this pumper it will be removed from its old pumper.
To narrow down the list click on Show Unassigned Leases to get just the leases that are not already assigned to a route.
|
A “dummy” pumper may need to be setup in the case where a field office person is entering information for a contract route. In this case, the contract pumper will not be entering information but you still want to group their leases for entry purposes. How to setup a “dummy” pumper:
•Setup a dummy user just like a normal pumper. The user name should be something that helps identify the type. Refer to User Maintenance for further setup instructions.
•Setup a pumper using the steps defined in Pumper Maintenance.
•Assign the leases to the new pumper.
•Return to user maintenance and make the user inactive. This will keep anyone from using the “dummy” pumper as a login.
•Field office personnel for the pumper will be able to enter the route. Any main office personnel will be able to access the route and perform data entry. |


