Master Grid Views provide the ability to view the information from different master files in a grid format. You have the ability to pick the fields needed to create a custom report. Additionally, filters and sorts can be set up in the Master Grid View to restrict the report to only necessary information. This information can be viewed, listed, saved, or exported. Master Grid Views are found many different places throughout Pak Accounting:
Check Stub •Division Order Maintenance > List > Grid View •Property > List > Grid View
Depletion • Reports > Lease Grid Views
First Purchaser •Reports > Property Tab> Property Views •Reports > Tickets Tab > Run Ticket Views Fixed Assets •Master Files Maintenance > Asset Class > List > Class Master Views •Assets > Asset Maintenance > List > Asset Master Views
General Ledger •Account Maintenance [F11] > Utilities > Mass Maintenance Grid •View Trend > View by Sub-Account •Sub-Account Maintenance [F12] > Utilities > Sub-Account Views Invoicing •Reports > Parts > Parts Views •Invoicing > Other > Invoice Grid View
Land Module •Reports > Land > Contract> Contract Views •Reports > Tract > Tract Master Views Management Dashboard •Change Log •BPM List > View In Grid selection
Minerals System •Master Views > Deed Views •Master Views > Leases Views
Payroll •Reports > User Defined > Employee Master Views Production •Daily Production > List > Daily Production Grid Views •Reports > Tickets Tab > Run Ticket Views •Reports > Property Tab > Property Views
Revenue>Billing •Revenue > Bill Cycle > Rev > Bill Extract Entries > Historical Tab •Reports > Property Tab > Property Views Service Ticket •Saltwater Disposal > Summary by Well Grid Utilities •Global > System Authorization > Release Notes •System Security > List > Security Grid Views - This option allows you to look at security at a certain company level. By selecting Global, you will get those settings at the Global Level. |
Common features of all Master Grid Views are the ability to sort, filter, and rearrange to display only what you want to see. Once changed, the display can be saved for future use or easily restored to the defaults.
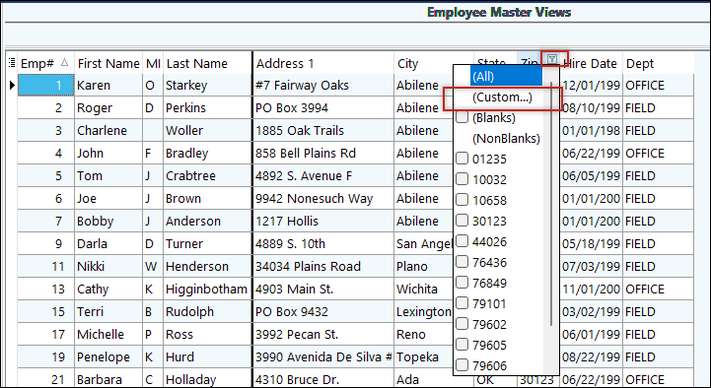
Select the master grid view to use and then select desired options. Once you have selected the specialized grid options, generate your Master Grid View by clicking “Next.” You can toggle back and forth to reset parameters for the grid and to then view the grid. Below is an example of the Employee Master Grid View. Once your Master Grid View has been generated you have the ability to add or delete columns and add additional touches to specialize the report to fit your needs.
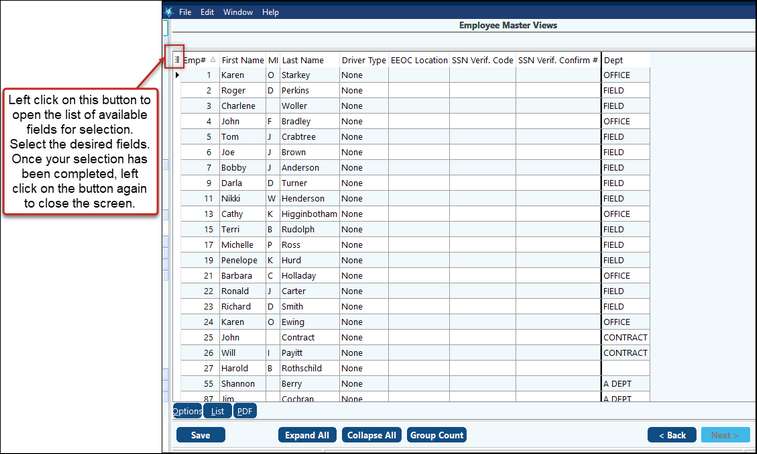
Each Master Grid View will have a specialized list of columns that can be added that are pertinent to the report you are generating.
The columns can be sorted, filtered and rearranged to fit your needs. Additionally, custom filters can be used to filter the grid in an easy and efficient way.
The Custom Filter option provides the ability to create the necessary grid in a way that is easy and efficient. Instead of filtering for every field needed, create a custom filter that will do it for you just by adding limits to the fields in the Custom Filter. To manually customize the filter and add complex logic expression, click on the Customize button.
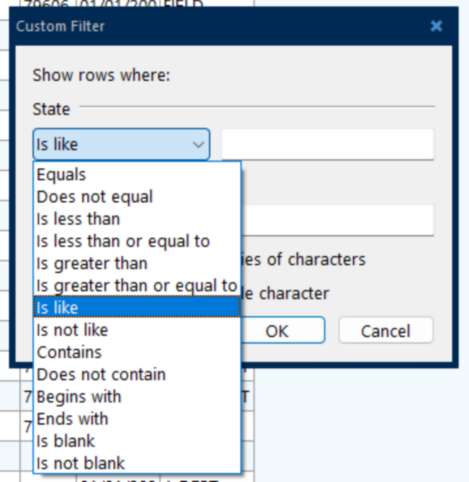
The Custom Filter menu will appear: The custom filter allows the grid view to be filtered by up to two different fields and ten different operands for both fields. The purpose of the operands is to allow for the filtering of data through the use of logical functions.
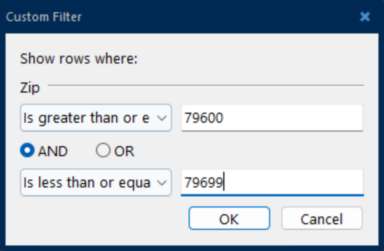
“AND” Function Suppose it is necessary to create a report that includes a range of zip codes. You could drop down the list of zip codes and check off the ones you want. However this is time consuming and leaves room for error. Also, if an additional zip code was added at a later date, it would not be included in the saved report format because it would not be manually checked like the other zip codes. However, there is a much easier way to create this report efficiently and accurately through the use of the Custom Filter. To create a custom filter for zip codes 79600 thru 79699, filter click on the down arrow to choose the Custom filter.
Next choose “is greater than or equal to” as the first operand and type in “79600”in the field next to it. For the second operand, choose “is less than or equal to” and type in “79699” in the field next to it. Click “OK” to see the results.
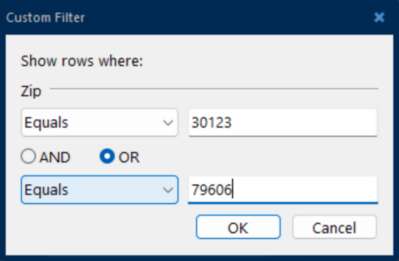
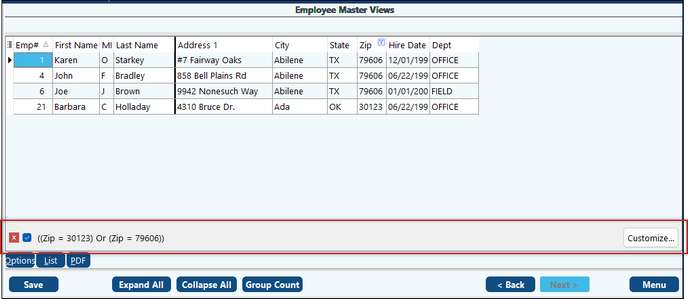
“OR” Function To create a custom filter for either 30123 or 79606 zip codes, set both filter operands to “Equals” and enter the zip codes in the corresponding fields. Ensure that the OR button is selected and view the results.
To temporarily disable the filter, uncheck the check box to the left of the filter expression. To delete the filter, click on the little “X” to the left. This will cause a dialog box to pop up with different options. |
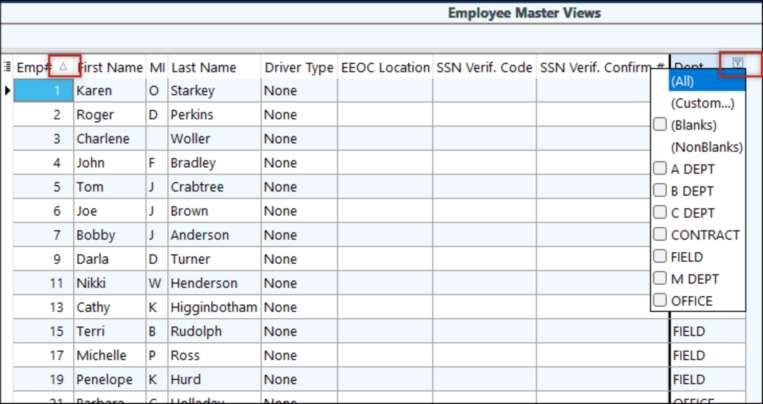
Each column has 2 areas that will react differently: filtering and sorting. As you move your mouse over the right side of the column, a down arrow will appear for a drop-down box. Clicking on this will pull down a list of all the unique values for this field.
By checking or unchecking the boxes, the list will get “filtered” or restricted so that only the values that are checked are included in the list. |
A quick and easy way to sort on a column is to click on the left side of that column. Once you have done this, a little triangle will appear indicating the column is in ascending sequence. For example:
Clicking it again will turn the triangle upside down and will also sort the row in descending sequence. Clicking again will alternate (toggle) between ascending and descending. Clicking on another column will change the sort to be on that field. To sort by two or more fields, hold down the shift key while clicking on the 2nd and subsequent columns to sort on and the sort will include all selected columns. For example, if I want the above list to be in alpha sequence by last name within each city, I would first click on the City column, then shift-Click on the Last Name column, and then on the First Name Column if we have multiple employees with the same last name. |
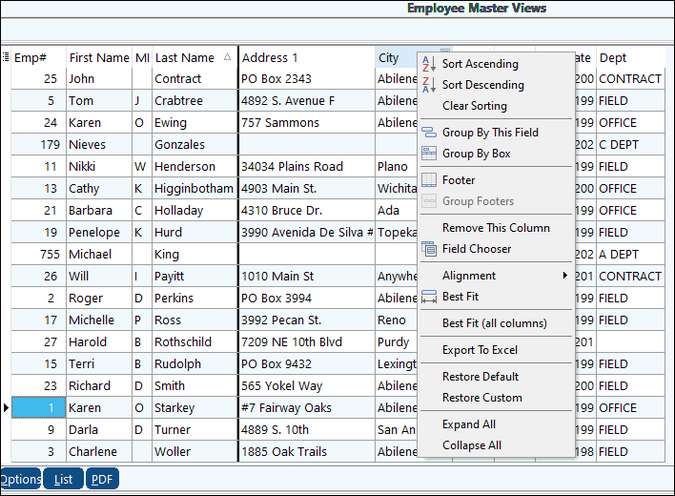
Instead of left-clicking on the left side of the column (to sort), Right-Click on the column heading line and a drop down menu will appear. For example:
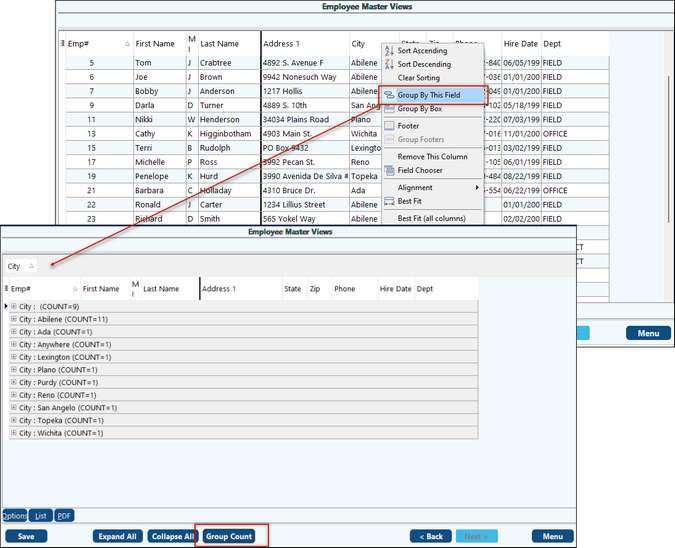
This drop down menu will give you the ability to clear the sort with the third option “Clear Sorting”, and the rows will return to their original sequence. Groups, Footers – Totals, count The drop down menu above, also introduces the ability to toggle on>off the “Group by Box” and>or the ability to group by field (column) that you are on. For example, by selecting the “Group by this Field” while right-clicked on the State Column, the grid gets grouped by State. To clear the grouping, right-click on the “State” field at the top of the screen and choose “Remove from Grouping.” While in the Group screen, you can click on the Group Count button on the bottom and get a count of the records by state.
|
Resizing columnsYou can change the width of a column by dragging its right edge. If you need to set a column's width according to the size of its contents, double-click its right edge. This will find the cell with the widest contents (including the column heading) and the column's width will then be changed to accommodate it. Moving columnsTo change the order of columns within the view, drag the column header to the required position. You can change the column's position within the view and within the Group panel. Once you have started making changes to the grid, the current options become your default customized format. You can save your customized format via the “Save” button. This will allow you to name this setup so that you can return to it later. OptionsLocated in the bottom, left corner of your Master Grid View. The menu will show a list of options such as: Best Fit – will adjust the column widths based on the contents of each column (including the column heading). Export to Excel – will ask you for a file name and will export the contents of the current grid to Excel. Restore to Default – will erase all the changes you have made and return the grid back to the default grid. Restore Custom – will erase all your recent changes and restore the grid back to the last grid you had customized. Expand All - Collapse All – will either show or not show the individual rows under each group. Printing and Exports:List – menu option will print a listing of what is displayed in the grid. PDF – menu option will save the displayed grid into a PDF format. For Excel exports you can you the Options menu that contains an Excel export or the drop down menu to export directly into Excel. |
