Frequently Asked Questions about General Items
Click on the blue link for the answer.
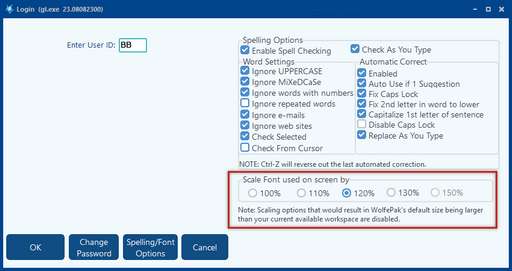
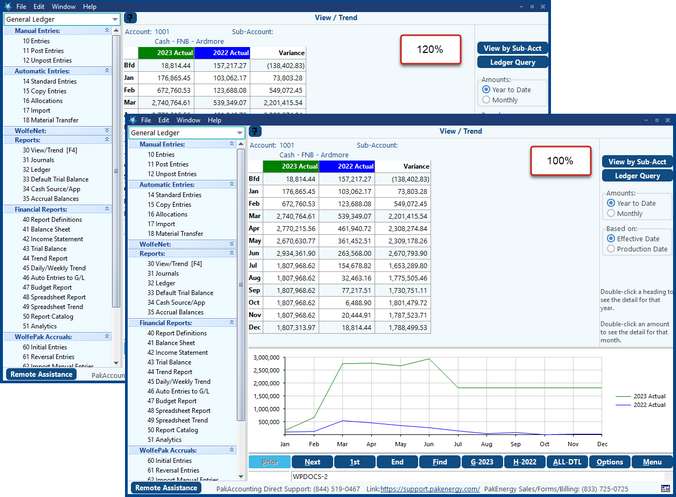
The system's screen size can now be changed to accommodate those users that would like to see a larger Pak Accounting window on their screen. Normally when you log into the system, the screen size is 100%. However, you have the ability to change the screen size to 110%, 120%, 130%, or 150% to be remembered by user. This is accomplished upon logging into the system. The first step is to enter your User ID and to then click on the Spelling/Font Options button. The screen that appears has a “Scale by” box that allows you to choose the desired screen size. Note that a screen size that results in Pak Accounting’s default size being larger than the current available workspace allowed will be disabled. Choose the scale option that is desired and click on the “OK” button at the bottom of the screen.
Type in the company code that you will be working in as normal. When Pak Accounting displays the company that you have chosen, the window size will then change to the scale size that you chose. Pak Accounting will continue to stay this size by User ID unless you change the scale.
The scale can be changed at any time by following the same steps as detailed above. In addition, the “Help / About” option will display the “Scale by” size in the Workstation Information section. Below is a list of the resolutions that are needed for each scale size:
|
Windows Date Settings If you get the following error message in Pak Accounting: '12/31' is not a valid date, your Windows date settings are set incorrectly for Pak Accounting. Go to your computer's Control Panel > Regional Options > Date, and make sure your date setting is mm/dd/yy, NOT dd/mm/yy. |
To transfer files see Utilities > Backup/Restore > File Transfer. |
These are sometimes received when a user has executed a process in Pak Accounting, but tried leaving the screen before the process was complete. They can also be received sometimes after a Windows update - computer did not completely refresh to apply the changes.
Processes to try:
1.Close out of Pak Accounting and go back in. Try the process / task again. 2.If the AV persists, then reboot the workstation. This will refresh the computer and force the computer to get a new copy of the program from the server. Try the process / task again. 3.If you continue to get the AV, record your step-by-step process (which menu item did you click, did you enter data and press enter, or use the tab key to go to the next field, or are you clicking in each field with the mouse, etc.). Then, go to another workstation see if you get the AV by using the exact same steps. If you do not get the error on the 2nd workstation, then the error is limited to the first workstation. 4.If both workstations get the AV, then try the process at the server. If the server gets the error, then update the software. The program on the server may have gotten corrupted. 5.If you continue to get the error after updating, send your step-by-step process to Pak Accounting where an attempt will be made to recreate the error here.
NOTE: If using an RDP session (Remote Desktop Protocol - where you are remoting into another computer to run Pak Accounting on that computer), these steps will need to be performed on the workstation being remoted into. If you are not sure if you are RDP, the biggest clue is if you close out of your Pak Accounting and go back in, do you go straight back to the error screen. If so, then you are probably remoting in. If you go to the General Ledger menu as normal, then you may not be. |
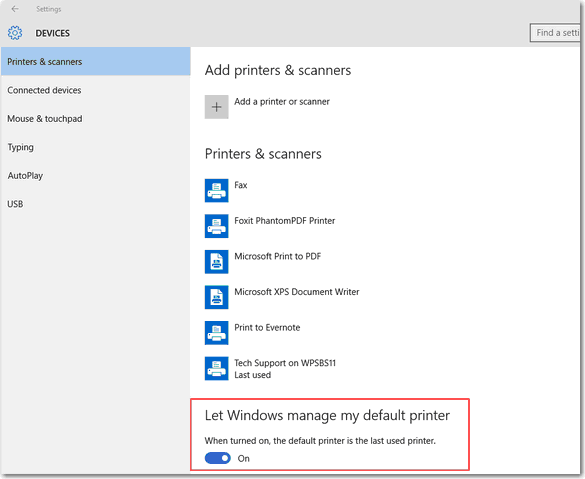
1.Change the Windows default printer to another printer 2.Go into Pak Accounting and print a test check using the correct check printer 3.Close out of Pak Accounting and go back in. 4.Print a report using the correct report printer. 5.Close Pak Accounting. Change the Windows default printer back to what it should be. 6.Go into Pak Accounting and print a report and test check to make sure it held the default. Windows 10 From your Windows Start menu select Settings then Devices. At the bottom of the screen turn off the option to have Windows 10 remember the last printer used. This can cause issues in the correct items going to your check printer and default printer within Pak Accounting.
|
Spell Check is offered in many different modules throughout Pak Accounting. Spell check can be turned on/off at the user level in the Utilities module > System Security > Other Settings tab. Spell check can be turned on/off per user ID upon entry into Pak Accounting by clicking on the Spelling & Font Options button. Additionally, words can be added to the custom dictionary in the Utilities module > Global > System Options > Spelling Options tab. If spell check is not working, check these two options. If spell check is enabled and still not working, call your Customer Success Team at the Direct Support phone # shown on the bottom of your screen.
NOTE: Pak Accounting does not recommend disabling spell check. |
PakEnergy automatically updates your software once a month during the monthly maintenance release. However, if you need to update due to a hot fix release, go to the Utilities module > Global > PakEnergy Download. Use this screen to download the latest version of Pak Accounting. The "One Button Download" is a feature that will allow you to do an automatic download and installation of the most recent version of Pak Accounting from the FTP site. After the download is complete it will automatically rebuild all company data files that have changed. This procedure does require an internet connection (preferably a high speed connection). Select the "Download and Install new Program Version" button to start the download. Note: All other users must be out of Pak Accounting prior to download. |
Check Pak Accounting’s Release Notes to see the software changes made to the various Pak Accounting modules. Also see View Release Notes. 1.Go to Help/About. Select the "Release Notes"button. 2.Go to Utilities > Global > PakEnergy Download. Select the “View Release Notes” button. |
Call your Customer Success Team, they will be able to email you the file to put in your font folder. |


