Pak Accounting uses four-digit account numbers You can begin to create your Chart of Accounts by using the [F11] hotkey, or G/L Menu - Account Maintenance Menu selection.
Before setting up your Chart of Accounts, it is helpful to understand how Pak Accounting organizes Accounts and Sub-Accounts Account numbers are 4-digit numbers, with an associated name. For example, account number 1200 might be Accounts Receivable, and 1150 could be Accounts Receivable - Employees.
Sub-Accounts are logical sub-divisions of accounts. Sub-Accounts lengths, depending on the company setting, can be either up to 6 or 10 characters long with both letters or numbers. They also have associated names. For example, if using a 6 character Sub-Account, three Sub-Accounts called ADAJOS - Joshua Adam's, GUTALI - Alice Gutters, and HAIMAR - Mark Hailed might be used to represent three employees. Rather that have a separate Accounts Receivable account for each employee who buys from the company, you could have one A/R account, with Sub-Accounts that represent the individual employees.
A Sub-Table is used to group the Sub-Accounts together. Sub-Tables can be either alpha or numeric up to 10 characters, and also have a description. Sub-Accounts in the same table are related - for example, Sub-Table number 40 might contain Employees. So the three Sub-Accounts above - ADAJOS, GUTALI, and HAIMAR - would be associated with Sub-Table 40 - Employees.
When you define account number 1150, Employee Accounts Receivable, you would specify Sub-Table 40 to be used when making entries. Then, whenever you make an entry to Employee A/R, the system would also ask you to specify a Sub-Account -- but only a Sub-Account from table 40, such as ADAJOS.
The preceding information should be enough to get you started. Compete details about setting up Accounts, Sub-Accounts, and Sub-Tables can be found in the General Ledger menu.
Also see the training video under - General Ledger > 3. Chart of Accounts. |
Account numbers with similar characteristics are always grouped together. There will be broad group categories – for example – all the 1000 series (1000 thru 1999) are usually used to setup Asset accounts. Within the Assets range of accounts, there can be sub-groups for Current Assets, Long-Term Investments, Property-Plant-Equipment, and Other Noncurrent Assets. Or, if it is simple set of books with very few assets, there could be just Assets. The same can be said of the Liabilities series. Most accountants will reserve the 2xxx series (2000 thru 2999) for Liabilities.
Recommended account ranges: 1000-1999 Assets 2000-2999 Liabilities Balance Sheet range of Accounts 3000-3999 Capital
4000-4999 Income 5000-5999 Cost of Goods Sold Income Statement range of Accounts 6000-8999 Expenses
With all Pak Accounting systems flowing into and out of the General Ledger, it is important that a flexible, well designed Chart of Accounts be setup and used. If you have multiple companies that you are responsible for, it is usually easier on everyone to make the Chart of Accounts in each company as similar as possible! When setting up a very small company, it might be easy to justify in your mind that you might want to use 3 digit account numbers or some other coding method. Resist the temptation! Stay with the traditional 4 digit accounts and only setup the accounts you need, but setup the account numbers using a more traditional numbering methodology. As the company grows and expands, you will be extremely thankful for doing so! The system is extremely flexible and can use any account numbering scheme, but just because you can, doesn’t mean you should! The further you stray from the standard conventions, the harder it will be to setup financial statements and for others to easily get information out of the system. What might seem like common sense practices to some, might not be so obvious to someone just entering the accounting profession. For example: Keep similar accounts together, if you have 3 different cash accounts because you have 3 different bank accounts, then they should be setup next to each other in your Chart of Accounts. A common practice is to leave some gaps between most accounts for future growth and change. The “art” would be how large of a gap to leave? The answer – it depends. How likely will you need to insert additional accounts in between? Make your best guess and move on. The system uses ranges and sub-ranges for many different reporting mechanisms and proper grouping of accounts is essential to be able to take full advantage of these reporting features. The system’s automatic closing of Income/Expense accounts at the end of the year depends on them all being in a range. This isn’t normally an issue or something that needs a lot of discussion, because it would just be totally “wrong” to setup an asset account in the middle of expense accounts.
The general rule: Keep like things together and follow the general range recommendations. If you feel uncomfortable in setting up a Chart from scratch, then seek professional guidance and review. |
To add a new account, click the Add button and enter the following fields:
Note: There are additional options not in the picture below, the options will appear depending on the account type setup. See explanation of additional options below.
Account Maintenance |
|
|---|---|
Account Number |
Define account numbers for your chart of accounts |
Which Sub-Table, if any, the account is tagged, or tied, to. For example: Account Number 2010 (Accounts Payable) would have Sub-Table 20 (vendors). On the other hand Account 1010 (cash account for checking) would not need a Sub-Table since it does not need to be broken out any further. |
|
Description |
Name of the account. This is required. |
Date Active/Date Inactive |
(Date format) - "From" - The default is 01/01/1980 and is the lowest date. "To" - The default date is 12/31/9999. The dates are used to define the allowed date range for transactions posted to this account. The system will accept new transactions only if their effective date is greater than/equal to the Active Date and less than/equal to the Inactive Date. Usually, these dates are not changed from their default values. An account can be made inactive by changing the "thru" date to the desired date that the account will no longer be allowed to have transactions coded to it. When an account is made inactive it will still be visible in the account look-ups, but in a light blue color to indicate that it is inactive and cannot have transactions coded to it. |
Account type |
(1 character, upper case) - identifies the type of account and divides the Chart of Account Listing with a blank line between each type: A = Asset L = Liability C = Capital/Ret Earnings/Equity; P = Payable I = Income E=Expense R= O/G Revenue B= O/G Billing |
On Ledger: List Detail? Print Jrnl Summary |
Check to print the detail; Unchecked will not print the detail on a standard ledger report, instead it will summarize it. Default is checked to list detail on the Ledger. For example, if Account 2010 (Accounts Payable) has the box unchecked, there would only be one line on the report - the total of 2010. However, if the box is checked, there would be one line for every Sub-Account (Vendor). This option can be overridden on the Ledger Listing. |
Additional Options |
|
A/P Bank |
Enter the bank code for the A/P account. This is the default bank account that checks will be written from. An option only with the Payable account type. |
Category Name |
Category to classify the account for Revenue and billing purposes. This will only show for Revenue and Billing Accounts (i.e. when a B or a R is used in the account type). |
Product Code |
Product code for the Revenue account. Only shows for Revenue (R) accounts. |
Export Full Revenue Type |
Revenue Type accounts with a category of taxes or other, this field will link the Oildex Code to the GL Account. |
Column Description |
Shortened Column description for certain revenue reports. Only shows for Revenue (R) accounts. |
Restrict Distribution to |
Interest type for the account. All (both Wrk & Non Wrk), Only Working Interests, Only Non-Working Interests, Percent based on (Gross - Other), Allocate Exempt To Royalty also. |
Check Stub - Add-on Offset Acct# / Sub # |
Used by the Check Stub program when you are required to use the Additional Company Costs feature. This will only show for Revenue and Billing Accounts. |
GEPX |
This option indicates which accounts to output to the GE system. Note: if changing only one account, this option is recommended. If changing multiple accounts, use the Import/Compare/Mass Chg Utility. |
GST Tax Codes |
This field is used by Australian GST Tax. Note: if changing only one account, this option is recommended. If changing multiple accounts, use the Import/Compare/Mass Chg Utility. |
Click Save or [F10] to save the account number.
List
To print a Chart of Accounts click on the List button at the bottom of the screen. Choose the account or range of accounts you wish to run the report for. Additionally, check mark the boxes for Active Only, Print Detail?, Print Sub-Account, or Print Last Posted Effective Date if you wish to see this level of detail.
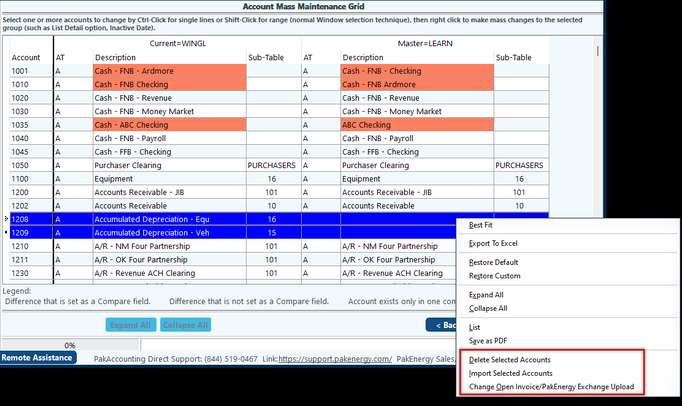
This utility allows you to make mass changes to a current chart of account, compare chart of accounts between 2 companies, and import accounts from one company to another. Mass ChangeThis utility allows you to do the following for multiple accounts at the same time so that you do not have to find each one and make an individual change: On the Account Mass Maintenance Grid, leave the Master Client # as the default of 00000 to just look at the company you are currently in. Click Next.
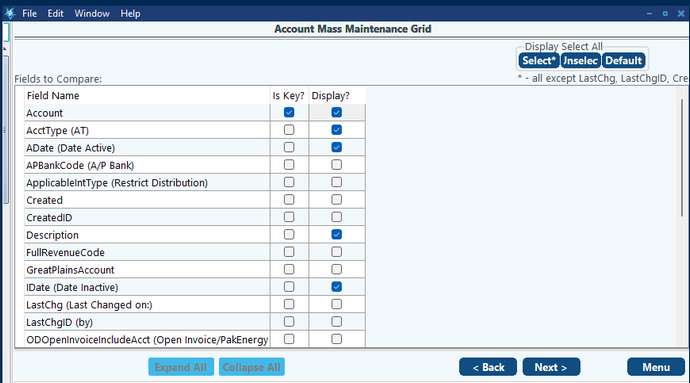
The next screen allows you to choose the columns you want to see. Typically, you can leave this as the default. Click Next.
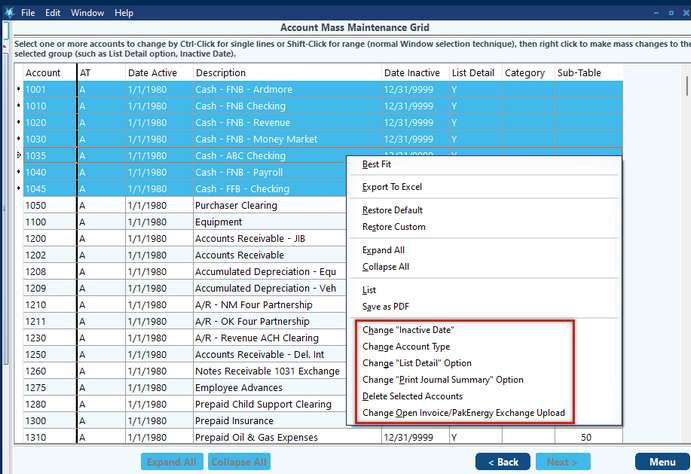
Shift and Select the accounts that you want to Change/Delete using the multi-select feature. Right-click once these accounts are marked. Select the needed option.
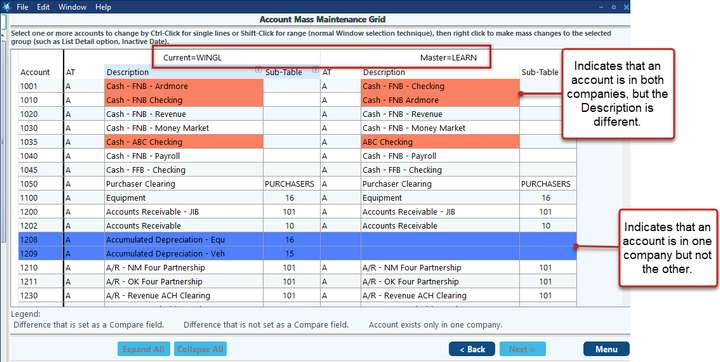
Compare and Mass Change1.In Master Client # enter the company you want to compare your current company with. Click Next.
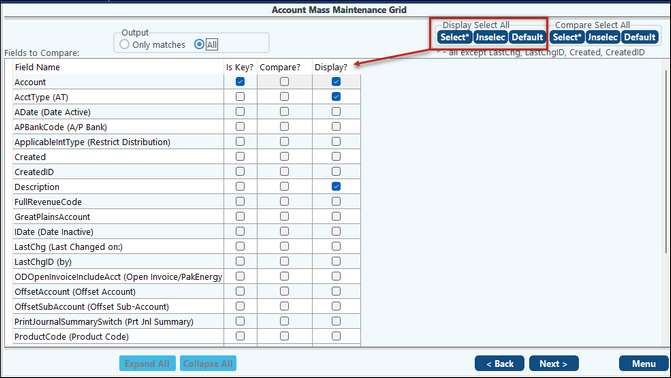
2.Set your Options
NOTES: •Must have “Display?” checked in order to check “Is Key?” •If “Is Key?” is checked then cannot check “Compare?” since it will already be included on the file •However, you can have “Compare?” checked without having “Display?” checked 3.Click on Next 4.Review the color coded grid. The Legend at the bottom will explain what the different colors mean. NOTE: AT means Account Type
5.Select one or more accounts to change by CTL-Click for single lines or Shift-Click for range. 6.Right-click on the selected entries. The action options will be toward the bottom of the window.
NOTES: •Grid will be disabled if Company Sharing is turned on •ALL mass change functions ONLY change the current company and NOT the master company. |
The Account Maintenance - Utility - Import From Excel allows accounts or changes to be made to accounts for specific fields.
•The only required column is for the Account Number and Description.
•However, if an optional column is specified, it must have a valid value for all accounts being imported.
•Supported formats are XLS, XLSX, and CSV.
NOTES:
•If an account has prior activity (transactions), the system will prevent the deletion of the account(s).
•If the company is sharing the chart of accounts with another company, the shared company will not have the ability to delete any accounts from the company the chart resides in.
•If the import includes categories or products that have not been set up then the import will be stopped at that point.

