This menu allows for Mobile Water Ticket Integration with ERP Service Ticket.
•Service Ticket > Utilities > Welltrax Water Ticket Sync > Connection Options tab will already be set for you. Do not change these options. If these fields are blank, please call your Customer Success Team. •Master File Maintenance > Company > Interfaces:
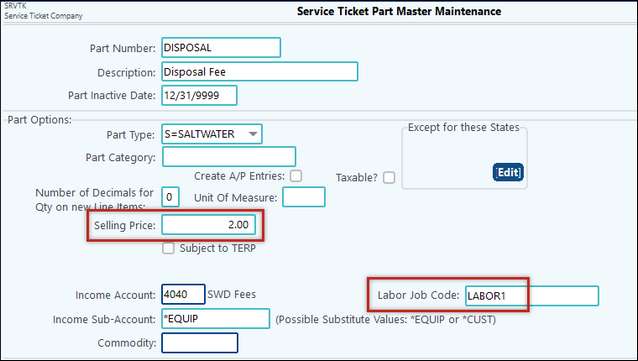
Most of the items below will already be setup, but you will notice a new feature or two on these screens: •Master File Maintenance > Parts and Facilities: Only the Part Types below will integrate with Mobile. oThe Selling Price and Labor Part Number can be set but drivers will not see this information.
•Master File Maintenance > Parts and Facilities > Facilities Maintenance button: Added an option to indicate if the current Facility should "Send to Mobile". This option will only show up if authorized for Mobile Water Ticket Integration. oBy default, this option will be checked. However, you can uncheck it if you have multiple services but not all of them need to go to Mobile.
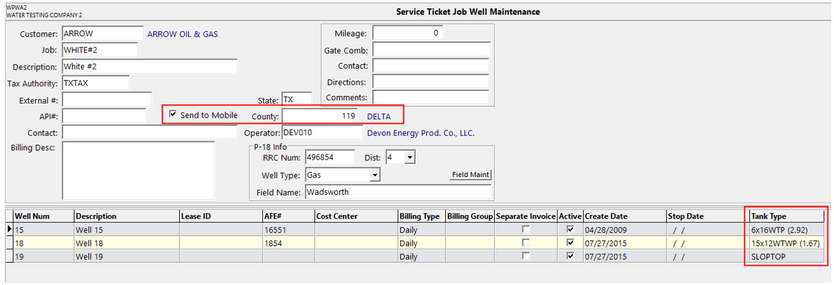
•Master File Maintenance > Customers/Job Loc > Job Location tab > Job Well Maintenance: oAdded an option to indicate if the current Customer/Job Location should "Send to Mobile" (this option will only show up if authorized for Mobile Water Ticket Integration). Also, added a new option to specify the County for the current Customer/Job Location. If the box to Send to Mobiles is checked, then a County must be selected. oAdded a column/field for Tank Type. This is a drop-down menu with a predefined set of options. ▪Also see Company > General tab – Validate Well’s and Default Well Tank Type. If the box is checked, and a default set, those will populate on this screen. ▪NOTE: The well in mobile is a required field for the ticket, so at least one tank in mobile must be set up. If not validating wells in ERP, then it doesn’t matter what it is, ERP will accept it.
|
USE
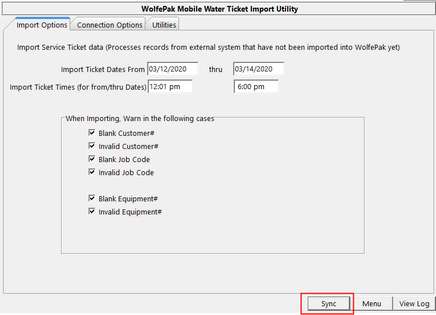
1.On the Import Options tab, set your Ticket Date and Ticket time for your sync. Click Sync to start the process. Use the View Log to see information regarding the sync, including errors.
NOTE: It’s best practice to open up the ticket import dates for the entire period. Once a ticket is imported from Mobile, it is flagged, so will not import twice. However, if a ticket is dated prior to the date range indicated, it will not pull in, and it may be missed.

2.Review the imported tickets in Imported Tickets Review.
3.Make any corrections in Enter/Edit Imported Tickets.
Below is a listing of items that are required for the sync. Also, there is a bit of difference in terminology. This will give an overview of what something may be called in ERP vs Mobile. (NOTE: I will probably make each header a toggle button for spacing. Then, on the menu items where these are located, I will have a link to this spot so they can get more info.) I.Water Ticket Entities Required for Crude
II.WP Operator Info sent to WPMM •Name III.WP Customer Info sent to WPMM •Name •Address1 •Address2 •City •State •Zip •Phone •Fax •Cell (Emergency Phone) IV.WP Job Location Info sent to WPMM •Operator •Name •County (required for crude, so required for water) •State V.WP Job Location Info sent to WPMM as Agreement required for crude •Start date/Active date, (when the Job Location record was created, since ERP doesn’t hold that kind of date info) •Lease •Load Level Method (always S for “strapping”) •Purchaser/Operator •Transporter •Transporter Lease # (a combination of the Customer#+JobLocation#) •Active (always true) VI.WP Well info sent to WPMM •Well # - well/tank is required for crude so can set the default or manually add in mobile if desired. VII.WP Part info sent to WPMM Firstly, the only types of part sent over are:
•Code /Part Num •Description •WPMM Associated Ticket Type (always fluid ticket) •Unit of Measure •Unit Selling Price •Labor unit Price (Selling Price of associated Labor Part #) VIII.WP Facility Info sent to WPMM •Name •Operator/Grantee •WP’s Property # IX.WPMM Water Ticket Info sent to WP a.Ticket Header •Ticket # •Ticket Date •Ticket Start Date/Time •Ticket End Date/Time •Cust # •Job Location # •Equipment # (company option dictates whether we bring in Truck # or Trailer # as the Equipment #) •Well # •Equipment Hrs b.Item Detail Line# 1 •Qty •Part# •If valid ERP Part# oPart Desc oPart Price oPart Num of Decimals oPart Facility (if the ItemType of the Part requires it) •If not a valid ERP Part # oDescription from Ticket •Calculated fields (doesn’t come from Ticket) oTaxable Flag oTax Rate oExt Amt oActual Qty Line #2 (if valid ERP Part# had a Labor Part associated with it) •Qty •Part# oPart Desc oPart Price oPart Num of Decimals oPart Facility (if the ItemType of the Part requires it) •Calculated fields (doesn’t come from Ticket) oTaxable Flag oTax Rate oExt Amt oActual Qty c.Labor Detail Line #1 (if a driver # is sent over with the Ticket) •Driver # (Employee#) •Hrs • |


