Matching Invoices against POs.
Vendors may send separate invoices for each shipment even though all the shipments are on the same PO or they may send one invoice for several shipments.
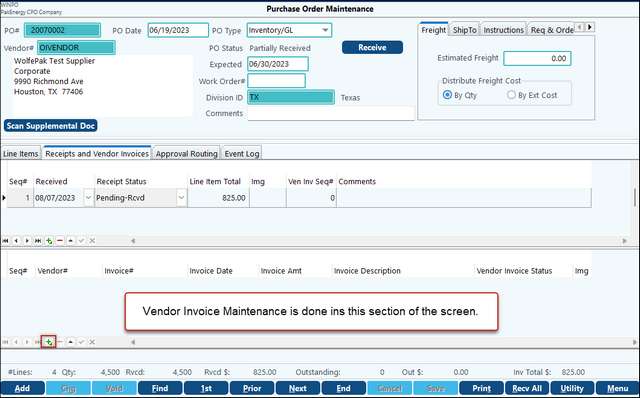
If Partially received
1.In the Approval Grid select the PO Receiving tab. (POs only partially received stay on this tab until fully received.)
2.Select the PO for the invoice and double click on it or click on the View PO button on the bottom of the screen. This will take you to the Receipts and Vendor Invoices tab of the CPO Maintenance screen. Vendor Invoice maintenance is done in the bottom portion of the screen.
3.Click on the Add/Edit button ("+" in the lower left hand corner) to add sequence line. Then double-click that line to access the Purchaser Order Receipt Selection for PO # screen.
4.Enter in the information for the partially received item (s). Click Save
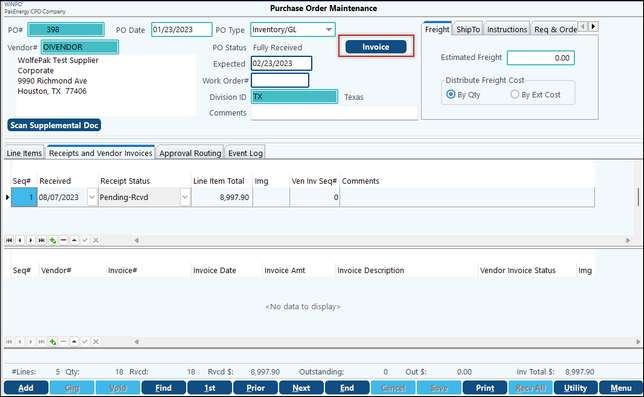
If Fully Received
1.In the Approval Grid select PO Invoice
2.Select the PO for the invoice and double click on it or click on the View PO button on the bottom of the screen. This will take you to the Receipts and Vendor Invoices tab of the CPO Maintenance screen.
3.Use the invoice Button at the top of the screen to access the Purchase Order Receipt Section for PO # screen.
| 4. | The Vendor# field will auto-populate. The top portion of this screen is similar to the A/P Invoice Entry screen. You must enter the Invoice#, the GL Effective Date and the Due Date. The Discount Amount and Discount date are optional. On the General tab at the top right of the screen, enter any additional check stub information you wish to appear on the check stub when printed, the Freight amount (if any), the Tax Amount (if any), and the total Invoice Amount. Include any freight and/or tax in this total. Select only the line items included in this invoice. If all items are on this invoice, you may select the Match All. |
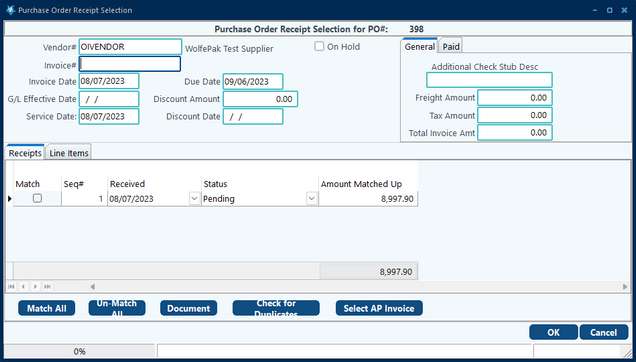
| If you have the Scanning module, you may click on the Document button and scan in your paperwork associated with the invoice.Then click on the OK button. The Check for Duplicates will check Invoice #, Invoice Date, and/or Invoice Amount as set up in Accounts Payable. You will be on the Receipts and Vendor Invoices tab again. |
5. Complete Process:
Click on the Menu button, you will be back at the Approve Grid to continue.
You will be back at the PO Receiving tab of the Approval Grid.
If you have multiple receipts for the same PO each of which has a different invoice number, you must repeat the above process for each invoice number. If you have multiple POs on the same invoice number, you must repeat the same process for each PO.
Once you menu from the Approval Grid:
•If you wish to update and post the invoice entries at this time, click on the Vendor Invoices tab, then on the Update button.
•If you do not wish to update the invoices at this time, click on the cancel button.
6. Update Grid
To update the invoice matching not updated at initial invoice entry, go to the Update Grid and click on the Vendor Invoice tab. Select the invoice you are ready to update and click on the Update button at the bottom of the screen.
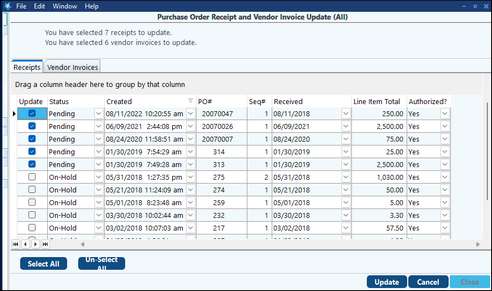
The invoice update creates entries in the General Ledger and creates the Open Item Invoice in Accounts Payable.