General Ledger Module setup
1. You may need to create additional Sub-Tables in your books, if they do not already exist, for Divisions, Cost Centers or alternate Ship To addresses. These are set up in General Ledger > Master Files Maintenance under Sub-Table maintenance.
| Add new Sub-Tables for each of the following: |
Division ID - These may be offices, locations, districts, regions, or other segregations of your choosing. It is possible you may only need one division setup, but at least one is required.
Cost Centers – These are the Sub-Accounts that the items will be charged to. They may be properties, leases, offices, departments or jobs; however you have costing designed. Normally, this Sub-Table already exists.
Ship To – If you have an office that is doing the ordering but you want the items shipped to a different location, you would set up that office with the shipping address in this table. For convenience, it is recommended to use a Sub-Table close to your vendor Sub-Table. If you use Sub-Table 20 for Vendors, you can assign 21 for “Ship To”.
2. Use Sub-Account Maintenance (F12) to enter data into the 3 new Sub-Tables. At least on Division ID Sub-Account will have to be set up in the Division ID Sub-Table.
Purchase Order Module setup - General Tab
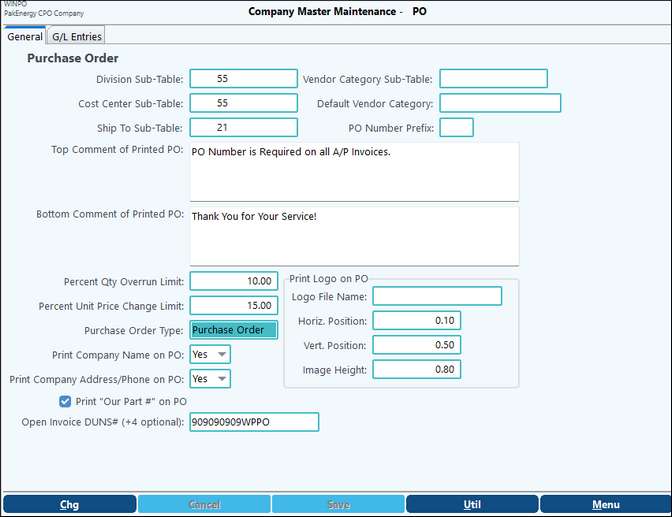
Division Sub-Table |
Enter the Sub-Table # you have assigned |
Cost Center Sub-Table |
Enter the Sub-Table # you have assigned |
Ship To Sub-Table |
Enter the Sub-Table # you have assigned |
Vendor Category Sub-Table |
Can be used instead of setting up Parts for each vendor. See note below for more information. |
Default Vendor Category |
Can be set here for the one category used primarily. Can be left blank. |
PO Number Prefix |
Can use up to 3 alpha/numeric character to add prefix to the PO #. |
Top Comment of Printed PO |
User entry for verbiage to print at top of PO |
Bottom Comment of Printed PO |
User entry for verbiage to print at bottom of PO |
Percent Qty Overrun Limit |
Enter percent of allowance |
Percent Unit Price Change Limit |
Enter percent of allowance |
Purchase Order Type |
Purchase Order is the default. If previously used PO system in the Invoicing Module, will say Inventory PO and conversion will need to process under Utilities section. |
Print Logos on PO |
The logo must be a .bmp file and stored in the GLN32/WPFORMS folder. Use the Position and Height fields for positioning. |
Print Company Name on PO |
Yes or No field |
Print Company Address/Phone on PO |
Yes or No field. Select No if this information is included in your logo. |
Print "Our Part #" on PO |
Used with the "Include the internal Sub-Account number and description on Purchase Order" option on the "Print PO(s)" menu. When both options are selected the Vendor Part number and your Part # will both print on the PO. |
Purchase Order Module setup - G/L Entries
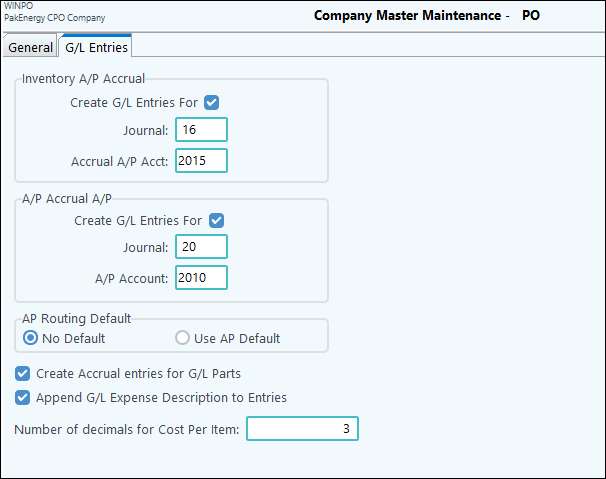
Inventory - A/P Accrual section |
Only needed if using Inventory type parts or the create Accrual entries for G/L Parts is checked. Check the box if you need this section. Enter in the Journal and needed Accrual A/P Account. |
|---|---|
A/P Accrual A/P section |
Check the box if you want to link the A/P Invoice to the PO. Enter in the Journal and needed Accrual A/P Account. |
AP Routing Default |
Selecting No Default will turn off the AP Routing. Selecting Use AP Default will use AP default for routing paths. Will allow use to "blank out" routing path to by-pass. |
Create Accrual entries for G/L Parts |
If checked, upon update of received items G/L entries will be created to record the expense entry/inventory entry. |
Append G/L Expense Description to Entries |
If checked, the system will make individual entries for each line items and append the G/L expense item description as part of the description. |
Number of decimals for Cost Per Item |
Used to define the number of decimals. |
NOTE: Pak Accounting provides the ability to code items to Inventory if you are authorized for Inventory. Also,when updating the receipt of GL parts, if the entries need to be to the expense account with the offset to the accrual account, check the box for "Create Accrual Entries for G/L Parts".
NOTE: If Vendor Category Sub-Table is activated then the G/L Parts Master behaves differently. There the user will setup categories and assigns a category at the vendor level. Example: Farm Supplies, Office Supplies. Then setup category at the vendor level (F12) in the A/P Coding tab. This will allow the user to setup parts under the category that will be used. Cannot use Vendor Category if user want parts entered at the vendor level. The user will have to decide to use only one of these options.